1. Безбедносне информације
Please read all safety instructions carefully before using this product. Failure to follow these instructions may result in electric shock, fire, or other hazards.
- Не излажите пројектор киши или влази да бисте спречили пожар или струјни удар.
- Не отварајте пројектор casinг. Унутра нема делова које корисник може сам да поправи. Сво сервисирање препустите квалификованом сервисном особљу.
- Обезбедите одговарајућу вентилацију. Не блокирајте вентилационе отворе.
- Користите само адаптер за напајање који се испоручује са пројектором.
- Избегавајте директно излагање очију сочиву пројектора када је укљученоamp је укључен.
- Keep the projector away from heat sources and direct sunlight.
2. Садржај пакета
Проверите да ли су све ставке наведене у наставку укључене у ваш пакет:
- 1 x Jectse Mini LED Projector
- 1 x Remote Control (2 AAA batteries not included)
- 1 x AV Line (3-in-1 RCA cable)
- 1 к Упутство за употребу
- 1 к адаптер за напајање

Figure 2.1: Contents of the Jectse Mini LED Projector package.
3. Производ је готовview
The Jectse Mini LED Projector is a compact and portable device designed for various multimedia applications. It features a 1080P resolution, LED light source, and multiple connectivity options.

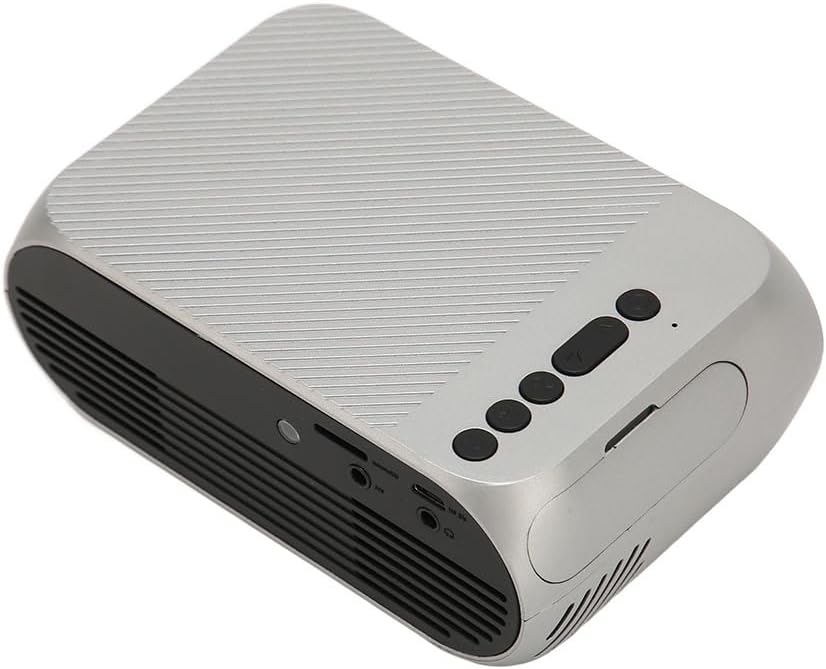
Слика 3.1: Предња и горња страна view of the Jectse Mini LED Projector.
3.1 Компоненте пројектора

Figure 3.2: Top panel controls of the Jectse Mini LED Projector.
- Објектив: Пројектује слику на екран.
- Вентилациона решетка: Обезбеђује правилан проток ваздуха за хлађење.
- Контролна дугмад: (Refer to Figure 3.2) For basic navigation and power control.
- Точак фокуса: Подешава јасноћу слике.
Слика 3.3: Задња и бочна страна view са улазно/излазним портовима.
3.2 Улазно/излазни портови
- HD Multimedia Interface (HDMI): For connecting devices like laptops, gaming consoles, and media players.
- AV порт: За повезивање старијих уређаја помоћу приложеног AV кабла.
- УСБ порт: За повезивање УСБ дискова за репродукцију медија fileс директно.
- Улазна снага: За повезивање адаптера за напајање.
- Audio Output (3.5mm Jack): За повезивање екстерних звучника или слушалица.
4. Подешавање
4.1 Постављање
Place the projector on a stable, flat surface. Ensure there is adequate space around the projector for ventilation. The ideal projection distance is between 1.5 to 2 meters for optimal image size and clarity.

Figure 4.1: Recommended projection distance and screen sizes.
4.2 Прикључак за напајање
- Прикључите адаптер за напајање на улазни порт за напајање пројектора.
- Plug the power adapter into a suitable electrical outlet (100-240V).
4.3 Повезивање улазних извора
The projector supports HD Multimedia Interface, AV, and USB inputs.

Figure 4.2: Projector compatibility with various devices.
- HD Multimedia Interface: Connect an HD Multimedia Interface cable from your source device (e.g., laptop, game console) to the projector's HD Multimedia Interface port.
- АВ: Connect the included AV cable to the projector's AV port and the corresponding audio/video output ports on your source device.
- УСБ: Insert a USB flash drive into the projector's USB port.
4.4 Подешавање фокуса
After powering on the projector, rotate the focus wheel (usually located near the lens) until the projected image appears clear and sharp.
5. Упутство за употребу
5.1 Укључивање/искључивање
- За укључивање: Press the Power Switch button on the projector or the power button on the remote control.
- За искључивање: Press the Power Switch button again. The projector will shut down.
5.2 Избор извора
After powering on, use the "Signal Source Button" on the projector or the "Source" button on the remote control to cycle through available input sources (HD Multimedia Interface, AV, USB).
5.3 Навигација кроз мени
Use the Direction Buttons and Confirm Button on the projector or the arrow keys and OK button on the remote control to navigate through the projector's on-screen menu for settings adjustments (e.g., picture mode, aspect ratio, sound settings).
5.4 Употреба даљинског управљача
Insert two AAA batteries (not included) into the remote control. Point the remote control towards the projector's IR receiver to operate functions such as power, source selection, volume, and menu navigation.
6. Одржавање
6.1 Чишћење сочива
Користите меку крпу без влакана, посебно дизајнирану за оптичка сочива, да бисте нежно обрисали сочиво пројектора. Не користите абразивна средства за чишћење или прекомерну силу, јер то може огребати сочиво.
6.2 Генерално чишћење
Wipe the exterior of the projector with a soft, dry cloth. Do not use liquid cleaners or solvents. Ensure the ventilation grilles are free from dust and debris to maintain optimal cooling.
КСНУМКС. Решавање проблема
| Проблем | Могући узрок | Решење |
|---|---|---|
| Нема пројектоване слике |
|
|
| Слика је мутна |
|
|
| Нема звука |
|
|
| Даљински управљач не ради |
|
|
8. Спецификације
| Феатуре | Детаљ |
|---|---|
| Бранд | Јецтсе |
| Број модела | Jectse3giz17bkpy |
| Резолуција | 1920*1080п |
| Извор светлости | ЛЕД |
| ЛЕД Лифе | 3000 сата |
| Удаљеност пројекције | 1.5-2м |
| Однос пројекције | 1.6:1 |
| Аспецт Ратио | 16:9 |
| Повер Инпут | 100-240В |
| Величина производа | 13 x 8.5 x 5 цм (приближно 5.1 x 3.3 x 2 инча) |
| Тежина артикла | 1.1 фунти |
| Технологија повезивања | HD Multimedia Interface, AV, USB |
| Посебне карактеристике | Adjustable, Portable Design |
9. Гаранција и подршка
For warranty information or technical support, please refer to the contact details provided with your purchase or visit the official Jectse webсајт. Сачувајте доказ о куповини за потребе гаранције.