1. Увод
The XTUGA X9 Audio Interface Mixer is designed for live streaming, podcasting, and studio recording. It features a metal design with an LCD screen, mic preamps, dual DSP audio processors, and 48V phantom power. This manual provides detailed instructions for setting up and operating your X9 mixer to achieve optimal audio performance.
2. Садржај пакета
Проверите да ли су све ставке присутне у вашем пакету:
- 1 x XTUGA X9 Live Sound Card (Audio Interface Mixer)
- 1 к Типе-Ц на УСБ кабл
- 1 к кабл типа Ц до типа Ц
- 1 x 3.5mm to 3.5mm Audio Cable
- 1 к Упутство за употребу

Image: The XTUGA X9 mixer box with its contents laid out, including the mixer unit, various cables, and the user manual.
3. Производ је готовview и карактеристике
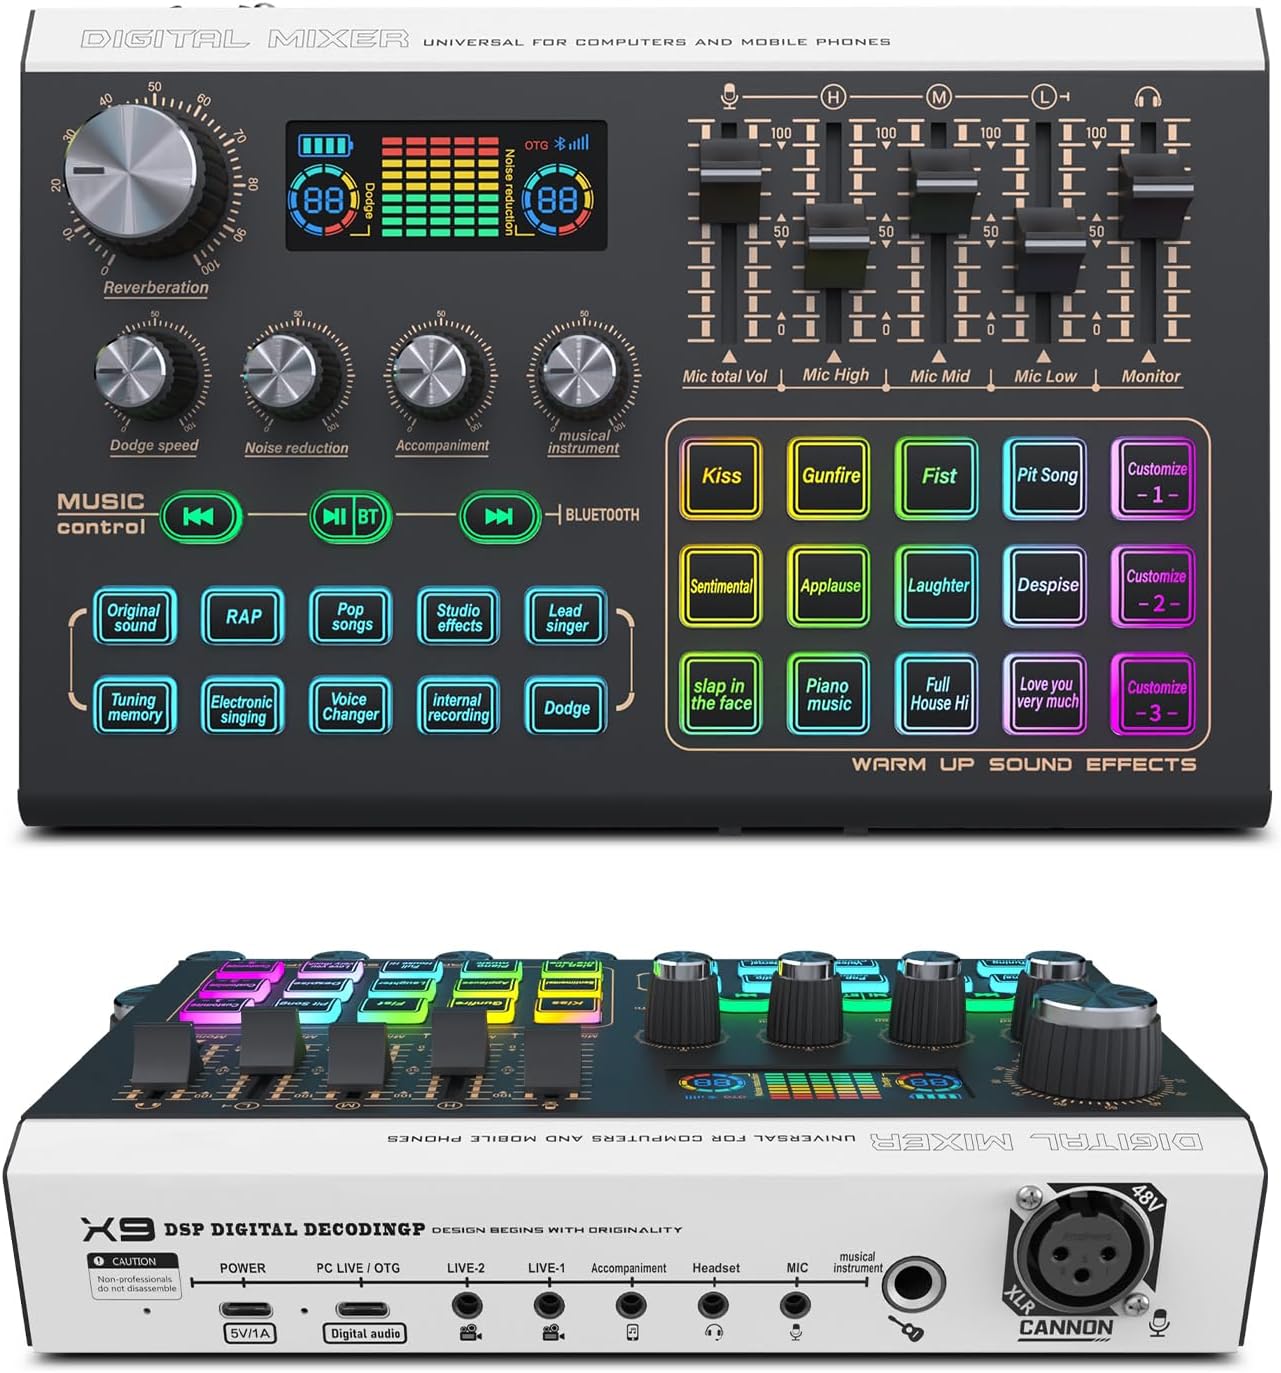
Слика: Одозго надоле view of the XTUGA X9 Audio Interface Mixer, showcasing its control panel with knobs, faders, and an LCD screen.
3.1. Дизајн и приказ
The X9 features a metal design with an LCD screen for visual feedback. It includes RGB colorful lighting that enhances the user experience and provides visual cues for various functions.

Image: The XTUGA X9 mixer displaying its vibrant RGB lighting effects, highlighting the buttons and the overall aesthetic.

Image: The XTUGA X9 mixer with an overlay indicating 10 scene effects, 12 sound effects, and 3 self-edited sound effects.
3.2. Audio Processing and Effects
Equipped with mic preamps and Dual DSP audio processors, the X9 delivers exceptional sound quality. It offers 10 scene effects, 12 pre-set sound effects, and 3 customizable sound effect buttons. Features include Reverb, Voice Changer, and Dodge effects to enhance vocals and content.

Image: Close-up of the XTUGA X9 mixer's sound effects panel, showing buttons labeled 'Kiss', 'Gunfire', 'Applause', and custom slots.

Слика: Са стране view of the XTUGA X9 mixer, highlighting the XLR input port labeled 'CANNON' and '48V'.
3.3. Connectivity and Inputs
The mixer supports simultaneous inputs from a 6.35mm dynamic mic, 3.5mm mic, and headset mic. It features an XLR microphone interface with 48V phantom power for condenser microphones. Bluetooth connectivity allows for wireless audio input.
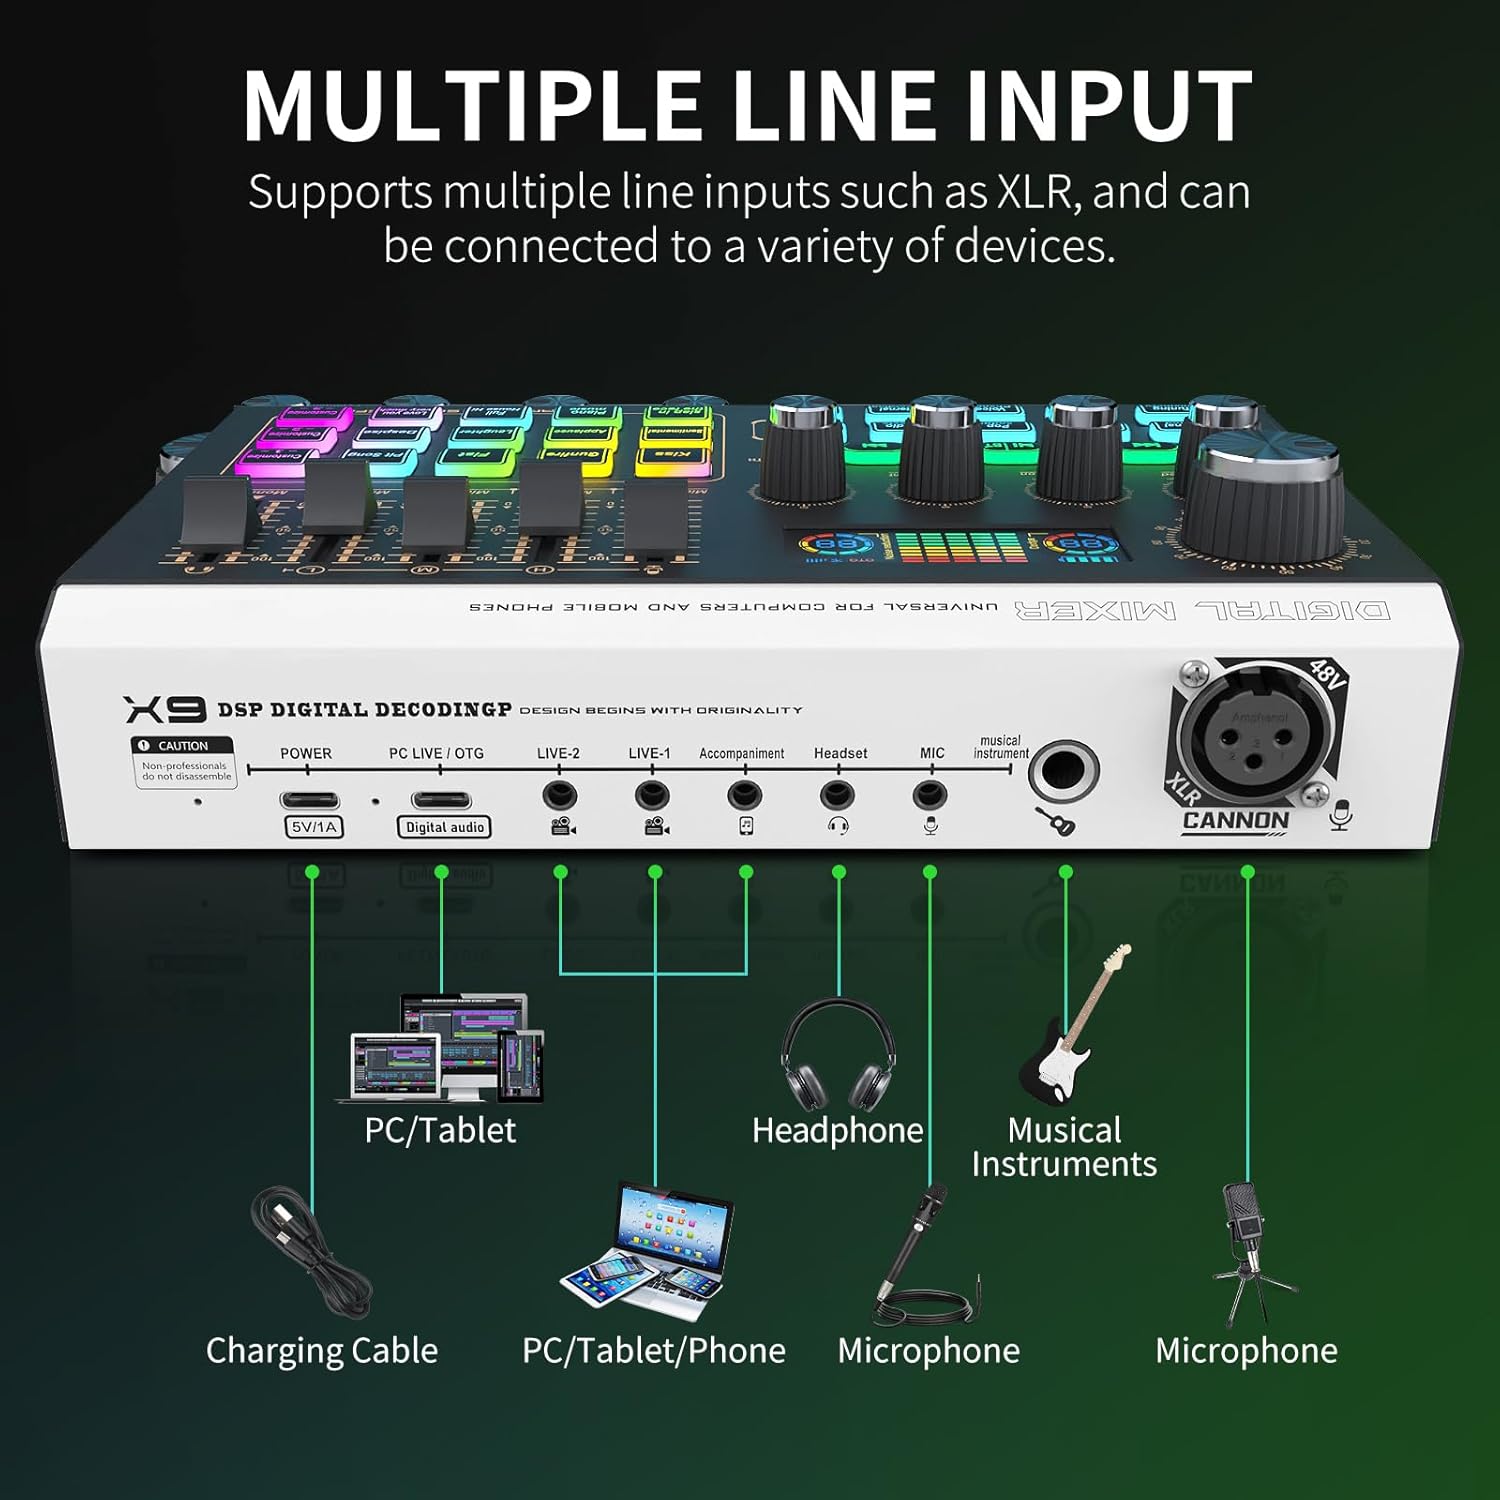
Image: Diagram illustrating the multiple input options of the XTUGA X9 mixer, including connections for PC/tablet, headphones, musical instruments, and microphones.

Image: Close-up of the XTUGA X9 mixer's control panel, showing faders and knobs with arrows indicating independent volume adjustment for different channels.
3.4. Контрола и прилагођавање
Enjoy precise control over each channel with smooth volume slider faders. Four independent channels provide individual volume control for microphone, LINE IN, headset, and OTG. The mixer offers individual EQ, Reverb, Voice Changer, and Dodge effects. Three customization buttons allow for easy recording and activation of personalized sound effects.
4. Водич за подешавање
4.1. Напајање уређаја
Connect the X9 mixer to a power source using the provided Type-C to USB cable. The mixer has a built-in rechargeable battery providing up to 8 hours of working time on a 3-hour charge.
4.2. Повезивање са рачунаром или мобилним уређајем
- PC/Tablet: Use the Type-C to Type-C cable or Type-C to USB cable to connect the mixer to your computer or tablet.
- Мобилни телефон: Use the appropriate Type-C or 3.5mm cable to connect your phone for live broadcasting or audio input.
4.3. Повезивање микрофона
- XLR Microphone: Plug your XLR microphone into the XLR input port. If using a condenser microphone, ensure 48V phantom power is activated.
- Dynamic/Headset Microphones: Connect 6.35mm dynamic microphones or 3.5mm headset microphones to their respective input jacks.
4.4. Connecting Headphones/Monitors
Plug your headphones or studio monitors into the designated headphone output jacks for real-time audio monitoring.
4.5. Connecting Musical Instruments
Connect your musical instruments to the dedicated instrument input jack on the mixer.
5. Упутство за употребу
5.1. Подешавање нивоа јачине звука
Use the individual slider faders and rotary knobs to precisely control the volume for each channel, including microphone, LINE IN, headset, and OTG inputs. The LCD screen provides visual feedback on volume levels.
5.2. Applying Sound Effects
The mixer features pre-set sound effects accessible via dedicated buttons (e.g., Kiss, Gunfire, Applause). To customize sound effects, use the three 'Custom' buttons. Press and hold a custom button to record your desired sound, then press it again to activate during use.
5.3. Voice Changer and Auto-Tune
Explore the 4 voice changer modes and 12 auto-tune options by pressing the 'Voice Changer' or 'Auto-Tune' buttons. Adjust parameters as needed to achieve desired vocal effects.
5.4. EQ Control
Utilize the individual EQ knobs (Mic High, Mic Mid, Mic Low) to fine-tune the tonal characteristics of your microphone input.
5.5. 48V Phantom Power
Activate or deactivate 48V phantom power for condenser microphones using the dedicated 48V switch on the mixer.

Image: Close-up of the XTUGA X9 mixer's 48V switch and earphone output jacks, indicating their functions.
5.6. Блуетоотх повезивање
To connect via Bluetooth, search for 'X9 Music' on your Bluetooth-enabled device and pair. You can then stream audio wirelessly to the mixer.
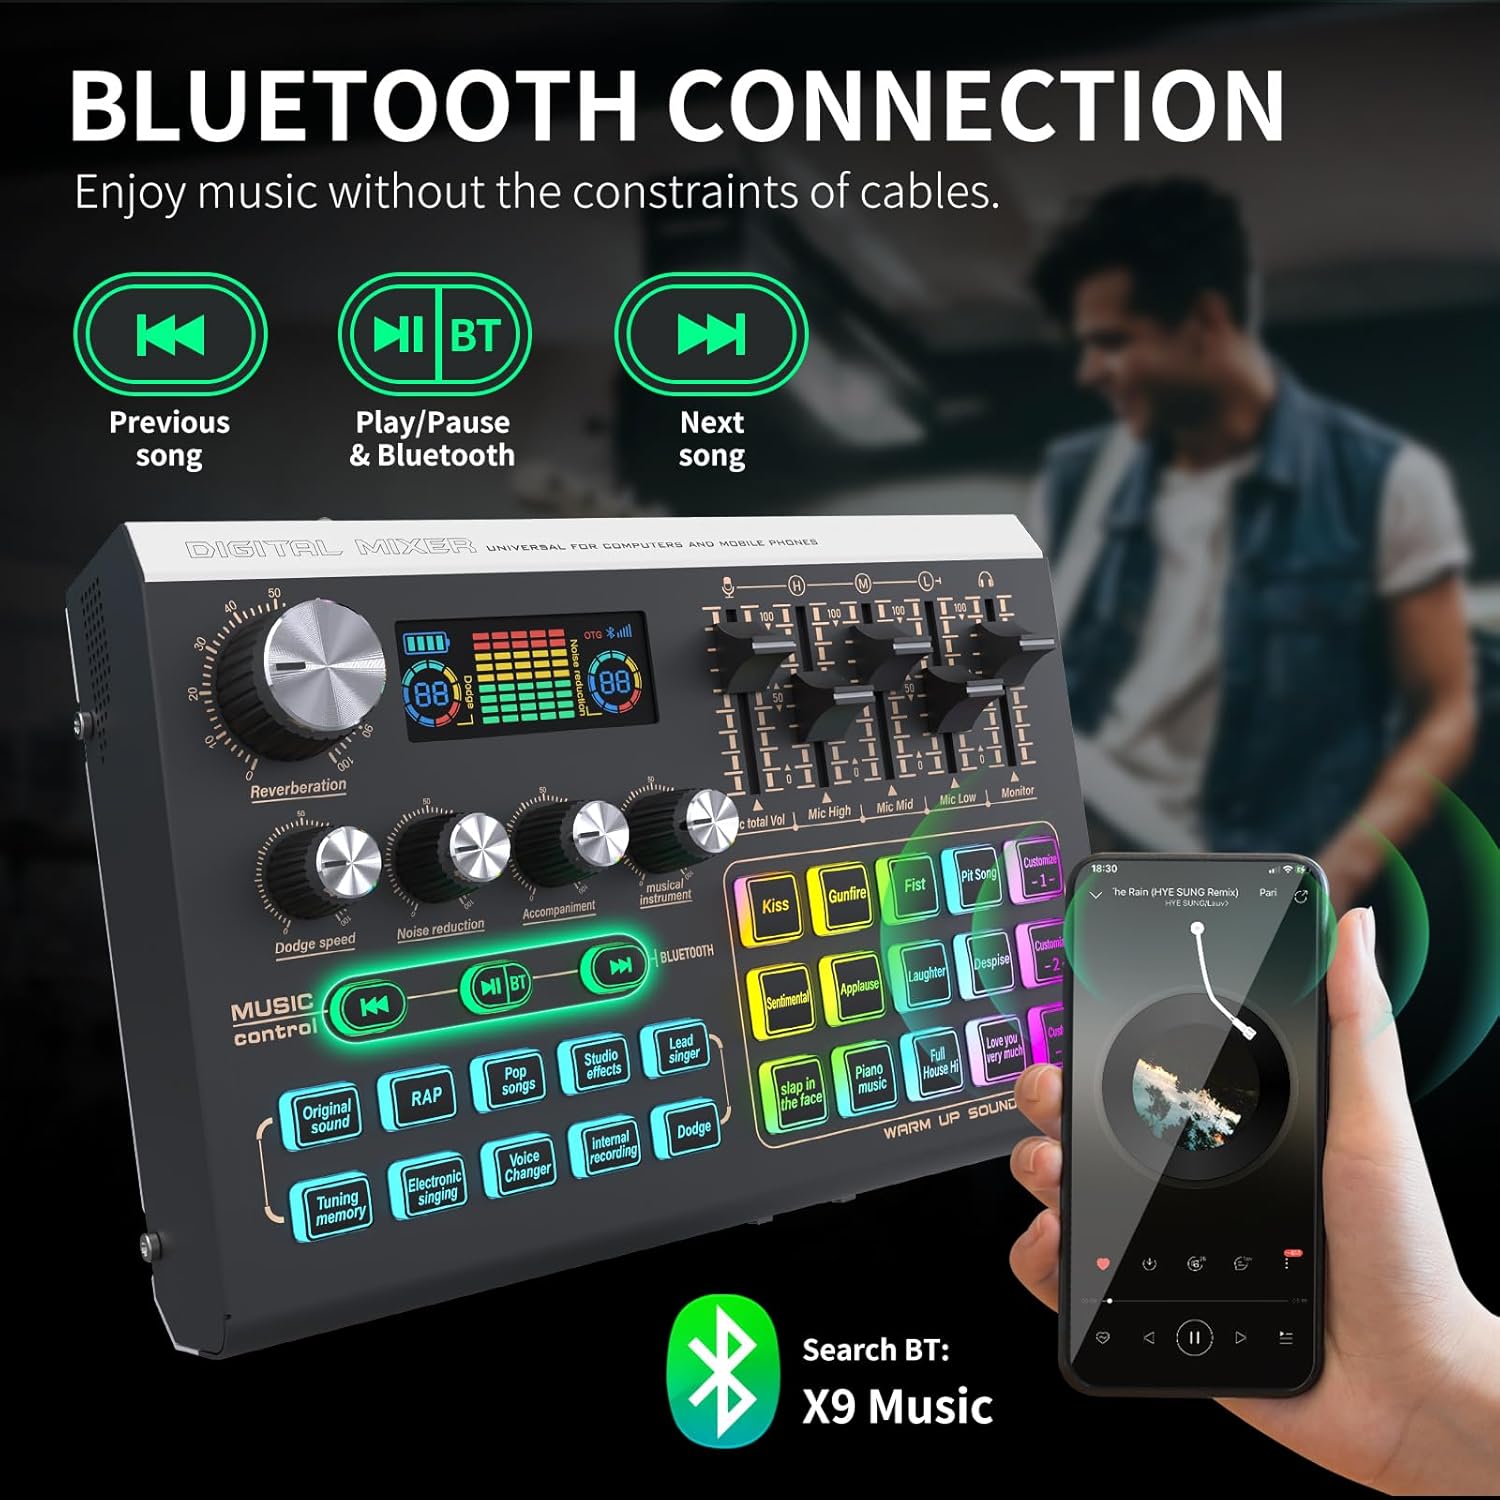
Image: The XTUGA X9 mixer connected via Bluetooth to a smartphone, with the Bluetooth search name 'X9 Music' displayed.
КСНУМКС. Решавање проблема
- Нема излаза звука: Check all cable connections, ensure volume faders are up, and verify input/output selections on your computer/software.
- Искривљени звук: Reduce input gain levels to prevent clipping (indicated by red lights on the LCD). Check cable integrity.
- Фантомско напајање не ради: Ensure the 48V switch is engaged for condenser microphones. Verify the microphone requires phantom power.
- Проблеми са Блуетоотх везом: Ensure the mixer is in pairing mode and within range. Disconnect and reconnect the Bluetooth device.
- Custom Sound Effects Not Recording: Press and hold the custom button until the recording indicator appears, then speak clearly. Release the button to save.
7. Спецификације
| Феатуре | Спецификација |
|---|---|
| Тежина артикла | 2.21 фунти |
| Димензије пакета | 10.75 к 6.81 к 2.91 инча |
| Број модела ставке | X9 |
| Батерије | 1 AA batteries required (included) - *Note: Product description indicates built-in rechargeable battery, AA battery mention may be an error in source data.* |
| Компатибилни уређаји | Guitar, Headphone, Microphone, Personal Computer, Speaker |
| Тип батерије | Литхиум Ион |
| Оперативни систем | Андроид, Хром ОС, Виндоус, иОС, macOS |
| Извор напајања | Цордед Елецтриц |
| Бранд | КСТУГА |
| Број канала | 1 |
| Технологија повезивања | Блуетоотх |
| Тип излазног конектора | RCA, TRS, USB Type B, XLR |
8. Одржавање
To ensure the longevity and optimal performance of your XTUGA X9 Audio Interface Mixer, follow these maintenance guidelines:
- Чишћење: Use a soft, dry cloth to wipe down the surface of the mixer. Avoid using abrasive cleaners or solvents that could damage the finish or electronic components.
- Складиштење: Чувајте миксер на хладном и сувом месту, даље од директне сунчеве светлости, екстремних температура и високе влажности.
- Руковање: Handle the mixer with care to avoid dropping it or subjecting it to strong impacts.
- Управљање кабловима: Avoid bending or kinking cables excessively, as this can damage internal wires.
9. Гаранција и подршка
The XTUGA X9 Audio Interface Mixer comes with a standard manufacturer's warranty. For detailed warranty information, technical support, or service inquiries, please refer to the contact information provided in your product packaging or visit the official XTUGA webсајту.