
1. Увод
This manual provides essential information for the safe and efficient operation of your WLLKIY Hybrid Solar Inverter. This device is a multi-functional inverter/charger that integrates an inverter, solar charger, and battery charger to provide uninterruptible power support in a compact design. Please read this manual thoroughly before installation and use, and retain it for future reference.
2. Безбедносна упутства
Please observe the following safety precautions during installation, operation, and maintenance of the inverter. Failure to comply with these instructions may result in electric shock, fire, or severe injury.
- Ensure all wiring is performed by qualified personnel.
- Do not attempt to disassemble or repair the inverter yourself. Refer to authorized service personnel.
- Проверите да ли је улазна волtage and current ratings match the specifications of your solar panels and battery bank.
- Install the inverter in a well-ventilated area, away from flammable materials and moisture.
- Always disconnect all power sources (AC, PV, Battery) before performing any maintenance or wiring.
- Осигурајте правилно уземљење претварача.
3. Карактеристике производа
- Чисти синусни излаз за осетљиву електронику.
- Конфигурабилна улазна волtage range for various applications (home appliances, personal computers).
- User-configurable battery charging current via LCD settings.
- Configurable AC/Solar charger priority via LCD settings.
- Compatibility with mains voltagе или снаге генератора.
- Automatic restart upon AC recovery.
- Integrated protection against overload, over-temperature, and short circuits.
- Smart charger design for optimized battery performance.
- Функција хладног старта.
- Optional WIFI/GPRS module for remote monitoring.
- Supports connection to lithium batteries.
4. Производ је готовview
Familiarize yourself with the components and connections of your WLLKIY Hybrid Solar Inverter.

Слика 4.1: Предња страна view of the WLLKIY Hybrid Solar Inverter, showing the main casing and front display panel.
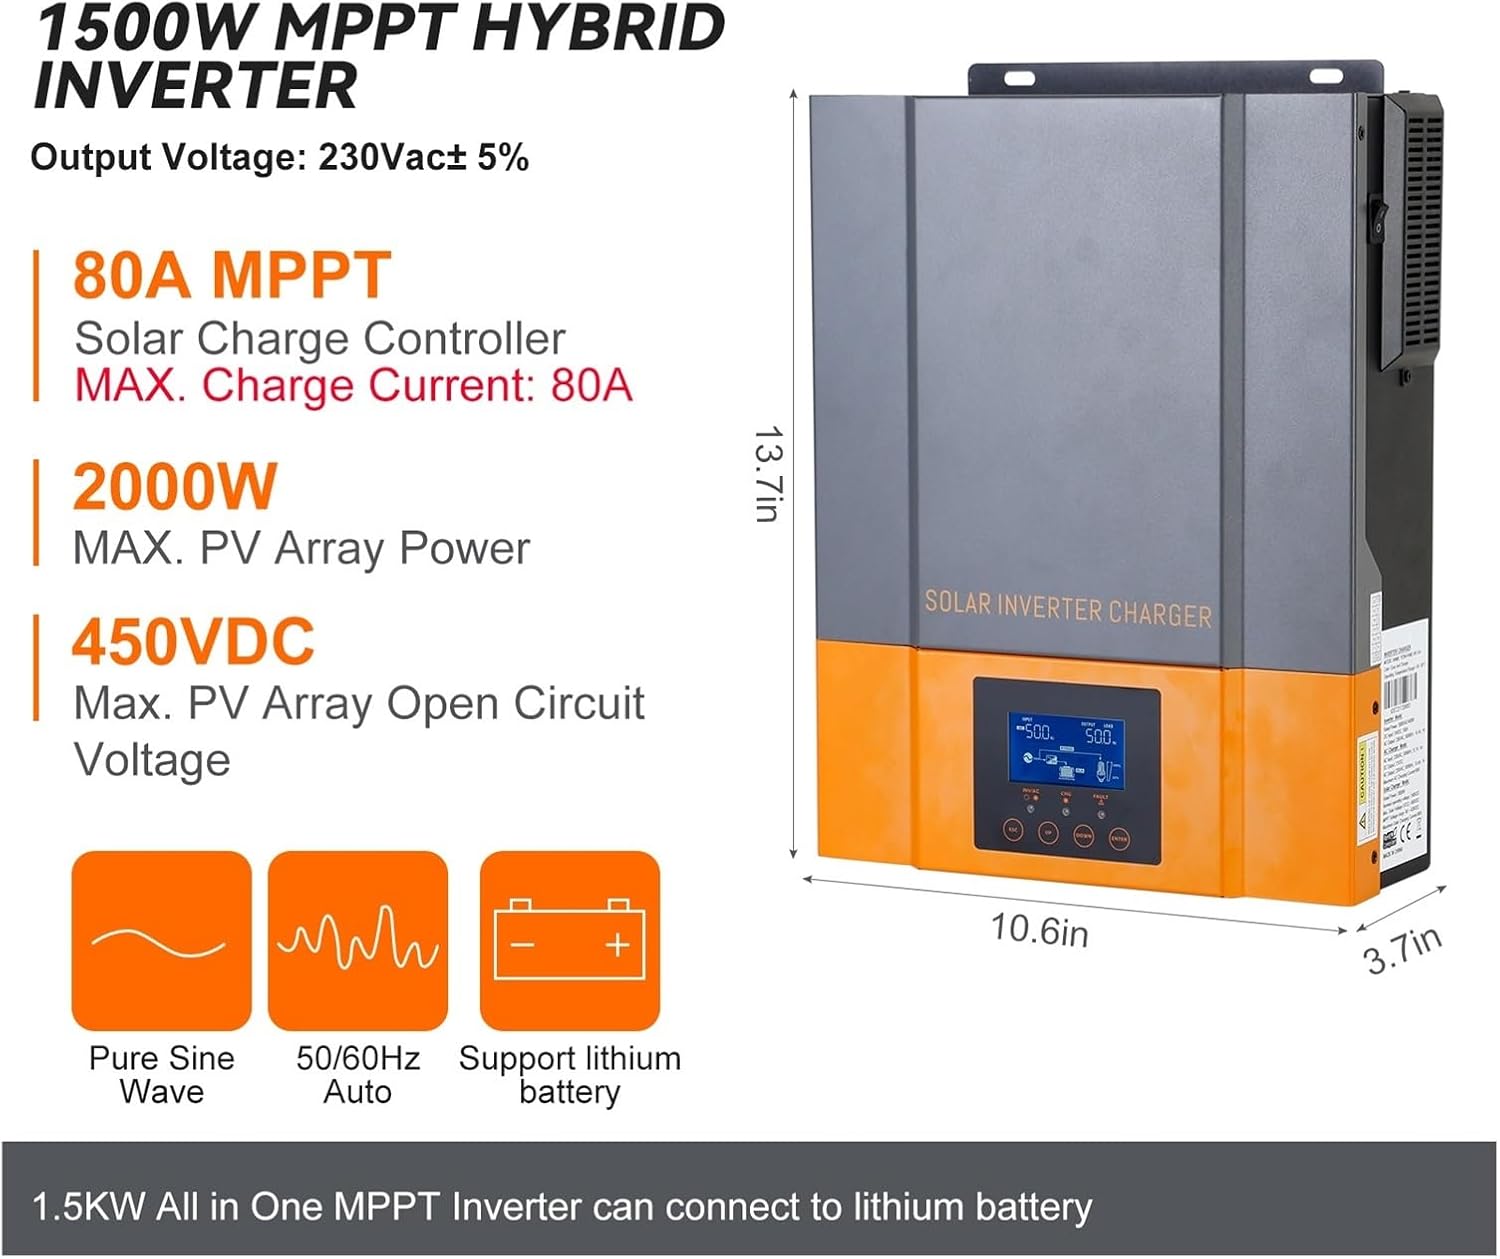
Figure 4.2: Inverter dimensions (13.7in H x 10.6in W x 3.7in D) and key electrical specifications including 230Vac output, 80A MPPT solar charge controller, 2000W max PV array power, and 450VDC max PV open circuit voltage. It supports pure sine wave output, 50/60Hz auto frequency, and lithium batteries.

Слика 4.3: Детаљно view of the LCD display, LED indicators (AC/INV, CHG, FAULT), and function keys (ESC, UP, DOWN, ENTER) on the front panel. The power ON/OFF switch is located on the side of the unit.
Поруке ЛЕД индикатора
| ЛЕД индикатор | Држава | Поруке |
|---|---|---|
| АЦ / ИНВ | Solid On (Green) | Излаз се напаја услужним програмом у линијском режиму. |
| Трепери (зелено) | Излаз се напаја из батерије или ПВ у батеријском режиму. | |
| ЦХГ | Solid On (Green) | Батерија је потпуно напуњена. |
| Трепери (зелено) | Батерија се пуни. | |
| ГРЕШКА | Solid On (Red) | Грешка се јавља у претварачу. |
| Трепери (црвено) | Стање упозорења се јавља у претварачу. |
Function Key Descriptions
| Функцијски тастер | Опис |
|---|---|
| ЕСЦ | За излазак из режима подешавања |
| UP | Да бисте прешли на претходни избор |
| ДОВН | Да бисте прешли на следећи избор |
| ЕНТЕР | За потврду избора у режиму подешавања или улазак у режим подешавања |
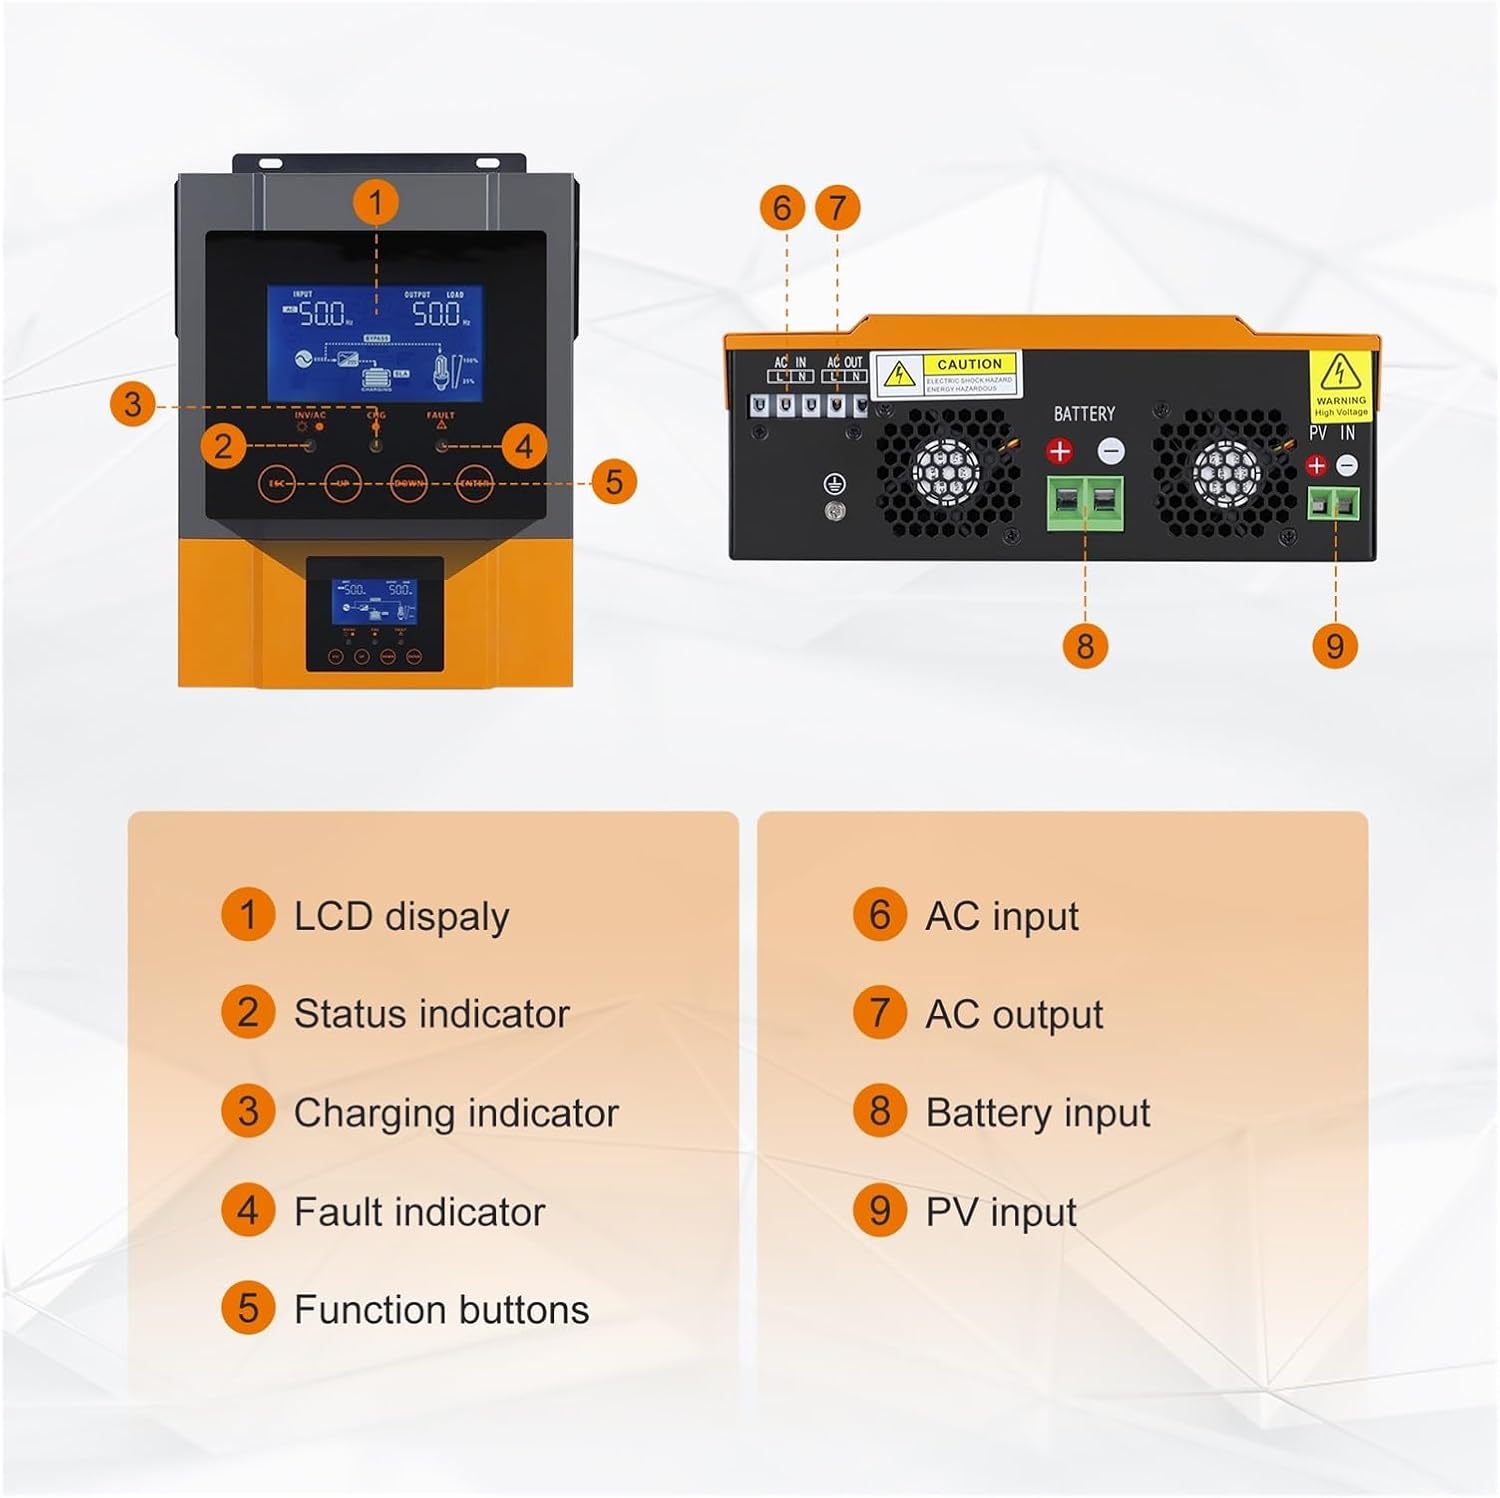
Figure 4.4: Key components and connection points. 1: LCD display, 2: Status indicator, 3: Charging indicator, 4: Fault indicator, 5: Function buttons, 6: AC input, 7: AC output, 8: Battery input, 9: PV input.

Figure 4.5: The inverter supports optional WIFI monitoring, allowing real-time performance viewing and parameter changes via a mobile application. The WIFI module is not included in the standard package.
5. Подешавање и инсталација
This section outlines the steps for installing your hybrid solar inverter. Ensure all safety instructions are followed.
5.1 Монтажа претварача
- Choose a suitable location: The inverter should be mounted indoors, in a dry, well-ventilated area, protected from direct sunlight, high temperatures, and moisture.
- Ensure adequate clearance: Allow at least 20 cm (8 inches) of clearance around the unit for proper heat dissipation.
- Secure mounting: Use appropriate screws and anchors to securely mount the inverter to a solid wall surface.
5.2 Ожичење
Refer to Figure 4.4 for connection port locations. All wiring must comply with local electrical codes.
- Повезивање батерије: Connect the battery cables to the Battery Input terminals (8). Ensure correct polarity (positive to positive, negative to negative).
- Повезивање PV панела: Connect the solar panel cables to the PV Input terminals (9). Observe correct polarity and ensure the PV array voltage is within the inverter's specified range.
- АЦ улазна веза: Connect the utility grid or generator AC power to the AC Input terminals (6).
- Прикључак на излаз наизменичне струје: Connect your loads to the AC Output terminals (7).
- уземљење: Спојите уземљење инвертора на поуздано уземљење.
5.3 Почетно укључивање
- Након што су сви прикључци безбедни, укључите осигурач батерије.
- Switch on the PV array breaker.
- Укључите прекидач наизменичне струје (ако је повезан).
- Turn on the inverter's power switch (refer to Figure 4.3).
- Observe the LCD display and LED indicators for normal operation.
6. Упутство за употребу
The inverter features an LCD display and function buttons for monitoring and configuration.
6.1 LCD Display and Button Operation
The LCD displays real-time system status, including input/output voltage, battery status, and charging information. Use the function keys (ESC, UP, DOWN, ENTER) to navigate through menus and adjust settings as described in Figure 4.3.
6.2 ЛЕД индикатори
The LED indicators provide a quick visual status of the inverter's operation. Refer to the table in Figure 4.3 for detailed descriptions of each indicator's state and corresponding message.
6.3 Конфигурисање подешавања
The inverter allows configuration of various parameters to optimize performance for your specific setup. These include:
- Battery charging current.
- AC/Solar charger priority.
- Инпут волtagе ранге.
- Output frequency (50Hz/60Hz).
To access and modify settings, press the ENTER button to enter the setting mode, use UP/DOWN to navigate, and ENTER to confirm selections. Press ESC to exit.
7. Одржавање
Редовно одржавање осигурава дуготрајност и оптималне перформансе вашег инвертора.
- Чишћење: Периодично чистите спољашњост инвертора сувом крпом. Уверите се да су вентилациони отвори без прашине и остатака.
- Везе: Годишње проверавајте све електричне спојеве на чврстоћу и знаке корозије.
- Окружење: Уверите се да окружење за инсталацију остаје у оквиру наведених опсега температуре и влажности.
- Здравље батерије: Запремина батерије монитораtage and performance regularly, especially for lead-acid batteries.
КСНУМКС. Решавање проблема
Овај одељак пружа решења за уобичајене проблеме на које можете наићи.
| Проблем | Могући узрок | Решење |
|---|---|---|
| Инвертор се не укључује | Нема везе са батеријом или је батерија нискаtage. Power switch off. | Проверите прикључке батерије и волtage. Ensure power switch is ON. |
| Нема излаза наизменичне струје | Overload. Short circuit. Inverter fault. | Reduce load. Check for short circuits. Refer to FAULT LED. |
| Батерија се не пуни | PV input too low. AC input not present. Charger settings incorrect. | Check PV array and AC input. Verify charger settings on LCD. |
| FAULT LED is solid red | Унутрашња грешка. | Disconnect all power sources, wait 5 minutes, then reconnect. If fault persists, contact support. |
9. Спецификације
Detailed technical specifications for the WLLKIY Hybrid Solar Inverter models.
| Феатуре | 1.5 kW 12V Model | 2.4 kW 24V Model | 3.2 KVA / 3 KW 24V Model |
|---|---|---|---|
| Називна излазна снага | 1.5 кВ | 2.4 кВ | 3200 ВА / 3000 В |
| Оутпут Волtagе Таласни облик | Чисти синусни талас | ||
| Оутпут Волtagе Регулатива | 230 Вац ± 5% | ||
| Алгоритам пуњења | 3-сtage | ||
| Максимална струја пуњења наизменичном струјом | 60 Amp | ||
| Булк Цхаргинг Волtagе (Поплављена батерија) | 14.6 В | 29.2 В | |
| Булк Цхаргинг Волtage (AGM/Gel Battery) | 14.1 В | 28.2 В | |
| Флоатинг Цхаргинг Волtage | 13.5 ВДЦ | 27.0 ВДЦ | |
| Максимална снага ПВ низа | 2000 В | 3000 В | |
| Номинал ПВ Волtage | 240 ВДЦ | ||
| МППТ Волtage Range (PV Array) | 90 ~ 430 ВДЦ | ||
| Мак ПВ Опен Цирцуит Волtage | 450 ВДЦ | ||
| Max Charging Current (AC + Solar) | 80 Amp | ||
| Опсег радне температуре | -10°Ц до 50°Ц | ||
| Температурни опсег складиштења | -15°Ц до 60°Ц | ||
| Влажност | 5% до 95% релативне влажности (без кондензације) | ||
10. Гаранција и подршка
За информације о гаранцији и техничку подршку, погледајте документацију коју сте добили уз куповину или контактирајте продавца. Сачувајте рачун као доказ о куповини.