
MakeSkyBlue 60A-V123
MakeSkyBlue 60A MPPT Solar Charge Controller User Manual
Model: 60A-V123
1. Увод
This user manual provides detailed instructions for the installation, operation, and maintenance of your MakeSkyBlue 60A MPPT Solar Charge Controller. This advanced controller is designed to efficiently manage power from your solar panels to charge various battery types, ensuring optimal performance and longevity of your solar power system.

Figure 1: MakeSkyBlue 60A MPPT Solar Charge Controller (Front View)
2. Кључне карактеристике
- МППТ технологија: Achieves 98.2% efficiency, providing 30% more power than PWM controllers. Features dynamic shading compensation and dual cooling (aluminum + fan). EN50530 certified for LiFePO4/AGM/Gel batteries, ensuring a 20% longer lifespan.
- Мулти-Волtagе Компатибилност: Versatile 12V/24V/48V auto-recognition caters to various battery setups, enhancing system flexibility.
- ЛЦД екран: Multi-function Liquid Crystal Display with backlight shows cumulative power generation, error codes, and adjustable parameters.
- Automatic Battery Voltagе Детекција: Automatically supports 12V, 24V, 48V Lead-Acid, AGM, and Gel batteries in series or parallel connection on Bat+, Bat- terminals.
- Intelligent Battery Protection: Guards against overcharging, overvoltagе, и мала волtage, safeguarding your battery's health.
3. Подешавање и инсталација
3.1. Садржај пакета
Проверите да ли су све компоненте присутне:
- MakeSkyBlue 60A MPPT Solar Charge Controller
- Mounting accessories (if included)
- Кориснички приручник (овај документ)
3.2. Монтирање контролера
Choose a dry, well-ventilated location away from direct sunlight and heat sources. Ensure adequate clearance around the unit for proper airflow and cooling. Mount the controller vertically to allow for efficient heat dissipation through the cooling fins and fan.

Figure 2: Product Dimensions (Dimensions in inches: Height 21.65, Width 14.96, Depth 8.66)
3.3. Ожичење
Follow the wiring diagram carefully. Always connect the battery first, then the solar panels, and finally the load (if applicable). Ensure all connections are secure and correct polarity is observed.
- Повезивање батерије: Connect the battery to the BAT+ and BAT- terminals. The controller will automatically detect the battery voltagе (12 В/24 В/48 В).
- Повезивање соларне плоче: Connect the solar panel array to the PV+ and PV- terminals. Ensure the PV array open circuit voltage (Voc) is within the specified range for your battery voltage (20V-80V for 12V, 37V-105V for 24V, 72V-160V for 48V).
- Прикључак оптерећења (опционо): If using the controller's load output, connect your DC load to the OUT+ and OUT- terminals.
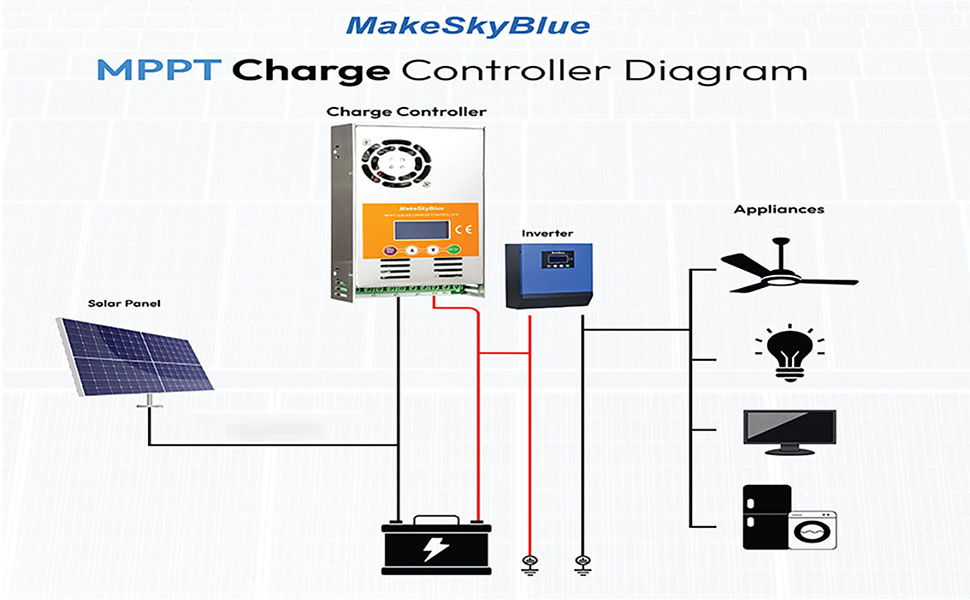
Figure 3: MPPT Charge Controller System Diagram. This diagram illustrates the connection flow from solar panel to charge controller, then to battery and inverter, which powers various appliances.
3.4. Компатибилност батерија
The controller is compatible with a variety of battery types, including:
- АГМ батерије
- Lithium Batteries (LiFePO4)
- Lead-Acid Batteries (Flooded)
- Гел батерије

Figure 4: Compatible Battery Types (Gel, Flooded, AGM)
4. Упутство за употребу
4.1. LCD Display Overview
The multi-function LCD provides real-time monitoring of system status, including charging current, battery voltage, and power generation. It also displays error codes for troubleshooting.
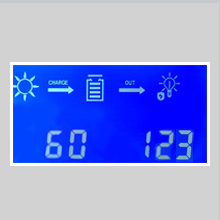
Figure 5: Close-up of the LCD Display showing charging status and numerical values.
4.2. Режими пуњења
The controller utilizes a three-stage charging process to optimize battery performance and extend lifespan. The default charging mode is for lead-acid batteries. Charging voltage can be set from 12V-17V for 12V batteries, 24V-34V for 24V batteries, and 48V-68V for 48V batteries.

Figure 6: MPPT Tracking Technology Graph. This graph illustrates how MPPT technology tracks the maximum power point of the solar panel, unlike PWM which operates at a fixed voltage.
5. Одржавање
Редовно одржавање осигурава дуготрајност и оптималне перформансе вашег соларног регулатора пуњења.
- Чишћење: Periodically clean the exterior of the controller, especially the cooling fins and fan area, to prevent dust buildup that can impede heat dissipation.
- Везе: Check all wiring connections regularly to ensure they are tight and free from corrosion.
- Праћење температуре: The controller has built-in temperature protection. The fan activates when the temperature exceeds 45°C and turns off below 40°C. Ensure the operating environment does not consistently exceed 75°C.
- Ажурирања фирмвера: Проверите произвођача webсајт за сва доступна ажурирања фирмвера.
КСНУМКС. Решавање проблема
If you encounter issues with your solar charge controller, refer to the following common problems and solutions:
| Проблем | Могући узрок | Решење |
|---|---|---|
| Нема дисплеја/искључено | Батерија није повезана или је низак ниво напуњеностиtage; loose wiring. | Проверите прикључке батерије и волtagе. Уверите се да је батерија напуњенаtagе је изнад минималног оперативног прага. |
| No charging from PV | No sunlight; PV array open circuit voltage too low/high; PV polarity reversed. | Check sunlight conditions. Verify PV array voltage is within specifications. Correct PV polarity. |
| Заштита од прекомерног пуњења | Баттери волtage reached overcharging protection limit. | This is a normal protection feature. The controller will stop charging once the battery reaches the overcharging protection voltage (15V for 12V, 30V for 24V, 60V for 48V). |
| Упозорење о високој температури | Insufficient ventilation; ambient temperature too high. | Ensure proper airflow around the controller. Reduce ambient temperature if possible. Clean cooling fins. |
For specific error codes displayed on the LCD, refer to the detailed user manual (PDF) available for download.
7. Спецификације
| Параметар | Валуе |
|---|---|
| Бранд | МакеСкиБлуе |
| Модел | 60А-В123 |
| Називна струја | 60А |
| Систем Волtage | 12V/24V/48V Auto Detect |
| Max PV Array Power (12V Battery) | ≤ 720В |
| Max PV Array Power (24V Battery) | ≤ 1440В |
| Max PV Array Power (48V Battery) | ≤ 2800В |
| PV Array Open Circuit Voltage (Voc) for 12V Battery | 20В-80В |
| PV Array Open Circuit Voltage (Voc) for 24V Battery | 37В-105В |
| PV Array Open Circuit Voltage (Voc) for 48V Battery | 72В-160В |
| Limited Current Protection | 61А |
| Температурна заштита | >75°Ц |
| Fan-on Temperature | >45°Ц |
| Fan-off Temperature | <40°Ц |
| Оверцхаргинг Протецтион Волtage (12V Battery) | 15В |
| Оверцхаргинг Протецтион Волtage (24V Battery) | 30В |
| Оверцхаргинг Протецтион Волtage (48V Battery) | 60В |
| Дисплаи Типе | ЛЦД |
| Боја | Оранге |
| Тежина артикла | 2.83 фунти |
| Димензије пакета | 10 к 8.03 к 2.83 инча |
| УПЦ | 634769632594 |
8. Гаранција и подршка
For detailed warranty information and technical support, please refer to the official MakeSkyBlue resources.
- Званично упутство за употребу (PDF): For comprehensive details and advanced settings, download the official PDF manual: Преузмите упутство за употребу
- Планови заштите: Размислите о куповиниasing extended protection plans for your device. Available options include 3-Year, 4-Year, and Complete Protect plans.
- MakeSkyBlue Store: Visit the official MakeSkyBlue store for more products and support: MakeSkyBlue Store
Ask a question about this manual
Ask about setup, troubleshooting, compatibility, parts, safety, or missing instructions. Manuals+ will review the question and use this page’s manual context to help answer it.