1. Увод
This manual provides detailed instructions for the setup, operation, maintenance, and troubleshooting of your Maxtang MTN-6900HX Mini PC. Please read this manual thoroughly before using the device to ensure proper functionality and safety. The Maxtang MTN-6900HX is a compact, high-performance mini PC featuring an AMD Ryzen 9 6900HX processor, designed for various applications including everyday computing, photo editing, video editing, and gaming.

Слика 1.1: Предња страна view of the Maxtang MTN-6900HX Mini PC. This image shows the compact design of the device.
2. Безбедносне информације
- Увек искључите адаптер за напајање пре чишћења или било каквог одржавања.
- Не излажите уређај води, влази или екстремним температурама.
- Обезбедите одговарајућу вентилацију како бисте спречили прегревање. Не блокирајте отворе за ваздух.
- Користите само приложени адаптер за напајање или компатибилну замену.
- Избегавајте испуштање или излагање уређаја јаким ударима.
- Не покушавајте сами да отворите или поправите уређај. Обратите се квалификованом сервисеру.
3. Садржај пакета
Проверите да ли су све ставке присутне у пакету:
- 1x Maxtang MTN-6900HX Mini PC (No RAM, No SSD, No OS)
- 1к ХДМИ кабл
- 1к адаптер за напајање
- 1к кабл за напајање
- 1x VESA Mount
- 4x zavrtnja za montažu
- 1x Product Manual (this document)
4. Производ је готовview
The Maxtang MTN-6900HX Mini PC features a comprehensive set of ports and internal expansion options. Familiarize yourself with the device's layout before proceeding with installation.
4.1 Спољни портови

Image 4.1: Detailed diagram of the Maxtang MTN-6900HX Mini PC's front and rear ports.
Предњи панел:
- УСБ 3.2: Two USB 3.2 Gen2 ports (10Gbps) for high-speed data transfer.
- USB-C (USB 3.2 10Gb): One USB-C port for data transfer.
- аудио: 3.5 мм аудио прикључак за слушалице или звучнике.
- РЕСЕТОВАТИ: Дугме за ресетовање.
- Дугме за напајање: За укључивање/искључивање уређаја.
Задња плоча:
- DC-in (Power input): Повежите адаптер за напајање овде.
- ДВИ: One HDMI port for video output (up to 4K@60Hz).
- Вентилациони канали: За одвођење топлоте.
- ДП: One DisplayPort for video output (up to 8K@60Hz).
- УСБ 4.0: Two USB4 ports (40Gbps, 100W PD, 8K video output).
- УСБ 2.0: Један УСБ 2.0 порт.
- LAN RJ45 2.5G: One 2.5 Gigabit Ethernet port for wired network connection.
- Кенсингтон брава: Сигурносни слот.
4.2 Унутрашње компоненте

Слика 4.2: Унутрашњи view of the Mini PC, highlighting the M.2 2280 NVMe SSD slots and DDR5 SO-DIMM slots.
The Mini PC supports:
- M.2 2280 NVMe SSD: Two PCIe Gen4 2280 slots for NVMe SSDs, supporting up to 4TB each (total 8TB).
- DDR5 SO-DIMM: Two dual-channel DDR5 SO-DIMM slots, supporting up to 64GB RAM.
- WiFi/Bluetooth Module: One M.2 slot for a WiFi and Bluetooth module (pre-installed or user-installable depending on configuration).
5. Hardware Installation (RAM & SSD)
This Mini PC is shipped without RAM, SSD, or an operating system. Follow these steps to install the necessary components.
5.1 Installing RAM (DDR5 SO-DIMM)

Image 5.1: Illustration of installing DDR5 SO-DIMM modules into the memory slots.
- Искључивање: Ensure the Mini PC is powered off and disconnected from the power source.
- Отворени случај: Carefully open the Mini PC case. Refer to the specific model's instructions for case removal.
- Locate Slots: Identify the two DDR5 SO-DIMM slots on the motherboard.
- Убаците РАМ меморију: Align the notch on the DDR5 SO-DIMM module with the key in the slot. Insert the module at a 45-degree angle and push down firmly until the side clips snap into place, securing the module.
- Поновите: If installing two modules for dual-channel operation, repeat for the second slot.
5.2 Installing NVMe SSD (M.2 2280)
Слика 5.2: View of the M.2 2280 NVMe SSD slots, indicating where to install storage.
- Locate Slots: Identify the M.2 2280 NVMe SSD slots on the motherboard.
- Уметните SSD: Gently slide the M.2 SSD into the slot, ensuring the gold contacts are fully engaged.
- Безбедан SSD: Once inserted, push down the end of the SSD and secure it with the provided screw.
- Затвори случај: After installing all components, carefully close the Mini PC case.
6. Initial Setup and Operating Instructions
6.1 Повезивање периферних уређаја
- Приказ: Connect your monitor(s) to the HDMI, DisplayPort, or USB4 ports using the appropriate cables.
- тастатура/миш: Connect your USB keyboard and mouse to the available USB ports.
- Мрежа: For a wired connection, connect an Ethernet cable to the 2.5GbE LAN port. For wireless, ensure your WiFi module is installed.
- Снага: Connect the power adapter to the DC-in port on the Mini PC, then plug the power cord into an electrical outlet.
6.2 Powering On and OS Installation
- Укључено: Press the power button on the front panel. The power indicator should illuminate.
- BIOS/UEFI: Upon first boot, you may need to enter the BIOS/UEFI settings (usually by pressing Дел or F2 during startup) to configure boot options or verify hardware detection.
- Инсталација оперативног система: Since the device comes without an OS, you will need to install one. Prepare a bootable USB drive with your preferred operating system (e.g., Windows 11 Pro 64-bit or Linux 64-bit). Insert the USB drive and follow the on-screen instructions to install the OS onto your NVMe SSD.
6.3 Конфигурација екрана
The Mini PC supports multiple displays, including triple screen output via HDMI, DisplayPort, and USB4.

Слика 6.1: Примерample setup showing the Mini PC connected to three external displays.
- Connect up to three monitors using the HDMI (4K@60Hz), DisplayPort (8K@60Hz), and USB4 (4K@60Hz) ports.
- After OS installation, you can configure display settings (resolution, orientation, extended/duplicate desktop) within your operating system's display settings.
6.4 Мрежна повезаност
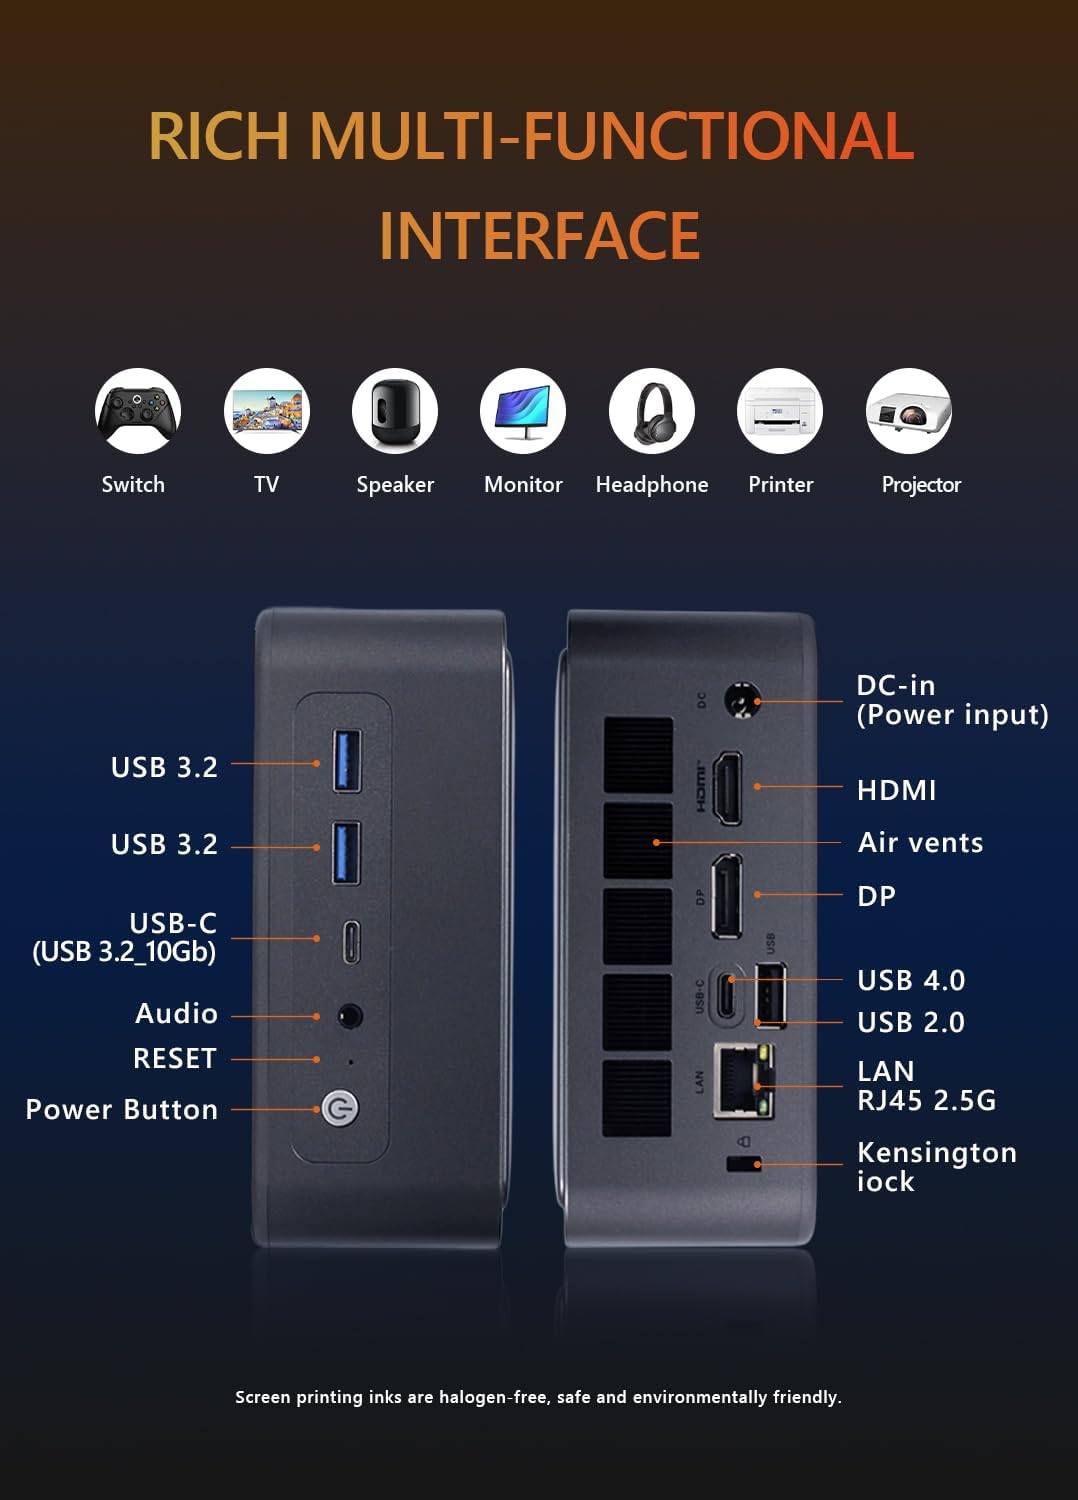
Image 6.2: Visual representation of the Mini PC's network capabilities, including 2.5GbE LAN, WiFi 6, and Bluetooth 5.2.
- Жични ЛАН: Connect an Ethernet cable to the 2.5GbE RJ45 port for a stable and high-speed wired network connection.
- Ви-Фи: If a Wi-Fi module is installed, connect to your wireless network through the operating system's network settings. The device supports Wi-Fi 6.
- Блуетоотх: If a Bluetooth module is installed, pair Bluetooth devices (e.g., headphones, keyboards) through the operating system's Bluetooth settings. The device supports Bluetooth 5.2.
7. Одржавање
- Чишћење: Use a soft, dry cloth to clean the exterior of the Mini PC. For dust in vents, use compressed air. Do not use liquid cleaners directly on the device.
- Ажурирања софтвера: Regularly update your operating system, drivers, and applications to ensure optimal performance and security.
- вентилација: Ensure the Mini PC is placed in a well-ventilated area and that its air vents are not obstructed to prevent overheating.
- Резервна копија података: Periodically back up important data to an external storage device or cloud service.
КСНУМКС. Решавање проблема
If you encounter issues with your Mini PC, refer to the following common troubleshooting steps:
- Нема напајања:
- Check if the power adapter is securely connected to both the Mini PC and the electrical outlet.
- Уверите се да је утичница функционална.
- Покушајте са другом утичницом.
- Без приказа:
- Verify that the monitor is powered on and the correct input source is selected.
- Ensure the video cable (HDMI, DP, USB4) is securely connected to both the Mini PC and the monitor.
- Пробајте други видео кабл или монитор ако је доступан.
- Оперативни систем се не покреће:
- Confirm that RAM and SSD are correctly installed as per Section 5.
- Check BIOS/UEFI settings to ensure the boot order is correct and the SSD is detected.
- If installing a new OS, ensure the bootable USB drive is properly created and selected as the boot device.
- Нема мрежне везе:
- За жично повезивање, проверите статус етернет кабла и рутера/модема.
- For Wi-Fi, ensure the Wi-Fi module is installed and drivers are updated. Check your Wi-Fi network settings in the OS.
- прегревање:
- Ensure the Mini PC's vents are clear and not obstructed.
- Place the device in a location with good airflow.
- Редовно чистите прашину из вентилационих отвора.
9. Спецификације
Detailed technical specifications for the Maxtang MTN-6900HX Mini PC:
| Феатуре | Спецификација |
|---|---|
| Назив модела | MTN-6900HX |
| Процесор | AMD Ryzen 9 6900HX (8 Cores/16 Threads, up to 4.9GHz) |
| Графика | AMD Radeon Graphics (Radeon 680M) |
| Меморија (РАМ) | Dual Channel DDR5 SO-DIMM, Max 64GB (User-installed) |
| Складиштење | 2x M.2 2280 NVMe PCIe Gen4 SSD slots, Max 4TB each (User-installed) |
| Оперативни систем | No OS pre-installed (Supports Windows 10/11 64-bit, Linux 64-bit) |
| Видео Оутпут | 1x HDMI (4K@60Hz), 1x DisplayPort (8K@60Hz), 2x USB4 (4K@60Hz) |
| УСБ портови | 2x USB4 (40Gbps), 2x USB 3.2 Gen2 (10Gbps), 1x USB 2.0 |
| Мрежа | 1x 2.5GbE RJ45 LAN, Wi-Fi 6, Bluetooth 5.2 |
| Аудио | 1к 3.5 мм аудио прикључак |
| Повер Инпут | 19V/20V DC-in |
| Димензије | 127 мм к 135 мм к 55 мм |
| Додатне карактеристике | Kensington Lock slot, VESA Mount support |
9.1 Processor Details

Image 9.1: Details of the AMD Ryzen 9 6900HX processor, including core count, threads, boost clock, and L3 cache.
9.2 Graphics Details

Image 9.2: Specifications for the integrated AMD Radeon 680M graphics, including shader count and GPU memory.
10. Гаранција и подршка
гаранција: This product comes with a 12-month product warranty from the date of order. Please retain your proof of purchase for warranty claims.
Служба за кориснике: For technical support or warranty inquiries, please contact Maxtang customer service. Refer to your purchase platform or the Maxtang official webсајт за контакт детаље.
Контакт информације произвођача: 6/F, Bldg 3, Honghui Industrial Park, Liuxian 2nd Road, Bao'an Dist, Shenzhen, China 518101