
1. Производ је готовview
The LONGER Ruby Ultimate Pulsed Infrared Laser Module is an advanced accessory designed to enhance the capabilities of your LONGER RAY5 5W/10W or RAY5 20W (3-pin) laser engraver. This module utilizes pulsed infrared laser technology to achieve high-precision engraving and cutting on a diverse range of materials, including various metals, plastics, leather, and ceramics. Its ultrafine laser spot size of 0.03x0.03mm allows for intricate detailing and clean cuts.

Figure 1: LONGER Ruby Pulsed Infrared Laser Module
2. Садржај пакета
Verify that all components are present and in good condition upon unpacking. The standard package for the LONGER Ruby module typically includes:
- LONGER Ruby Laser Module
- Повер Адаптер
- Монтажна плоча
- Limit Switches (2)
- Mounting Hardware (screws, nuts)
- Вренцх
- Hex Keys (various sizes)
- Цоннецтион Цабле
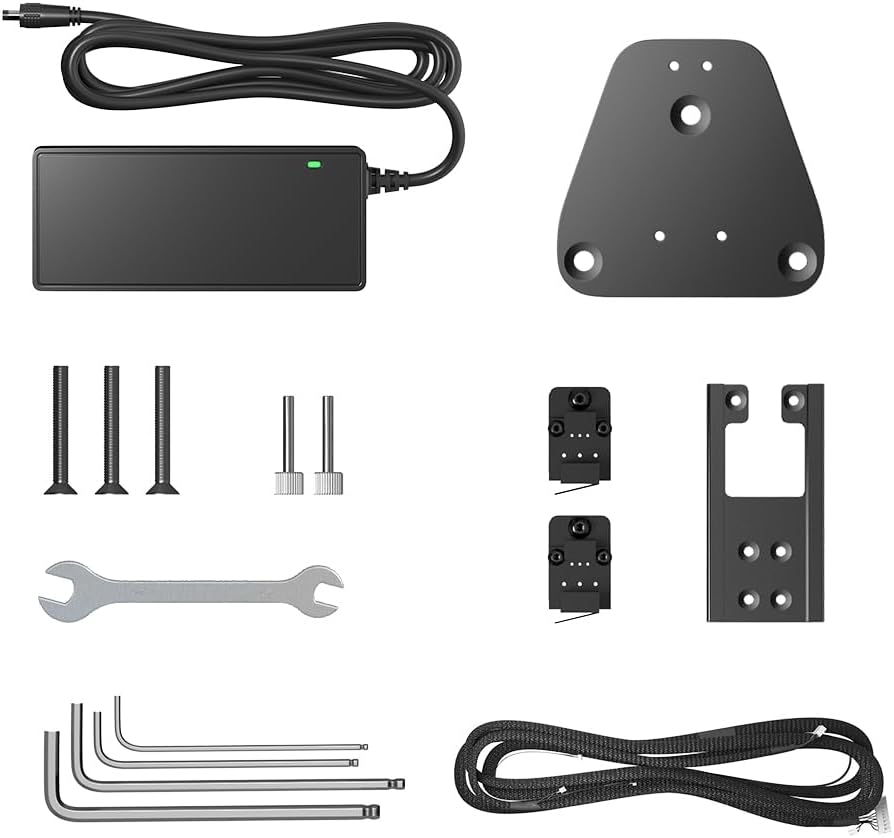
Figure 2: Included accessories for the laser module.
3. Подешавање и инсталација
This section outlines the general steps for installing the LONGER Ruby Laser Module onto a compatible LONGER RAY5 series engraver. Refer to your specific engraver's manual for detailed frame assembly instructions.
- Искључивање: Ensure your laser engraver is powered off and unplugged from the power source before beginning installation.
- Remove Existing Module (if applicable): Carefully detach any previously installed laser module from the engraver's gantry. Disconnect all cables.
- Mount the Ruby Module: Attach the LONGER Ruby module to the gantry using the provided mounting plate and hardware. Ensure it is securely fastened and aligned correctly.
- Повежите каблове: Connect the power and signal cables from the Ruby module to the corresponding ports on your engraver's control board. Ensure correct pin orientation if applicable.
- Install Limit Switches: If upgrading or replacing, install the new limit switches as per your engraver's instructions.
- Укључите и тестирајте: Once installation is complete, power on your engraver. Perform a basic movement test to ensure the module moves freely along the X and Y axes.
3.1. Focusing the Laser
Accurate focusing is crucial for optimal engraving and cutting performance. The LONGER Ruby module features an ultrafine laser spot for precision.
- Place a piece of scrap material on the working surface.
- Adjust the module's height until the laser spot is at its smallest and most intense point on the material surface.
- Some models may include a focusing tool or a fixed focal length. Refer to your specific model's quick start guide for precise focusing methods.

Figure 3: The 0.03mm compression laser spot for high-resolution effects.
4. Упутство за употребу
The LONGER Ruby module is compatible with various laser control software. This section provides general operating guidelines.
4.1. Компатибилност материјала
The Ruby module offers exceptional versatility across a wide range of materials:
- метали: Iron, copper, aluminum, magnesium, zinc, gold, silver, titanium, metal oxides, electroplated surfaces.
- Non-Metals: ABS, inks, epoxy resins, leather, ceramics, stone.

Figure 4: Versatility of engraving materials with the LONGER Ruby module.
4.2. Software and Settings
Use LightBurn or other compatible laser control software to prepare your designs and control the engraver. Proper settings are crucial for desired results.
- Снага: Adjust laser power based on material type and desired depth of engraving/cut.
- брзина: Control the movement speed of the laser head. Slower speeds generally result in deeper cuts or darker engravings.
- Пропуснице: For thicker materials, multiple passes at lower power/higher speed may be more effective than a single high-power pass.
- Ваздушна помоћ: Utilize air assist for cleaner cuts and to prevent material charring, especially with certain non-metals.
4.3. Прampле Оператионс
4.3.1. Laser Module Cutting Performance
Video 1: Demonstrates the cutting capabilities of a laser module, showing various power settings and their effect on material thickness.
4.3.2. Infrared Laser Module Metal Engraving
Video 2: Shows the process of DIY metal engraving using an infrared laser module, highlighting its precision on metallic surfaces.
4.4. Using the LightBurn Camera Kit (Optional)
For enhanced precision and workflow, the LONGER Ruby module can be integrated with a LightBurn Camera Kit. This allows for accurate material placement and visual alignment of designs.
- Инсталирајте носач камере: Open the camera bracket into a cross shape and secure it to the bottom mounting bracket using the hand-tightening set screws.
- Attach Camera Module: Attach the camera module to the camera bracket.
- Mount to Engraver: Attach the bottom mounting bracket to the frame of your RAY5 or B1 engraver.
- Adjust Camera Height: Ensure the distance between the working plane and the camera lens is approximately 450mm.
- LightBurn Setup: Open LightBurn settings, switch the camera capture system to the default capture system, and select full-color for the camera view.
- Calibrate Camera Lens: Use the 'Calibrate Camera Lens' function in LightBurn. Place the dot cards in five positions (left, right, top, bottom, and middle) to capture 5 times. Ensure the captured result scores ≥ 1.
- Align Camera: Click 'Camera Control' -> 'Camera Alignment' -> 'Camera' -> Next. Click the intersection position in the order of numbers 1-4, zooming in to the maximum and double-clicking the intersection point. If there's an obvious offset, reselect.
- Постављање материјала: Place your material (e.g., basswood flat) in the working area.
- Set Engraving Parameters: Adjust engraving parameters (speed, power, passes) and set the scale value according to the actual positioning size.
- Frame and Start: Before clicking 'Frame', select 'Current Position' as the 'Start Form'. The lower left corner point is used as the 'Job Origin'. Patrol to see if there is a collision. Click 'Start' to make a positioning mark, then capture the image.
4.4.1. LightBurn Camera Kit Setup and Operation
Video 3: A detailed guide on setting up and using the LightBurn Camera Kit for precise laser engraving, including calibration steps.
5. Одржавање
Regular maintenance ensures optimal performance and extends the lifespan of your LONGER Ruby Laser Module.
- Очистите сочиво: Periodically clean the laser lens with a soft, lint-free cloth and lens cleaning solution to remove dust and debris that can affect laser performance.
- Проверите везе: Уверите се да су сви електрични прикључци безбедни и без оштећења.
- Inspect Cooling Fan: Keep the cooling fan free of dust and obstructions to prevent overheating.
- Gantry and Rails: Keep the engraver's gantry and linear rails clean and lubricated according to your engraver's manual.
КСНУМКС. Решавање проблема
This section addresses common issues you might encounter with your laser module.
6.1. Ласер не ради или је излаз слаб
- Проверите везе: Verify all cables are securely connected to both the module and the control board.
- Напајање: Ensure the power adapter is correctly plugged in and providing adequate power.
- Подешавања софтвера: Confirm that laser power and speed settings in your software are appropriate for the material.
- Чистоћа сочива: A dirty lens can significantly reduce laser output. Clean the lens as described in the Maintenance section.
- Фокус: Incorrect focus will result in weak or no engraving. Re-focus the laser.
6.2. Unexpected Laser Firing or Safety Shutdowns
The LONGER RAY5 series engravers are equipped with thermal protection features to prevent accidents.
- Thermal Protection Triggered: If the machine detects excessive heat or an uncontrolled laser emission, it may trigger a flame protection shutdown. This will typically display a warning on the screen and require a machine restart.
- Restart Procedure: If a safety shutdown occurs, power off the machine, wait a few moments, and then power it back on. Investigate the cause of the shutdown (e.g., material catching fire, sensor obstruction).
6.2.1. LONGER RAY5 Thermal Protection Test
Video 4: Demonstrates the thermal protection feature of the LONGER RAY5, showing how the machine alerts and stops operation when an issue like material ignition is detected.
7. Спецификације
| Феатуре | Детаљ |
|---|---|
| Димензије производа | 1 к 1 к 1 инча |
| Тежина артикла | 3.12 фунти |
| Произвођач | Дуже |
| Број модела ставке | Модул за ласерско гравирање |
| Батерије су потребне | бр |
8. Информације о гаранцији
The LONGER Ruby Ultimate Pulsed Infrared Laser Module comes with a Једна година гаранције. For warranty claims or detailed terms and conditions, please contact LONGER customer support.
9. Корисничка подршка
For technical assistance, troubleshooting, or any inquiries regarding your LONGER Ruby Laser Module, please utilize the following support channels:
- Подршка путем е-поште: Reach out via email for detailed inquiries.
- Ћаскање уживо: Доступно за хитну помоћ.
- Телефонска подршка: Contact our technical service team directly.
- Фацебоок група: Join the official LONGER community for peer support and updates.
Our technical service team aims to provide a 24-hour reply to ensure your issues are resolved promptly.