
1. Увод
This manual provides instructions for the installation, operation, and maintenance of your TOPBULL 60A MPPT Solar Charge Controller. This intelligent regulator is designed to efficiently manage power flow from solar panels to various battery types, ensuring optimal charging and system protection. Please read this manual thoroughly before installation and use.
2. Кључне карактеристике
- Напредна MPPT технологија: Achieves up to 99% tracking efficiency and 98% peak conversion efficiency for maximum power harvest from solar panels.
- Аутоматиц Волtagе-признање: Аутоматски детектује 12В или 24В ДЦ систем волtage.
- Широка компатибилност са батеријама: Supports various deep cycle battery types including Sealed, Gel, Flooded (FLD), Lithium Iron Phosphate (LiFePO4), and AGM batteries. Includes 0V Li-ion battery charging (activation) support.
- Comprehensive Electronic Protections: Built-in safeguards against reverse polarity, battery overcharge, battery overdischarge, overload, short-circuit, TVS lightning, overpower, over-temperature, and reverse current.
- Интуитивни ЛЦД екран: Provides real-time solar charging and battery operation information, customizable parameters, and error codes.
- Двојни УСБ портови: Conveniently charge electronic devices (5V, 2.4A total).
- Ефикасно одвођење топлоте: Има издржљив метални цasing and dual high-speed intelligent fans for optimal thermal management, enhancing longevity and performance.
- Компензација температуре: Automatically adjusts charging and discharging parameters based on ambient temperature to prolong battery life.
3. Производ је готовview
Familiarize yourself with the components and display of the solar charge controller.

Слика 3.1: Фронт view of the TOPBULL 60A MPPT Solar Charge Controller, showing the LCD display and control buttons.
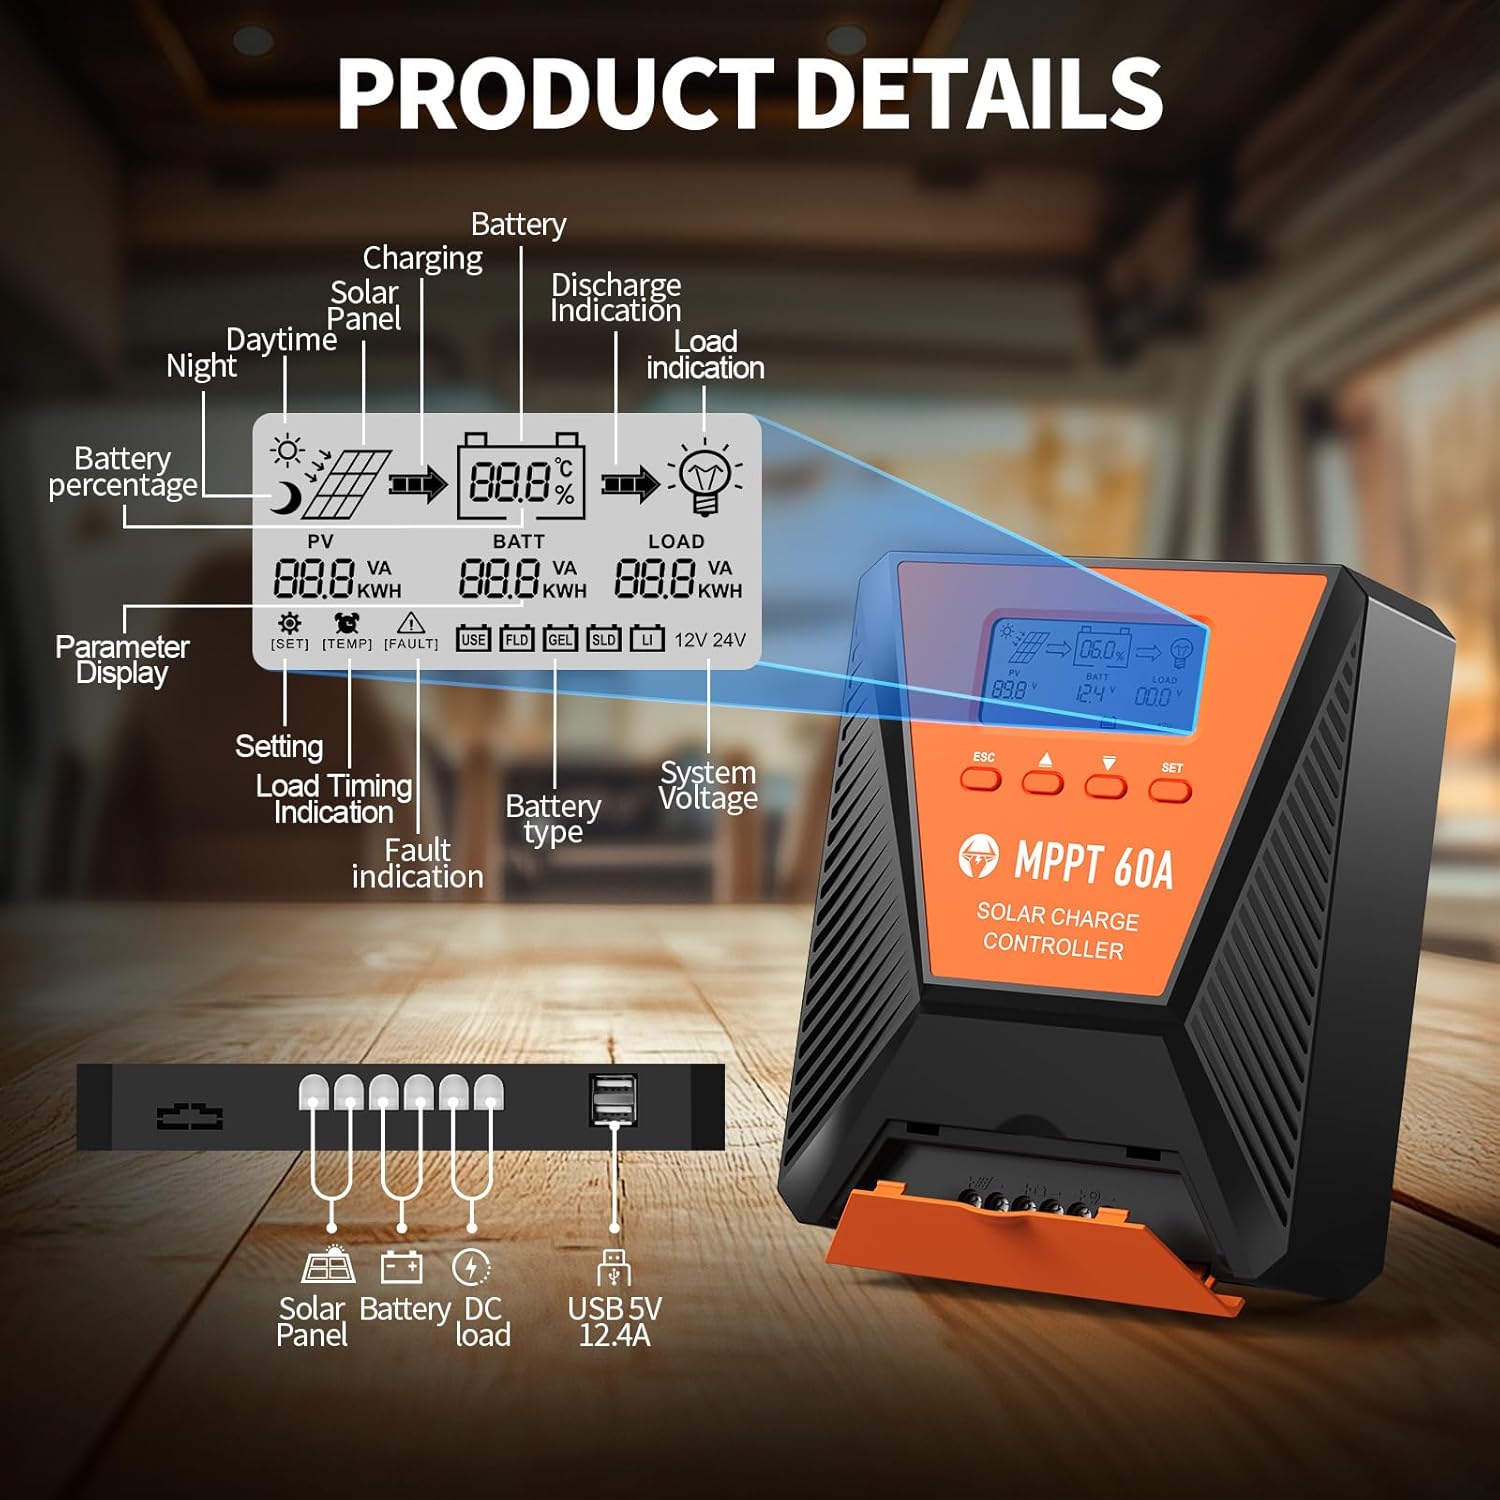
Слика 3.2: Detailed diagram illustrating the LCD display elements and the connection ports at the bottom of the controller. The display shows PV voltagе, запремина батеријеtage, load status, battery percentage, and various indicators. The ports include connections for solar panel, battery, DC load, and dual USB 5V 2.4A outputs.
3.1. Индикатори на ЛЦД екрану
- PV (Photovoltaic): Displays solar panel voltagе и моћ.
- BATT (Battery): Приказује запремину батеријеtage, charge status, and type.
- ЛОАД: Indicates load status and power consumption.
- Проценат батеријеtage: Visual representation of battery charge level.
- Систем Волtage: Displays 12V or 24V system recognition.
- Приказ параметара: Shows current settings and values.
- Индикација грешке: Alerts for system errors.
3.2. Контролна дугмад
- ЕСЦ: Used to switch load (manual switch) and exit setup menus.
- Up Arrow (▲): Navigates up through main interface pages to view parameters; increases values in setup mode.
- Down Arrow (▼): Navigates down through main interface pages to view parameters; decreases values in setup mode.
- КОМПЛЕТ: Enters setting mode, confirms selections, and saves changes. If no key operation for 10 seconds, it exits setting mode automatically.
4. Инсталација и подешавање
4.1. Мере предострожности
- Уверите се да су сви прикључци исправни и безбедни пре него што укључите напајање.
- Always connect the battery first, then the solar panel, and finally the load. Disconnect in reverse order.
- Инсталирајте контролер у добро проветреном простору, даље од запаљивих материјала и директне сунчеве светлости.
- Користите одговарајуће пресеке жица за све спојеве како бисте спречили прегревање.
4.2. Монтирање контролера
Mount the controller vertically on a flat, non-flammable surface using the provided mounting screws. Ensure adequate clearance around the unit for proper airflow and heat dissipation, especially for the cooling fans located on the top.

Слика 4.1: Image showing the dimensions of the controller (approximately 9.0 inches long, 7.3 inches wide, 2.8 inches high) and the included mounting screws and user manual.
4.3. Ожичење
Follow the connection order carefully to avoid damage to the controller or other components.
- Повежите батерију: Connect the positive and negative terminals of your battery bank to the corresponding battery terminals on the controller. The controller will automatically detect the system voltagе (12В или 24В).
- Повежите соларну плочу: Connect the positive and negative leads from your solar panel array to the solar panel terminals on the controller. Ensure the maximum PV input voltage does not exceed 100VDC. For a 12V system, maximum solar input power is 720W; for a 24V system, it is 1440W.
- Повежите једносмерно оптерећење (опционо): Connect your DC loads to the load terminals on the controller. This allows the controller to manage load discharge and provide protection.

Слика 4.2: Wiring diagram illustrating the correct connection sequence: Battery first, then Solar Panel, then DC Load. An optional inverter for AC loads is also shown connected to the battery bank.
4.4. Избор типа батерије
The controller is compatible with various battery types. It is crucial to select the correct battery type for optimal charging and battery longevity. Refer to the display and settings section to adjust this parameter if needed. The controller supports FLD (Flooded), LiFePO4 (Lithium Iron Phosphate), SLD (Sealed Lead-Acid), GEL, and AGM batteries.

Слика 4.3: Illustration showing the controller connected to a battery, with icons representing compatible battery types: LI (Lithium), FLD (Flooded), GEL, SLD (Sealed), and AGM. The controller automatically identifies battery voltage and supports custom parameters, including lithium battery 0V charging.
5. Операција
5.1. Праћење дисплеја
The LCD display provides real-time information about your solar system. Use the Up (▲) and Down (▼) buttons to cycle through different display screens, showing parameters such as PV voltagе, запремина батеријеtage, charging current, load current, and battery state of charge.
5.2. Параметер Сеттингс
To enter the parameter setting stage:
- Press the "SET" button to enter the setting mode. The value to be adjusted will flash.
- Use the Up (▲) or Down (▼) buttons to adjust the value.
- Press the "SET" button again to confirm and save the new value.
If no button is pressed for 10 seconds in setting mode, the controller will automatically exit without saving changes.
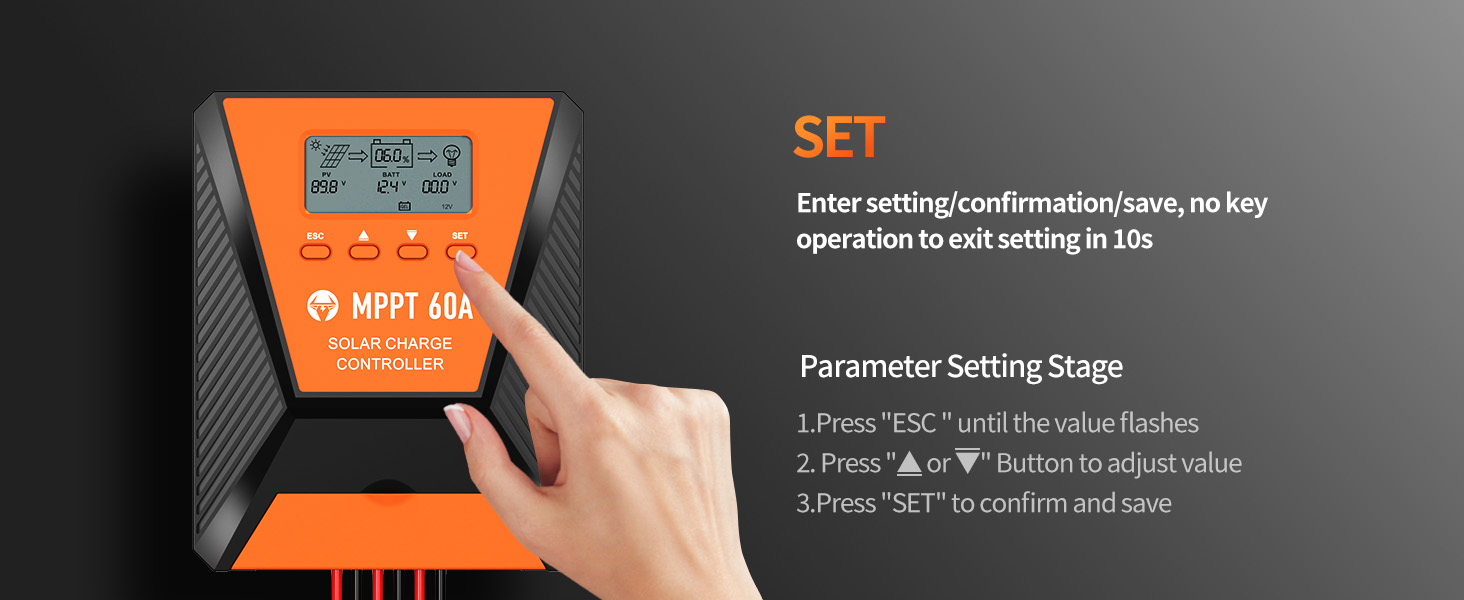
Слика 5.1: Visual guide for using the SET button to enter, adjust, and confirm parameter settings on the controller's LCD display.
5.3. Load Working Modes
The controller supports three distinct load working modes:
- Lighting Time Control Mode (1H-23H): The load automatically turns on or off based on the intensity of sunlight and a set timer.
- Normal OFF Mode (0H): The load remains off. This mode is useful for specific loads or during debugging.
- Normal ON Mode (24H): The load remains continuously on. This mode is suitable for loads requiring a 24-hour power supply.

Слика 5.2: Diagram explaining the three load working modes: Lighting time control (1H-23H), Normal OFF (0H), and Normal ON (24H).
6. Одржавање
Редовно одржавање осигурава дуготрајност и оптималне перформансе вашег соларног регулатора пуњења.
- Прегледајте везе: Periodically check all wiring connections for tightness and corrosion. Loose connections can cause resistance and heat buildup.
- Очистите контролер: Keep the controller clean and free from dust and debris. Ensure the cooling fan vents are unobstructed. Use a dry cloth for cleaning.
- Перформансе монитора: Regularly check the LCD display for normal operation and any error codes. Compare actual performance with expected values.
- Инспекција батерије: Inspect battery terminals for corrosion and ensure proper ventilation around the batteries.
КСНУМКС. Решавање проблема
Овај одељак се бави уобичајеним проблемима са којима се можете сусрести са вашим соларним контролером пуњења.
| Проблем | Могући узрок | Решење |
|---|---|---|
| No display/Controller not powering on | Батерија није повезана или је низак ниво напуњеностиtage; reverse polarity; loose wiring. | Проверите прикључке батерије и волtage. Ensure correct polarity. Tighten all wiring. |
| Батерија се не пуни | Solar panel not connected; insufficient sunlight; solar panel fault; incorrect battery type setting. | Verify solar panel connections. Ensure adequate sunlight. Check solar panel output. Confirm correct battery type setting. |
| Учитавање не ради | Load disconnected; overload protection activated; incorrect load working mode. | Check load connections. Reduce load to within controller limits. Adjust load working mode settings. |
| Приказан је код грешке | Specific system fault (e.g., over-temperature, short-circuit). | Refer to the controller's display for the specific error code and consult the full user manual for detailed explanations and solutions. Address the underlying issue (e.g., reduce temperature, clear short-circuit). |
8. Спецификације
| Параметар | Валуе |
|---|---|
| Модел | 60А |
| Систем Волtage | 12В/24В аутоматско препознавање |
| Макс. ПВ Инпут Волtage | 100ВДЦ |
| Max. Solar Input Power (12V System) | 720В |
| Max. Solar Input Power (24V System) | 1440В |
| Ефикасност праћења | ≥99% |
| Максимална ефикасност конверзије | до 98% |
| Подржани типови батерија | FLD, LiFePO4, SLD, GEL, AGM |
| УСБ излаз | Dual 5V, 2.4A (Total) |
| Димензије (приближно) | 10.71 x 8.62 x 4.33 инча (паковање) |
| Тежина артикла | 3.36 фунти |
| Материјал | Метал |
| Дисплаи Типе | ЛЦД |
9. Гаранција и подршка
TOPBULL products are designed for reliability and performance. For warranty information or technical assistance, please contact TOPBULL customer support through the retailer where the product was purchased or visit the official TOPBULL website. Please have your product model number and purchase date available when contacting support.
За додатне информације, можете посетити TOPBULL Store on Amazon.