
МАЛА БУШОНА 4571
Комплет кавеза SmallRig за Sony BURANO - упутство за употребу
Модел: 4571
Марка: SMALLRIG
1. Увод
This instruction manual provides detailed guidance for the assembly, operation, maintenance, and troubleshooting of the SmallRig Cage Kit for Sony BURANO (Model 4571). This kit is specifically designed to protect your Sony BURANO camera and enhance its functionality by providing multiple accessory attachment points. Its modular design offers flexibility for various shooting scenarios.
Important Note: This kit is not compatible with the Sony BURANO's original top handle.

Figure 1: Fully assembled SmallRig Cage Kit on a Sony BURANO camera, showcasing its protective and accessory-mounting capabilities.
2. Шта је укључено
Пре него што почнете са монтажом, проверите да ли су све компоненте наведене у наставку присутне у вашем паковању:
- Monitor Mount × 1
- NATO Rail to 15mm Rod Clamp × 1
- 15mm Rod × 1
- Горња ручка × 1
- Двострука шипка 15 ммamp × 1
- Горња плоча × 1
- Left Side Plate × 1
- Right Side Plate × 1
- Right Rear Side Plate × 1
- Bottom Plate × 1
- Wireless Video Transmission Mounting Bracket × 1
- Кабл Цлamp for HDMI × 1
- 15mm LWS Baseplate × 1
- 1/4"-20 screw (long) × 13
- 1/4"-20 screw (short) × 2

Слика 2: Завршеноview of all components included in the SmallRig Cage Kit (ID 4571) and key product dimensions.
3. Подешавање и монтажа
The SmallRig Cage Kit features a modular design for flexible and easy assembly. Follow these steps to set up your cage kit:
3.1. Attaching the Cage Components
The cage consists of multiple plates (top, bottom, left, right, right rear) that form a full-wrap protective frame around the Sony BURANO camera. Secure these plates using the provided 1/4"-20 screws.

Слика 3: Експлодирао view demonstrating the modular assembly of the cage components around the Sony BURANO camera body.
3.2. Installing the Top Handle
The ergonomic wooden top handle provides a comfortable grip and supports quick installation and adjustment. Attach it to the top plate of the cage. It can be adjusted forward or backward for optimal balance.

Figure 4: Detail of the wooden top handle, designed for comfortable and adjustable grip.
3.3. Монтажа монитора
The included monitor mount allows for fast switching between LCD mode and viewfinder mode by replacing the camera's original monitor mount. Secure the monitor mount to the cage as shown.

Figure 5: The monitor mount allows seamless transitions between viewfinder and LCD screen modes, featuring adjustable rotation dampинг.
3.4. Attaching the 15mm LWS Baseplate
The 15mm LWS baseplate features a quick-release design, allowing it to be quickly mounted to the bottom of the cage. This baseplate is essential for expanding accessories like follow focus systems and for multi-scene switching between handheld and tripod setups.

Figure 6: The 15mm LWS system enhances stability for both handheld and tripod shooting, reducing strain and improving balance.
4. Operating the Cage Kit
The SmallRig Cage Kit provides numerous mounting points and features to optimize your shooting experience.
4.1. Utilizing Multiple Mounting Points
The cage kit is equipped with various mounting interfaces for expanding your professional setup:
- 3/8"-16 Threaded Holes for ARRI: For secure attachment of ARRI-standard accessories.
- 1/4"-20 Locating Holes: Prevents accessories from twisting.
- QD Sockets: Quick-detach points for straps or other QD accessories.
- H21 NATO Rails: For quick attachment and release of NATO-compatible accessories.
- H18 Cold Shoes: Standard cold shoe mounts for microphones, lights, etc.
- Dovetail Clamp for ARRI: For mounting the cage onto ARRI standard dovetail plates.
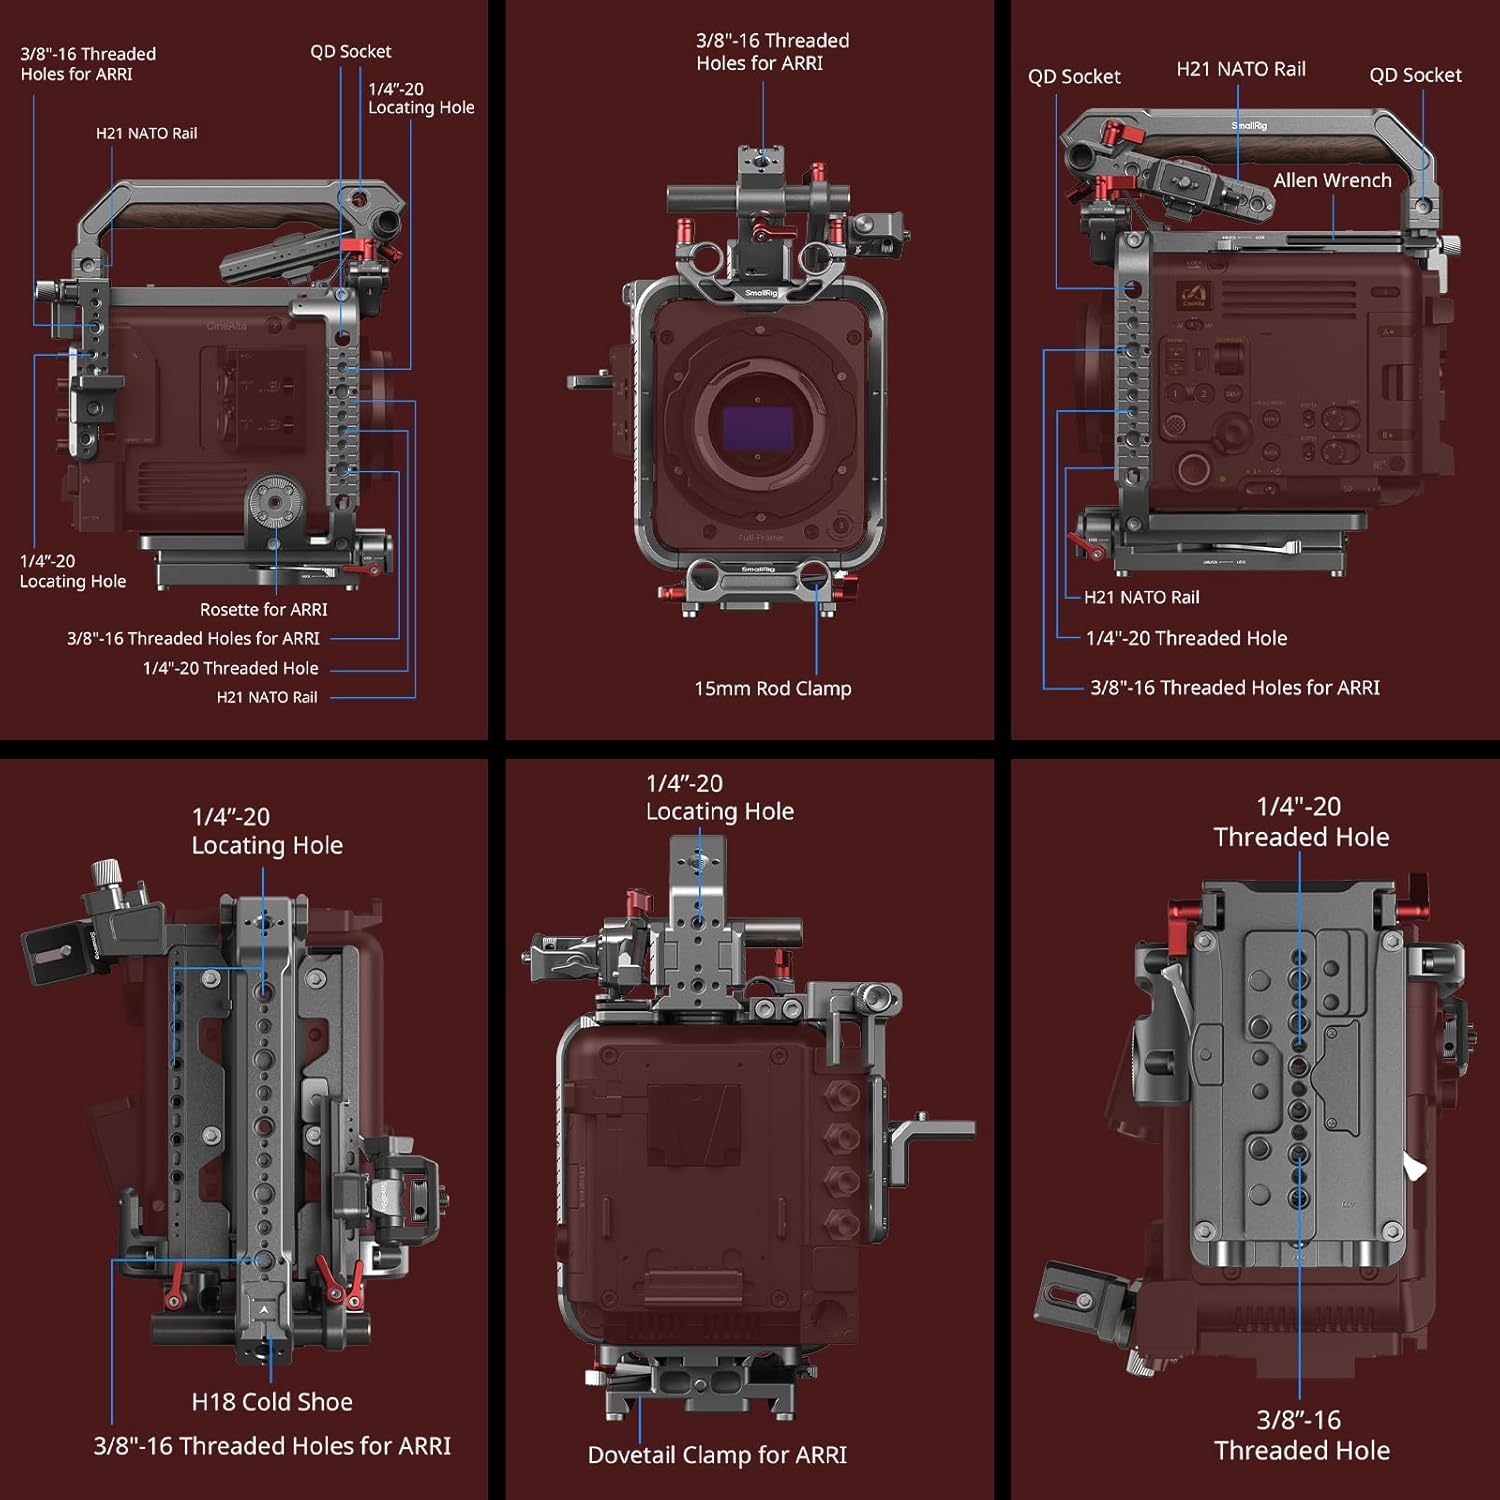
Слика 7: Свеобухватни view of the diverse mounting points available on the cage kit, facilitating extensive accessory integration.
4.2. Quick Disassembly and Storage
The top handle and 15mm LWS baseplate can be quickly disassembled without tools, facilitating convenient storage and transfer of the kit.
4.3. HDMI Cable Clamp
The included HDMI cable clamp helps secure your HDMI cable, preventing accidental disconnections and ensuring stable performance during shooting.

Figure 8: The HDMI cable clamp ensures stable cable connection, while the video transmission bracket allows for compact mounting of wireless video systems.
4.4. HawkLock Quick Release System
Certain components may feature the HawkLock Quick Release Self-Locking System, allowing for rapid and secure attachment and detachment of accessories.

Figure 9: The HawkLock Quick Release system provides a secure and efficient method for attaching and detaching accessories.
5. Одржавање
To ensure the longevity and optimal performance of your SmallRig Cage Kit, follow these maintenance guidelines:
- Чишћење: Wipe down the metal and wooden surfaces with a soft, dry cloth after each use to remove dust and fingerprints. For stubborn dirt, a slightly damp Може се користити крпа, а затим одмах осушити. Избегавајте абразивна средства за чишћење или раствараче.
- Складиштење: Store the kit in a dry, cool place away from direct sunlight and extreme temperatures. When disassembled, keep all components organized to prevent loss.
- Инспекције: Periodically check all screws and connections to ensure they are tight. Re-tighten any loose screws to maintain stability and safety.
- подмазивање: Moving parts, such as the monitor mount's rotation mechanism, generally do not require lubrication. If movement becomes stiff, contact SmallRig support for guidance.
КСНУМКС. Решавање проблема
This section addresses common issues you might encounter with your SmallRig Cage Kit.
| Проблем | Могући узрок | Решење |
|---|---|---|
| Cage feels loose or wobbly after assembly. | Вијци нису потпуно затегнути. | Ensure all 1/4"-20 screws securing the cage plates are tightened firmly. Use the provided Allen wrench if necessary. |
| Monitor mount is not holding position. | Rotation damping adjustment is loose. | Tighten the adjustment knob on the monitor mount until it holds the desired position securely. |
| Accessories attached to NATO rail slide unexpectedly. | НАТО цлamp is not fully engaged or tightened. | Обезбедите да НАТОamp on the accessory is properly seated on the rail and the locking lever/knob is fully tightened. |
| HDMI cable detaches easily. | HDMI cable clamp not installed or not tightened. | Install the HDMI cable clamp and ensure it securely holds the cable in place. |
If you encounter issues not listed here, please refer to the support section for further assistance.
7. Спецификације
| Феатуре | Детаљ |
|---|---|
| Број модела | 4571 |
| Компатибилност | Sony BURANO Camera |
| Димензије производа (склопљено) | 262.0mm × 222.0mm × 207.0mm (10.3 × 8.7 × 8.1in) |
| Преклопљена величина | 322.5 мм × 250.5 мм × 88.0 мм |
| Тежина производа | 1817.7 ± 10.0g (64.1 ± 0.35oz) / 4 pounds |
| Димензије пакета | 322.5 × 250.5 × 88.0 мм (12.91 × 9.76 × 3.54 инча) |
| Тежина пакета | 2108.2 ± 10.0 г (74.4 ± 0.35 оз) |
| Материјали | Алуминијумска легура, силикон, нерђајући челик, дрво |
| Монтажни бодови | 3/8"-16 ARRI Threaded Holes, 1/4"-20 Locating Holes, QD Sockets, H21 NATO Rails, H18 Cold Shoes, ARRI Dovetail Clamp |
8. Гаранција и подршка
SmallRig products are designed for durability and performance. For warranty information and customer support, please refer to the official SmallRig webсајт или директно контактирајте њихову корисничку службу.
Произвођач: СмаллРиг
Земља порекла: Кина
For the most up-to-date support resources, including FAQs and contact details, please visit the Official SmallRig Store on Amazon или њихова корпорација webсајту.
Ask a question about this manual
Ask about setup, troubleshooting, compatibility, parts, safety, or missing instructions. Manuals+ will review the question and use this page’s manual context to help answer it.