Увод
This manual provides detailed instructions for the setup, operation, and maintenance of your ORIA Wooden Digital Alarm Clock. Please read this manual thoroughly before using the product to ensure proper function and longevity.

Image: The ORIA Wooden Digital Alarm Clock, showcasing its LED display and wooden finish.
Садржај пакета
Молимо вас да проверите пакет за следеће ставке:
- 1 x ORIA Wooden Digital Alarm Clock
- 1 x 1.5m Type-C Charging Cable
- 1 к Упутство за употребу
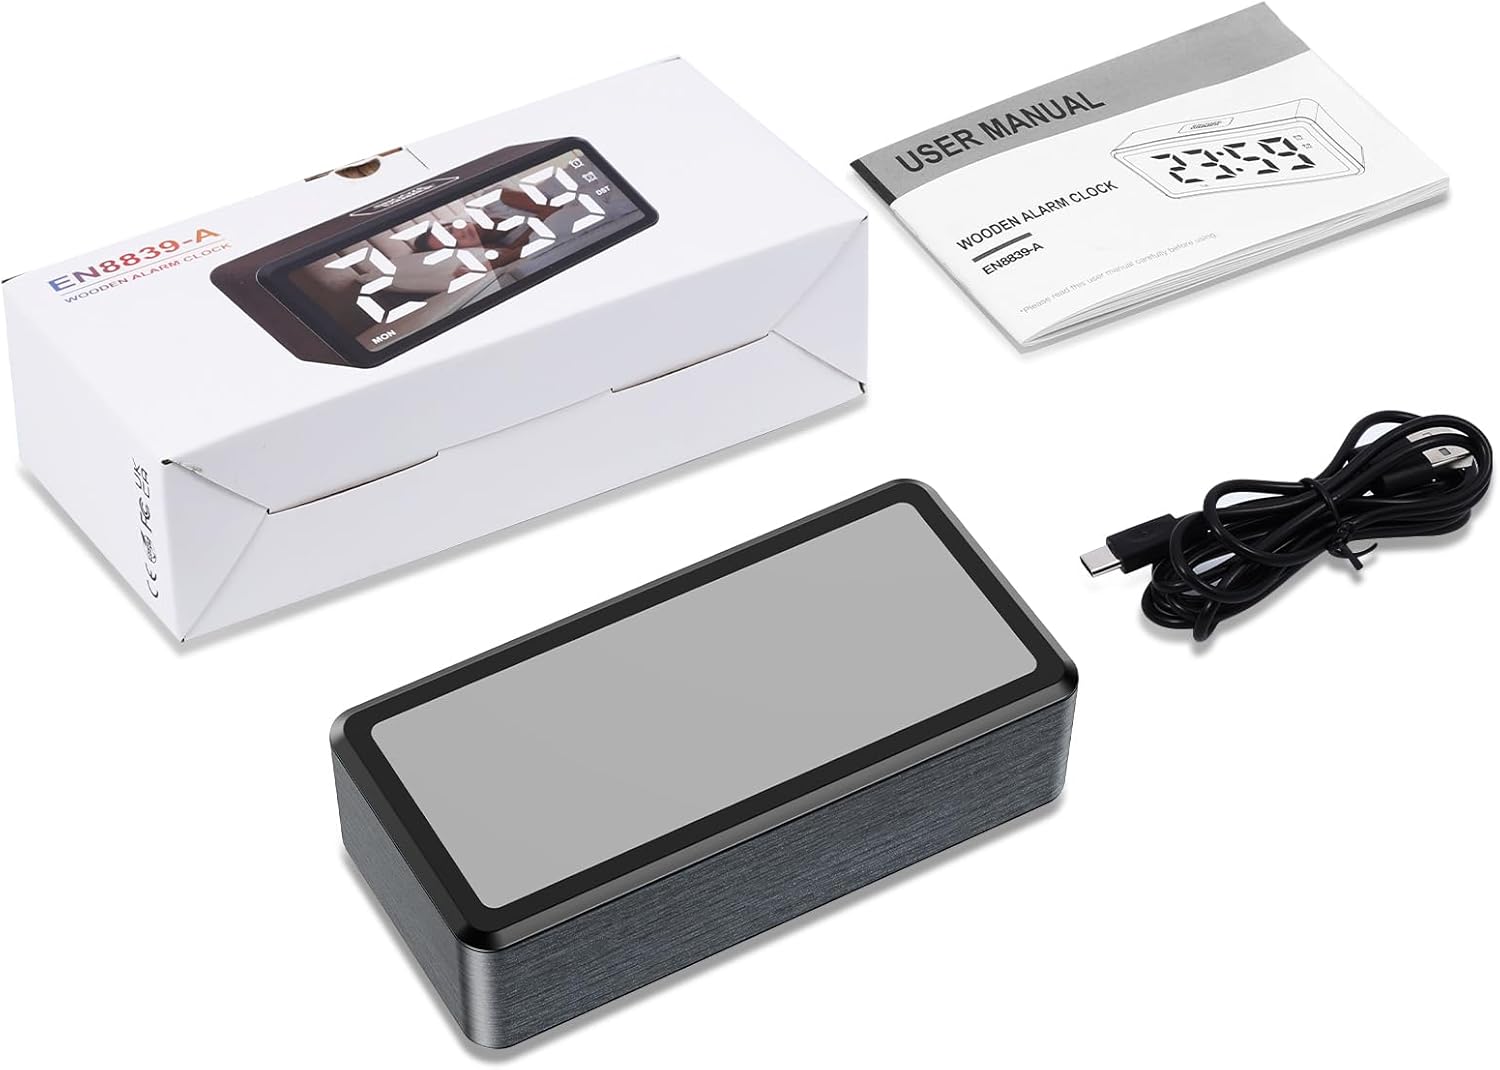
Image: Contents of the product package, including the alarm clock, Type-C cable, and user manual.
Производ је завршенview
The ORIA Wooden Digital Alarm Clock features a large LED mirror display and intuitive controls. Key features include dual alarms, adjustable brightness and volume, and Daylight Saving Time (DST) functionality.

Image: Visual representation of the clock highlighting features such as 12/24H display, DST, week display, snooze, dual alarm, adjustable volume, adjustable brightness, and USB output port.
Сетуп
Поверинг Он
The alarm clock must be plugged in for operation. Connect the provided 1.5m Type-C cable to the clock and a suitable USB power adapter (not included). The LED display will light up once powered.
Функција резервне батерије
The clock requires 2 AAA batteries (not included) for its memory function. These batteries retain your time and alarm settings during a power outage but will not power the LED display. The display will remain off when operating solely on battery power.

Image: Illustration showing the Type-C power connection and the AAA battery compartment for memory backup.
Упутство за употребу
Подешавање времена
- In time display mode, press and hold the СЕТ button for 2 seconds to enter time-setting mode. The HOUR digits will flash.
- Притисните тастер + or - buttons to adjust the hour. Hold the button to advance rapidly.
- Кратко притисните на СЕТ button to confirm the hour and move to minute setting. The MINUTE digits will flash.
- Притисните тастер + or - дугмад за подешавање минута.
- Кратко притисните на СЕТ button to confirm the minute and move to week setting. The WEEK digits will flash.
- Притисните тастер + or - buttons to adjust the day of the week.
- Притисните тастер СЕТ button again to save all settings and exit time-setting mode.
Формат 12/24 сата
In time display mode, short press the СЕТ button to toggle between 12-hour and 24-hour time formats. The AM/PM indicator will light up or turn off accordingly in 12-hour mode.

Image: Comparison of the clock display in 12-hour format (with AM/PM indicator) and 24-hour format.
Подешавање аларма и одлагања
The clock features two independent alarms (AL1 and AL2).
- To Activate/Deactivate Alarm: In time display mode, short press the АЛ1 button to switch Alarm 1 ON/OFF. The corresponding alarm icon will light up or turn off. Repeat for АЛ2 дугме за аларм 2.
- Да подесите аларм: Притисните и држите АЛ1 button for 2 seconds to enter Alarm 1 setting mode. The HOUR digits will flash.
- Користите + or - to adjust the hour, then short press АЛ1 to confirm and move to minute setting.
- Користите + or - to adjust the minute, then short press АЛ1 to confirm and move to alarm mode setting.
- Режими аларма: Користите + or - to select an alarm mode:
- 1-7: Alarm sounds Monday to Sunday (Default for ALARM 1).
- 1-5: Alarm sounds Monday to Friday (Default for ALARM 2).
- 6-7: Аларм се оглашава суботом и недељом.
- Кратак притисак АЛ1 to confirm the alarm mode and move to snooze time setting.
- Време одлагања: The default snooze time is 5 minutes. Use + or - to set the snooze duration from 5 to 60 minutes.
- Притисните АЛ1 again to save all settings and exit alarm setting mode.
- Repeat the process for Alarm 2 using the АЛ2 дугме.

Image: Display showing the two independent alarms and the three selectable alarm modes (Monday-Friday, Monday-Sunday, Saturday-Sunday).
Подешавање осветљености
The LED screen brightness can be adjusted to 5 levels: 100%, 80%, 50%, 20%, and 5%. To adjust, press the СНООЗЕ / ДИММЕР button repeatedly in time display mode to cycle through the brightness levels.

Image: Visual representation of the clock display at different brightness levels, from 100% to 5%.
Подешавање јачине звука
The alarm volume can be adjusted to 5 levels: 95 dB, 85 dB, 75 dB (default), 65 dB, and 55 dB. To adjust, press the ВОЛ button repeatedly to cycle through the volume levels.
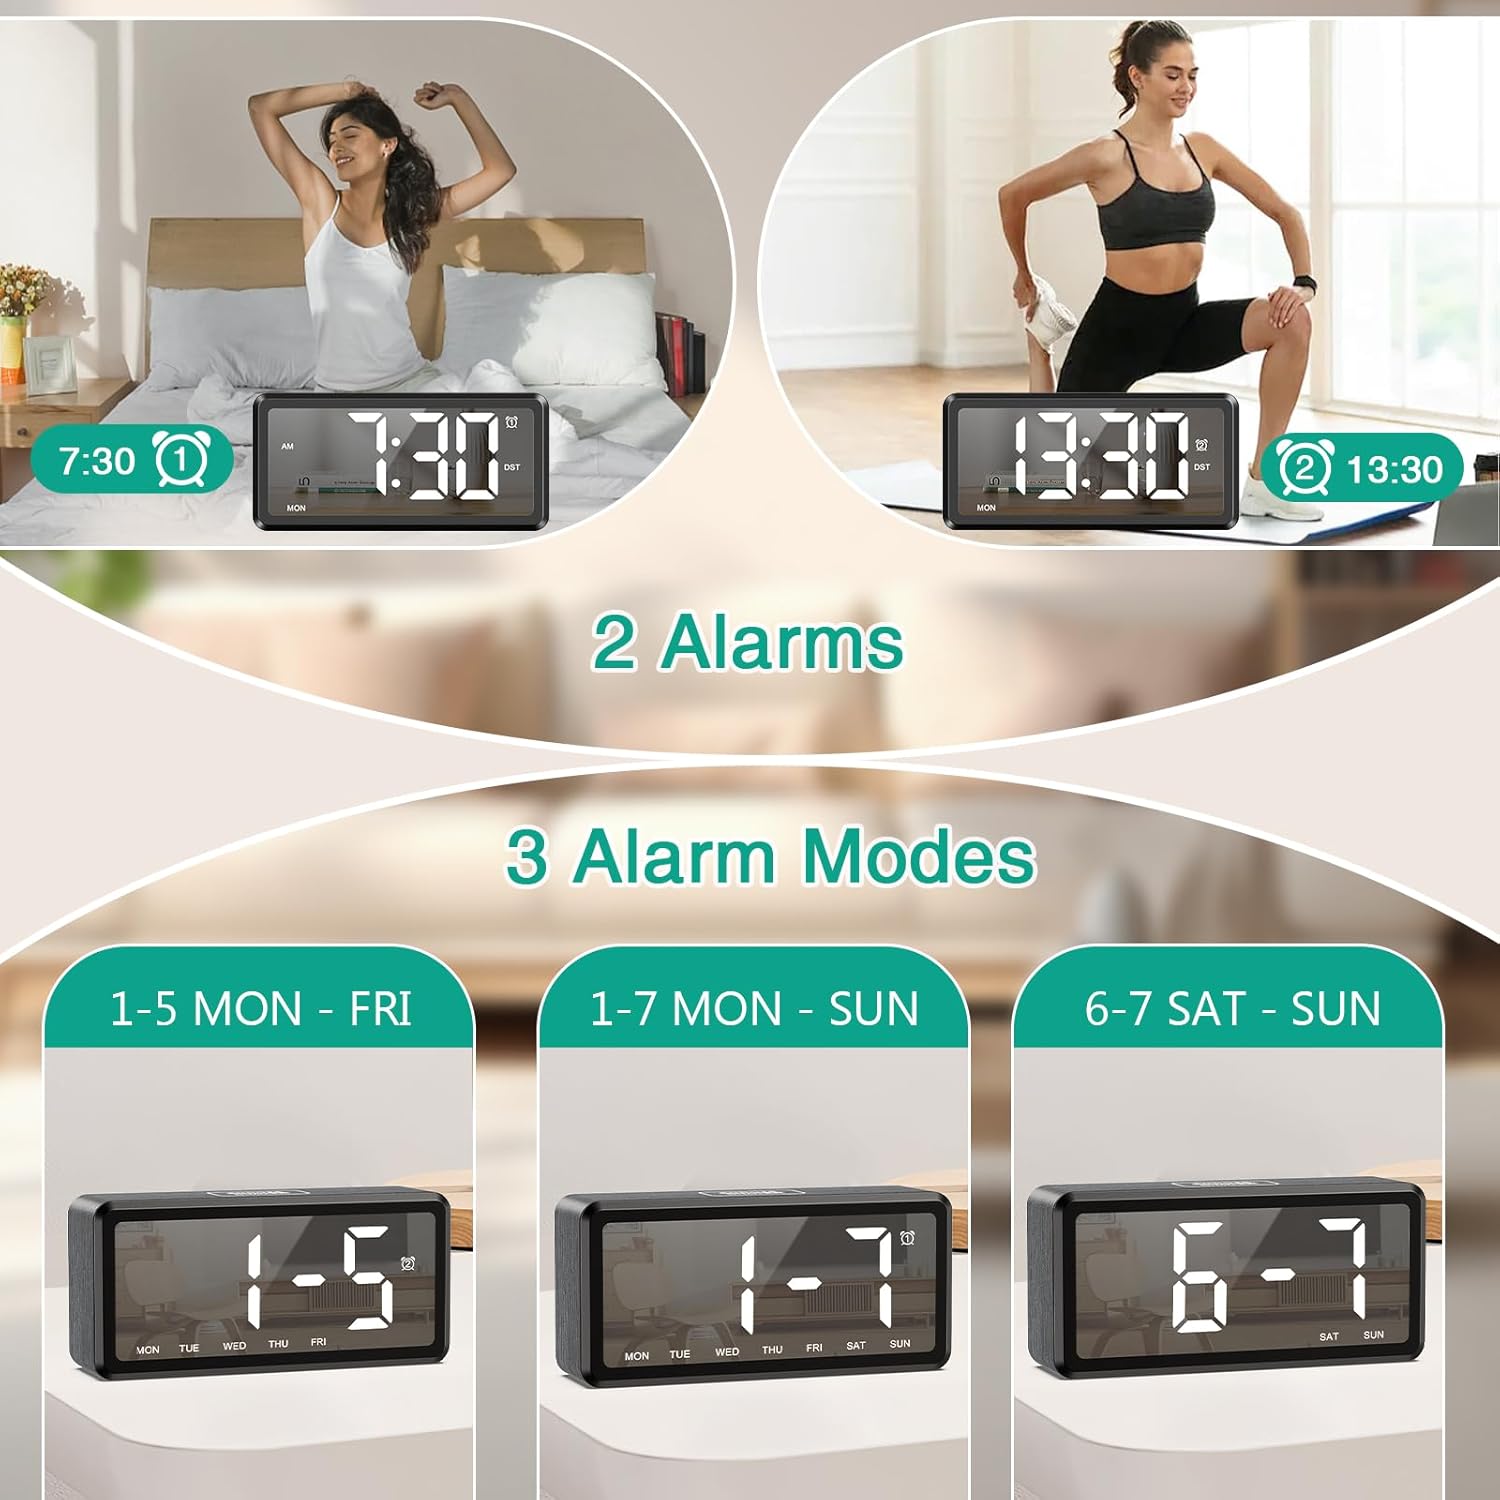
Image: Graphic illustrating the five adjustable alarm volume levels from 55dB to 95dB, along with snooze duration.
Летње рачунање времена (ДСТ)
To activate or deactivate Daylight Saving Time, short press the ДСТ button. The DST indicator will light up or turn off, and the time will adjust by one hour accordingly.
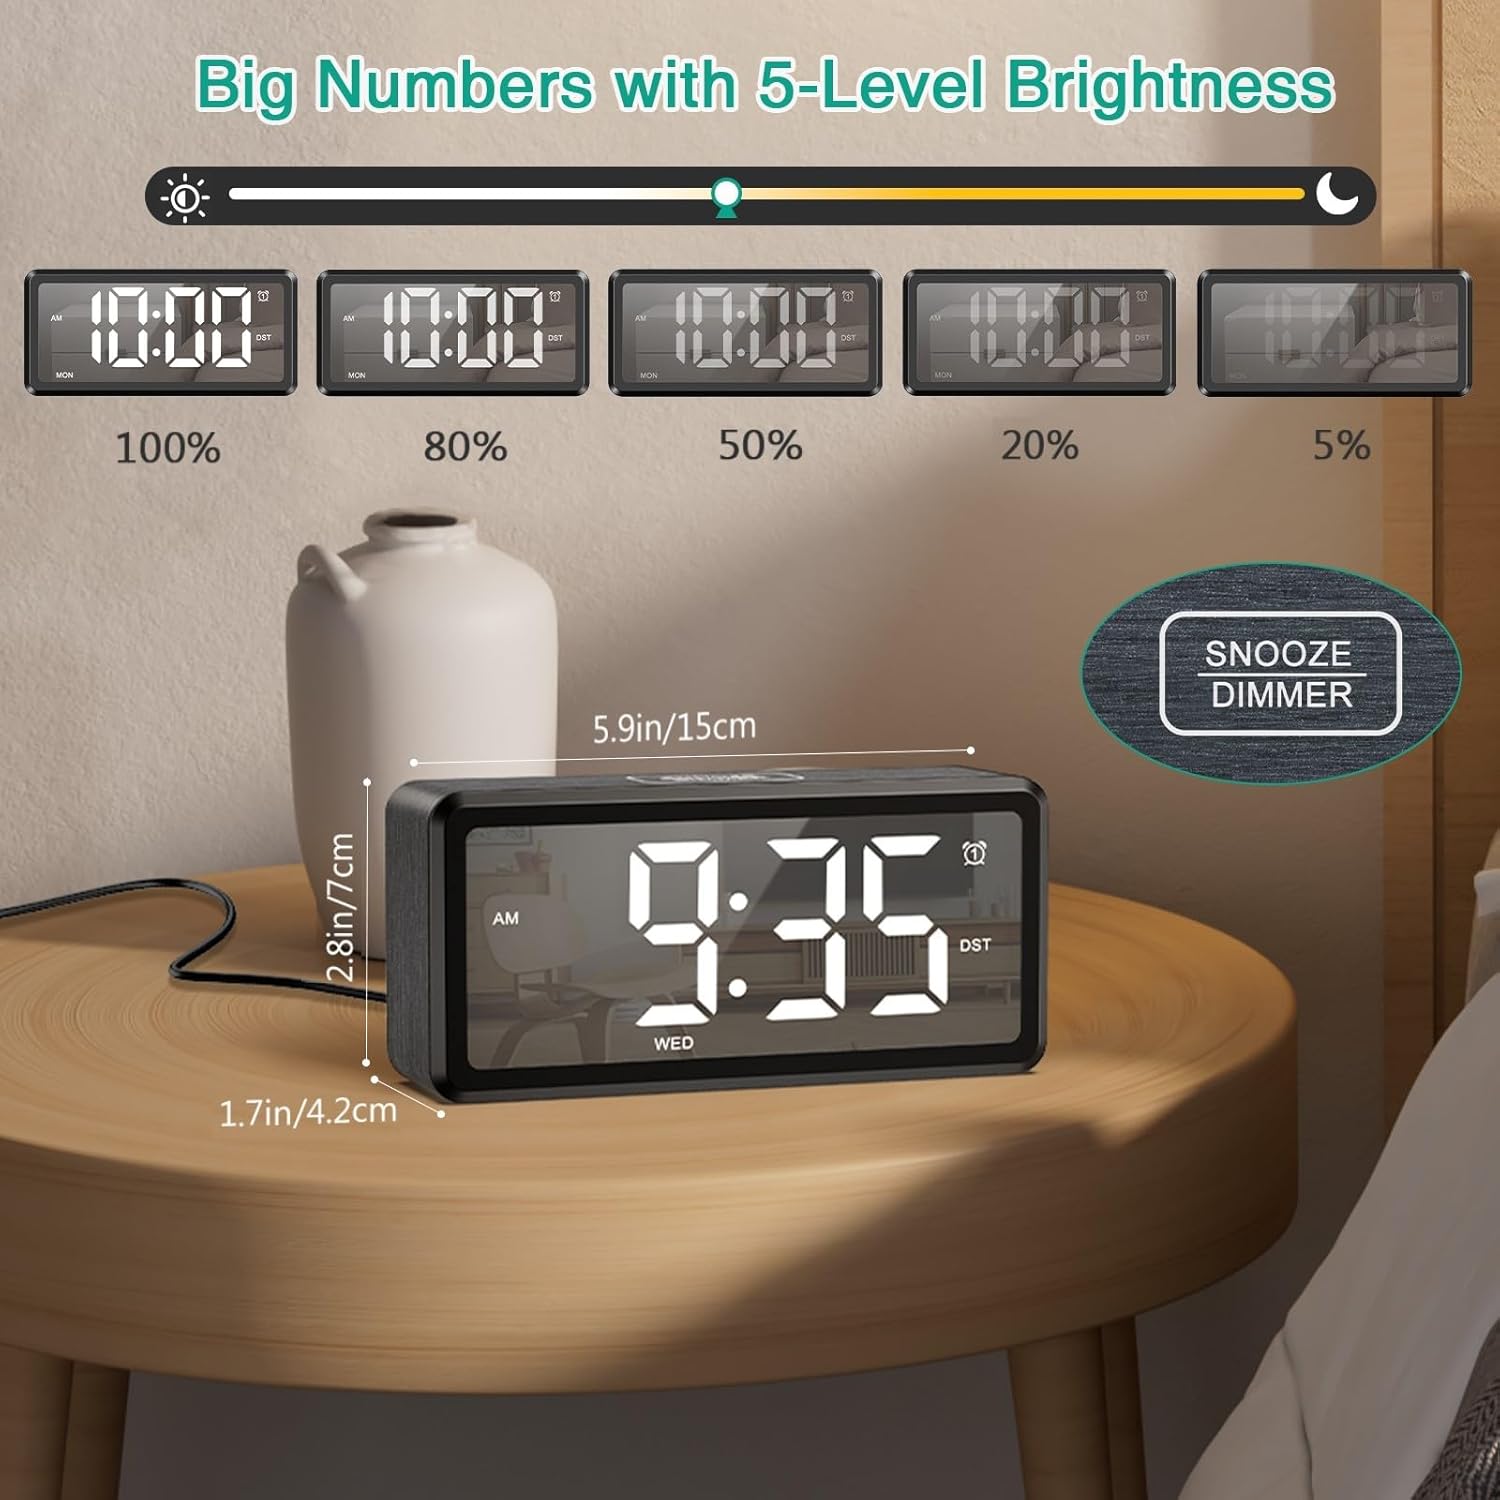
Image: The clock display showing time before and after activating DST with a single button press.
Одржавање
To ensure the longevity and optimal performance of your ORIA Wooden Digital Alarm Clock, follow these simple maintenance guidelines:
- Чишћење: Wipe the clock's surface with a soft, dry cloth. Avoid using abrasive cleaners, solvents, or chemical sprays, as these can damage the finish and display.
- Пласман: Place the clock on a stable, flat surface away from direct sunlight, excessive heat, moisture, and strong magnetic fields.
- Снага: Always use the provided Type-C cable and a compatible USB power adapter. Disconnect power during electrical storms or when not in use for extended periods.
- батерије: If using AAA batteries for backup, replace them annually or when the memory function appears unreliable. Ensure correct polarity when inserting batteries.
Решавање проблема
| Проблем | Могући узрок | Решење |
|---|---|---|
| Екран је празан. | Није укључено; струја је искљученаtage; batteries only. | Ensure the Type-C cable is securely connected to a power source. If using only AAA batteries, the display will not light up; they are for memory backup only. |
| Аларм се не оглашава. | Alarm is deactivated; volume is too low; incorrect alarm time/mode. | Check if the alarm icon (AL1/AL2) is lit. Adjust the volume level. Verify the alarm time and selected alarm mode (1-7, 1-5, or 6-7). |
| Време је нетачно након нестанка струјеtage. | No AAA batteries installed; dead AAA batteries. | Install 2 new AAA batteries for memory backup. If batteries are installed, replace them. |
| Дугмад не реагују. | Привремени софтверски квар. | Unplug the clock from power, remove any backup batteries, wait 30 seconds, then reconnect power and batteries. |
Спецификације
| Феатуре | Детаљ |
|---|---|
| Бранд | ОРИА |
| Број модела | OUS-HY-WA173 |
| Дисплаи Типе | ЛЕД |
| Извор напајања | Кабловски електрични (USB тип C) |
| Баттери Бацкуп | 2 x AAA batteries (for memory only, not included) |
| Димензије производа | 2.73" Ш x 5.85" В |
| Материјал оквира | Дрво |
| Посебне карактеристике | Dual Alarms, Snooze, Adjustable Brightness (5 levels), Adjustable Volume (5 levels), DST, 12/24H Format |
| Унутрашња/спољна употреба | Индоор |
Гаранција и подршка
ORIA is committed to providing high-quality products and customer satisfaction. Your ORIA Wooden Digital Alarm Clock comes with the following:
- 1-годишња гаранција: Покрива производне недостатке и кварове при нормалној употреби.
- 90-Day Free Replacements: For any issues within the first 90 days of purchase.
- Бесплатни повраћај у року од 30 дана: Hassle-free returns within 30 days of purchase.
- 24/7 корисничка подршка: Assistance available around the clock for any queries or issues.
- Доживотна техничка подршка: Ongoing technical assistance for the lifespan of your product.
For support, please visit the official ORIA website or contact our customer service team using the contact information provided on your purchase receipt or the ORIA brand store on Amazon.

Image: Graphic summarizing ORIA's customer support offerings, including warranty, replacements, returns, and technical support.