1. Увод
This manual provides detailed instructions for the installation, operation, and maintenance of your ANNKE AU-DT81DX200-V1 4K 8-Channel Digital Video Recorder (DVR). This DVR is designed for security surveillance systems, offering 4K (8MP) high-definition live viewing and recording capabilities. It features advanced H.265+ video compression, AI human/vehicle detection, and supports various camera types for flexible integration.

Image 1.1: The ANNKE 4K 8CH DVR connected to a display, illustrating its 4K Ultra HD video capability.
2. Садржај пакета
Verify that all items listed below are included in your package. If any items are missing or damaged, contact ANNKE customer support.
- 1x ANNKE 4K 8CH DVR with 2TB Hard Drive
- 1x 5.9 ft/1.8 m HDMI Cable
- 1x 3.2 ft/1 m Ethernet Cable
- 1к адаптер за напајање
- 1к УСБ миш
- 1x Упутство за употребу (овај документ)
- 1x Wall Sticker

Image 2.1: Visual representation of all components included in the ANNKE 4K 8CH DVR package.
3. Систем је завршенview
The ANNKE AU-DT81DX200-V1 DVR is a hybrid 5-in-1 system, supporting various camera technologies. It can operate in two primary modes:
- ДВР режим: Supports up to 8 BNC (TVI/AHD/CVI/CVBS) cameras and an additional 4 IP cameras.
- NVR Mode: Can be configured to support up to 12 IP cameras exclusively.
This flexibility allows for integration with existing analog systems while providing options for future IP camera expansion.
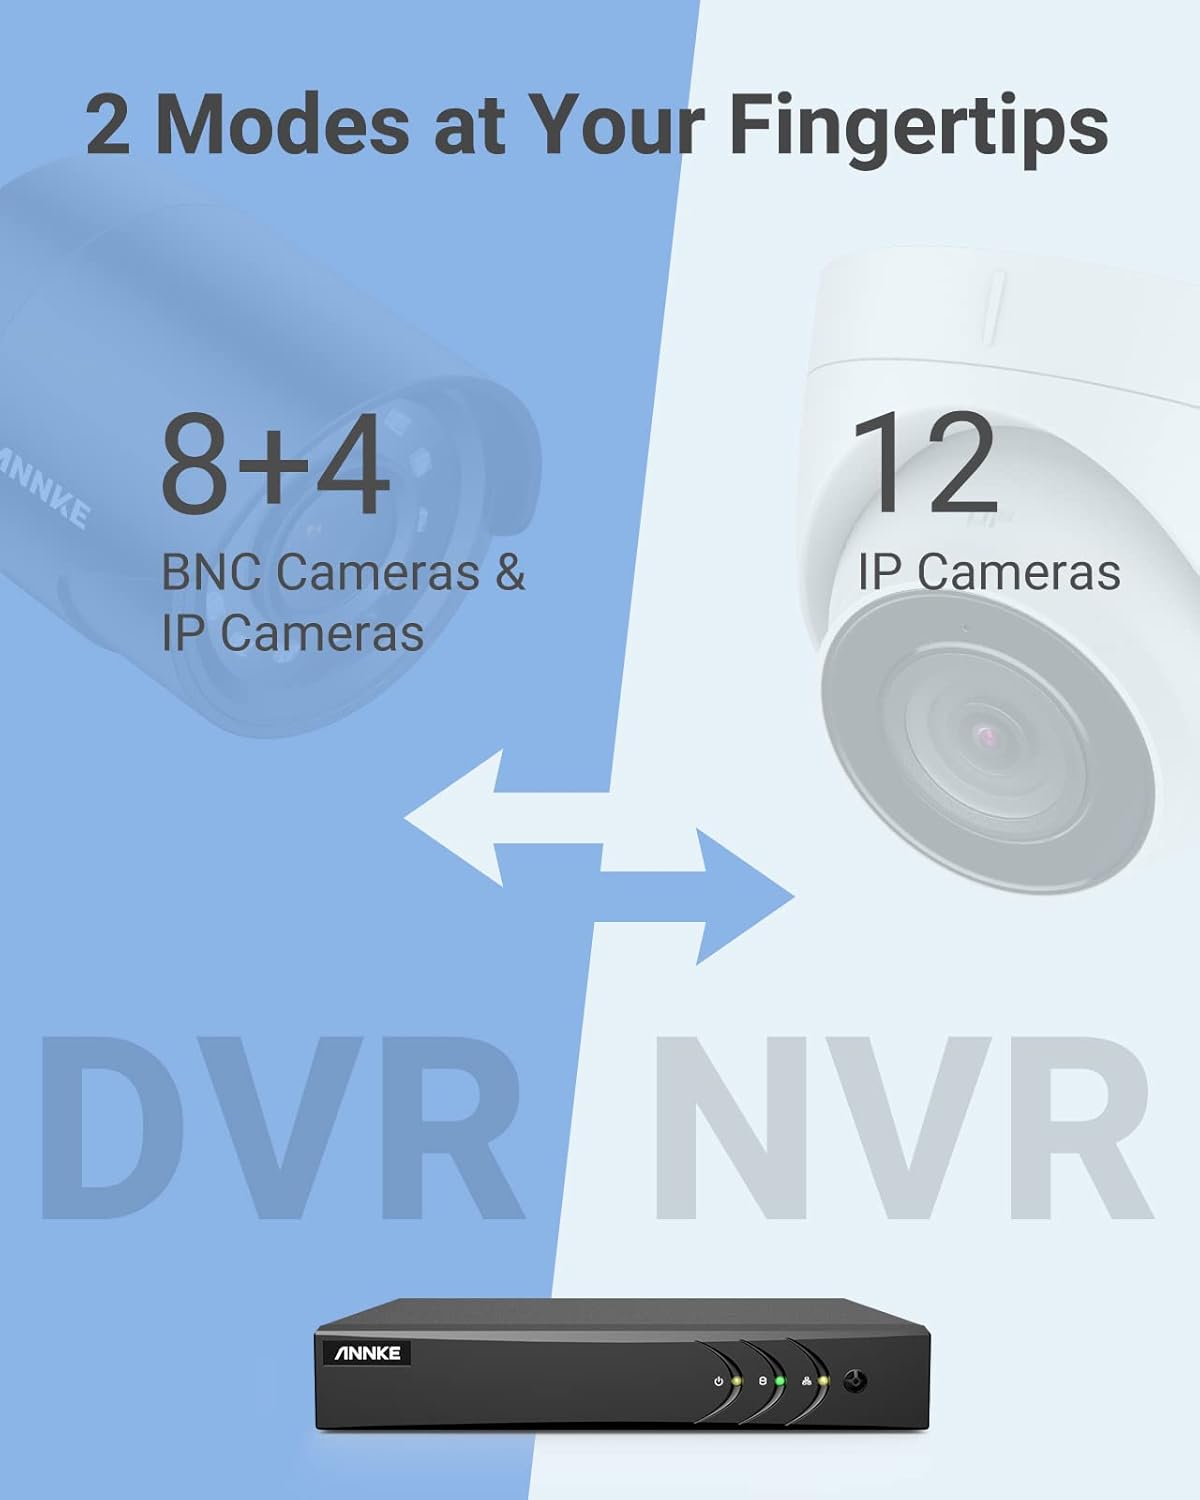
Image 3.1: Illustration of the DVR's dual operational modes, supporting both BNC and IP cameras or IP cameras exclusively.
4. Водич за инсталацију
4.1 Физичко подешавање
- Повежите камере: Connect your security cameras to the BNC video input ports on the back of the DVR. For IP cameras, connect them to your network switch/router, and ensure the DVR is also connected to the same network via the Ethernet cable.
- Повежи монитор: Повежите монитор на HDMI или VGA излазни порт DVR-а користећи приложени HDMI кабл или VGA кабл (није укључен).
- Повежите УСБ миш: Прикључите УСБ миш у један од УСБ портова на ДВР-у.
- Прикључите напајање: Прикључите адаптер за напајање на улаз за напајање DVR-а, а затим га укључите у утичницу. DVR ће се аутоматски укључити.
4.2 Почетна конфигурација
При првом покретању, DVR ће вас водити кроз почетни чаробњак за подешавање. Пратите упутства на екрану да бисте:
- Set up a strong password for the administrator account.
- Configure network settings (DHCP is recommended for most users).
- Подесите датум и време.
- Scan and add IP cameras if applicable.
5. Управљање DVR-ом
5.1 Уживо View
Након почетног подешавања, DVR ће приказивати уживо view from connected cameras. Use the USB mouse to navigate the interface. Right-click to access the main menu.
5.2 Снимање
The DVR is pre-configured for continuous recording. You can customize recording schedules, motion-triggered recording, or alarm-triggered recording via the main menu under Снимање > Распоред.
5.3 Репродукција
То реview снимљено фооtage:
- Од уживо view, кликните десним тастером миша и изаберите Репродукција.
- Select the desired camera(s) and date.
- Use the timeline to navigate through recordings. Events (like motion detection) are often marked on the timeline for quick access.

Image 5.1: The DVR's playback interface, demonstrating how to locate and review recorded events on a timeline.
6. Напредне функције
6.1 AI Human/Vehicle Detection
The DVR incorporates deep learning-based motion detection 2.0, which can differentiate between human and vehicle movements. This significantly reduces false alarms caused by environmental factors such as leaves or light changes.
- Конфигурација: Enable and configure AI detection for each analog channel via the main menu under AI > Motion Detection 2.0.
- Smart Events: Supports line crossing and intrusion detection for specific areas.
- Обавештења: Configure the DVR to send app push notifications, email alerts, or trigger a buzzer when human or vehicle motion is detected.
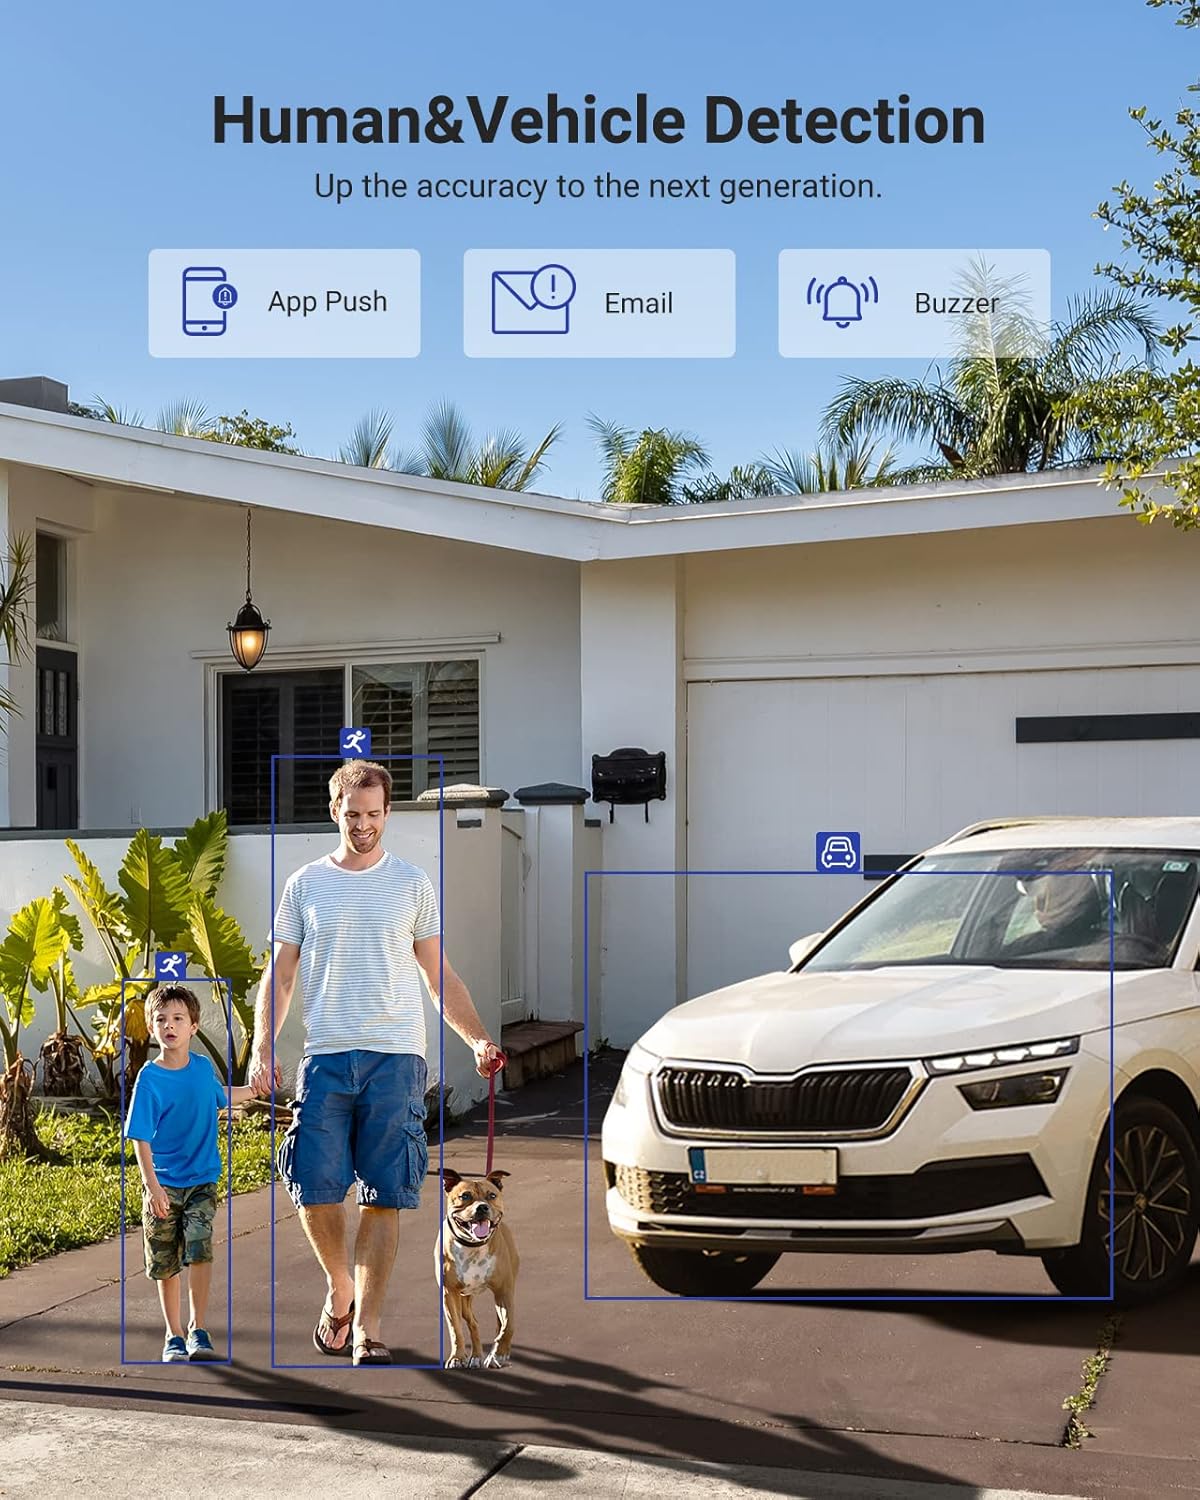
Image 6.1: Visual demonstration of the AI human and vehicle detection capability, showing how the system identifies and distinguishes between people and vehicles.
6.2 Удаљени приступ
Access your DVR remotely from anywhere using the ANNKE Vision App or a web претраживач.
- ANNKE Vision App: Download the app from the App Store (iOS) or Google Play Store (Android). Register an account and add your DVR by scanning the QR code or entering its serial number.
- Web Прегледач: Access the DVR's web интерфејс уношењем његове ИП адресе у а web претраживач на вашем рачунару.
- Компатибилност: The system is compatible with various devices including smartphones, tablets, laptops, and personal computers. It also supports integration with Alexa for voice control.

Image 6.2: Remote access via the ANNKE Vision App, showing compatibility with mobile devices and Alexa.
7. Video Management
7.1 H.265+ видео компресија
The DVR utilizes advanced H.265+ video compression technology. This technology significantly reduces file sizes, saving up to 80% of storage space compared to H.264 compression, while maintaining video quality. This allows for longer recording durations on the same 2TB hard drive.

Image 7.1: Comparison illustrating the storage efficiency of H.265+ compression versus H.264.
8. Компатибилност
The ANNKE AU-DT81DX200-V1 is a versatile 5-in-1 hybrid DVR, designed to be compatible with a wide range of security cameras:
- HD TVI Input: Supports 8 MP@15 fps, 5 MP@20 fps, 3K@20 fps, 4 MP@30 fps.
- AHD Input: Supports 5 MP@20 fps, 4 MP@30 fps, 1080p@25 fps, 1080p@30 fps.
- HD CVI Input: Supports 4 MP@30 fps, 4 MP@25 fps, 1080p@25 fps, 1080p@30 fps.
- ЦВБС улаз: Supports PAL/NTSC standards.
- IPC Input: Supports up to 8MP IP cameras.
This broad compatibility ensures that the DVR can integrate with both older analog cameras and modern IP cameras, providing a flexible upgrade path for existing surveillance systems.

Image 8.1: The DVR's compatibility with various camera technologies, including TVI, CVI, AHD, and IP cameras.
9. Спецификације
| Феатуре | Спецификација |
|---|---|
| Бранд | АННКЕ |
| Број модела | AU-DT81DX200-V1 |
| Технологија повезивања | Виред |
| Резолуција снимања видео записа | 4К (8МП) |
| Број канала | 8 (Analog) + 4 (IP) or 12 (IP) |
| Видео Цомпрессион | H.265 Pro+/H.265 Pro/H.265/H.264+/H.264 |
| Supported Camera Types | TVI, AHD, CVI, CVBS, IPC |
| АИ карактеристике | Human Detection, Vehicle Detection, Line Crossing, Intrusion Detection |
| Капацитет меморије | 2 TB HDD (Up to 10 TB supported) |
| Ремоте Аццесс | ANNKE Vision App, Web Бровсер |
| Компатибилни уређаји | Камере, лаптопови, лични рачунари, паметни телефони, таблети |
| Извор напајања | Цордед Елецтриц |
| Боја | Црно |
| Димензије артикла | 17.13 к 12.4 к 3.86 инча |
10. Одржавање
Regular maintenance ensures optimal performance and longevity of your DVR system.
- Чишћење: Keep the DVR free from dust. Use a soft, dry cloth to clean the exterior. Do not use liquid cleaners.
- вентилација: Ensure the DVR is placed in a well-ventilated area to prevent overheating. Do not block ventilation openings.
- Ажурирања фирмвера: Periodically check the ANNKE official website for firmware updates. Keeping your DVR's firmware updated can improve performance, add new features, and enhance security.
- Резервна копија података: Редовно правите резервне копије важних видео записаtagна екстерни уређај за складиштење.
- Здравље чврстог диска: The DVR's menu may offer options to check the health status of the installed hard drive. Monitor this periodically.
КСНУМКС. Решавање проблема
This section addresses common issues you might encounter with your DVR.
- Нема видео излаза:
- Check HDMI/VGA cable connections to both the DVR and the monitor.
- Ensure the monitor is set to the correct input source.
- Verify the DVR is powered on (power indicator light should be active).
- No Camera Display:
- Check camera power supply and video cable connections.
- For IP cameras, ensure they are on the same network as the DVR and properly added in the DVR's camera management settings.
- Verify camera compatibility with the DVR (refer to Section 8).
- Даљински приступ не ради:
- Ensure the DVR is connected to the internet.
- Check network settings on the DVR (e.g., DHCP enabled, correct IP address).
- Verify the ANNKE Vision App is updated to the latest version.
- Ensure the DVR is properly added to your ANNKE Vision account.
- Лажни аларми за кретање:
- Adjust the sensitivity of motion detection in the DVR settings.
- Utilize the AI Human/Vehicle Detection feature (Section 6.1) to filter out irrelevant movements.
- Define specific detection zones to exclude areas with frequent non-threatening movement.
If you continue to experience issues, please contact ANNKE customer support.
12. Гаранција и подршка
ANNKE products typically come with a limited warranty. Please refer to the warranty card included in your package or visit the official ANNKE webсајт за детаљне услове гаранције специфичне за ваш регион.
For technical support, product inquiries, or warranty claims, please contact ANNKE customer service through their official website or the contact information provided in your product documentation. Have your model number (AU-DT81DX200-V1) and purchase details ready when contacting support.
ANNKE Official Webсајт: ввв.аннке.цом