1. Увод
Thank you for choosing the Behringer B-2 Pro Dual-Diaphragm Condenser Microphone. This versatile microphone is designed for professional audio recording in various applications, including vocals, instruments, and ambient sound capture. Its robust construction and flexible features make it an excellent choice for home studios, project studios, and professional recording environments. This manual provides essential information for the proper setup, operation, and maintenance of your B-2 Pro microphone.
2. Важна безбедносна упутства
- Пажљиво прочитајте ова упутства пре употребе производа.
- Сачувајте ова упутства за будућу употребу.
- Обратите пажњу на сва упозорења и пратите сва упутства.
- Не користите овај апарат у близини воде или влаге.
- Чистите само сувом крпом.
- Не блокирајте отворе за вентилацију. Инсталирајте у складу са упутствима произвођача.
- Не постављајте у близини извора топлоте као што су радијатори, грејни регистри, пећи или други уређаји (укључујући ampлифиерс) који производе топлоту.
- Користите само додатке/прибор које је навео произвођач.
- Све сервисирање препустите квалификованом сервисном особљу. Сервисирање је потребно када је уређај оштећен на било који начин, као што је оштећен кабл за напајање или утикач, ако је течност проливена или су предмети упали у апарат, ако је апарат био изложен киши или влази, не ради нормално , или је одбачено.
- This microphone requires +48V phantom power to operate. Ensure your audio interface or mixer provides phantom power and that it is enabled before connecting the microphone.
3. Садржај пакета
Проверите да ли се све ставке наведене у наставку налазе у вашем паковању. Ако неке ставке недостају или су оштећене, обратите се продавцу.
- Behringer B-2 Pro Dual-Diaphragm Condenser Microphone
- Custom Shockmount
- Виндсцреен
- Durable Aluminum Carrying Case
- Tripod Microphone Stand
- КСЛР кабл
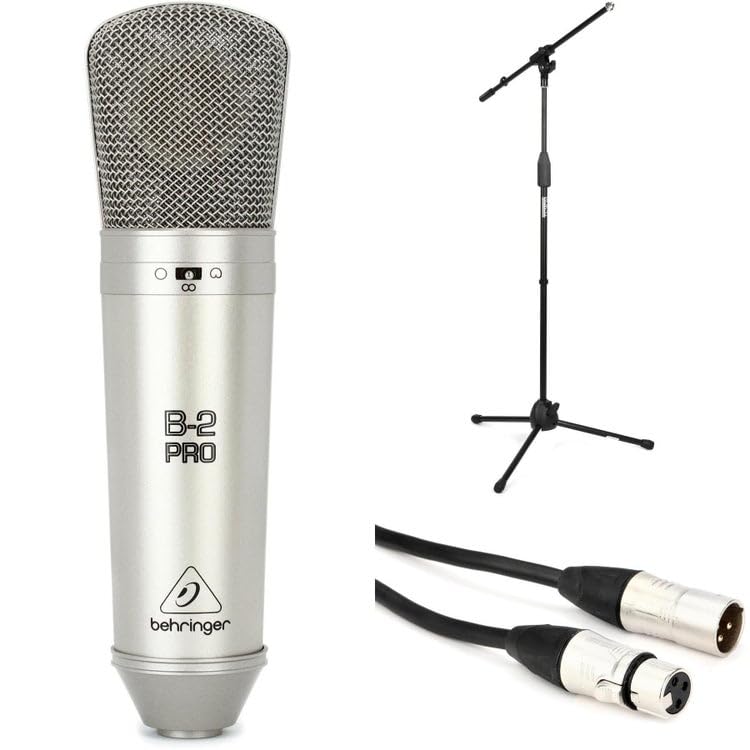
Image: Behringer B-2 Pro microphone with its shockmount, windscreen, and XLR cable, as typically included in the package.
4. Карактеристике производа
The B-2 Pro is engineered to deliver high-quality audio performance with exceptional versatility.
- Dual-Diaphragm Design: Enables selection of multiple polar patterns for diverse recording applications.
- Selectable Polar Patterns: Choose between Cardioid, Omnidirectional, and Figure-8 patterns to optimize sound capture for different sources and environments.
- Switchable 10dB Pad: Attenuates input signals by 10dB, allowing the microphone to handle very loud sound sources without distortion. Ideal for drums, guitar amplifiers, or brass instruments.
- Лов-Цут филтер: Reduces unwanted low-frequency rumble or proximity effect, improving clarity in recordings.
- Позлаћени КСЛР конектор: Ensures signal integrity and corrosion resistance.
- Робусна конструкција: Designed for durability and reliable performance in studio settings.
5. Подешавање
- Распакујте микрофон: Carefully remove the B-2 Pro microphone and its accessories from the aluminum carrying case.
- Саставите постоље за микрофон: Extend the tripod legs of the included microphone stand for stability. Adjust the height as needed.
- Attach the Shockmount: Screw the custom shockmount onto the top of the microphone stand. Ensure it is securely fastened.
- Монтирајте микрофон: Gently insert the B-2 Pro microphone into the shockmount. The shockmount's elastic suspension helps isolate the microphone from vibrations and handling noise.
- Attach the Windscreen: Place the foam windscreen over the microphone capsule to reduce plosives (harsh "p" and "b" sounds) and protect the microphone from dust.
- Connect the XLR Cable: Connect one end of the supplied XLR cable to the microphone's XLR output. Connect the other end to an XLR input on your audio interface, mixer, or preampлифиер.
- Enable Phantom Power: The B-2 Pro is a condenser microphone and requires +48V phantom power to operate. Ensure that phantom power is enabled on your audio interface or mixer пре connecting the microphone to prevent potential damage.

Image: Illustration of the B-2 Pro microphone setup, including stand, shockmount, and cable connection to an audio interface.
6. Operating the B-2 Pro
6.1. Polar Pattern Selection
The B-2 Pro features a switch on the microphone body to select between three polar patterns. Adjust this switch according to your recording needs.
- кардиоид: This pattern picks up sound primarily from the front of the microphone, rejecting sound from the sides and rear. It is ideal for isolating a single sound source, such as a vocalist or an instrument, in a live or studio setting.
- Омнидирецтионал: This pattern picks up sound equally from all directions. It is suitable for capturing room ambiance, group vocals, or multiple instruments simultaneously.
- Figure-8: This pattern picks up sound equally from the front and rear of the microphone, while rejecting sound from the sides. It is commonly used for recording two vocalists facing each other, or for capturing a specific instrument while minimizing room reflections from the sides.

Image: Visual representation of the three selectable polar patterns: Cardioid, Omnidirectional, and Figure-8, showing their sound pickup characteristics.
6.2. 10dB Pad Switch
The B-2 Pro includes a switchable 10dB pad. When engaged, this pad reduces the microphone's output level by 10 decibels.
- Engage the Pad: Use the 10dB pad when recording very loud sound sources, such as drums, loud guitar amplifiers, or brass instruments, to prevent input clipping at your audio interface or mixer.
- Disengage the Pad: For quieter sources like vocals or acoustic guitars, disengage the pad to ensure a healthy signal level.
6.3. Low-Cut Filter Switch
The low-cut filter (also known as a high-pass filter) reduces low-frequency content below a certain point.
- Engage the Filter: Use the low-cut filter to reduce unwanted rumble, handling noise, or proximity effect (an increase in bass response when a microphone is close to the sound source). This can improve clarity, especially for vocals and acoustic instruments.
- Disengage the Filter: For sources where full low-frequency response is desired, such as bass instruments or kick drums, disengage the filter.
6.4. Постављање микрофона
Proper microphone placement is crucial for optimal sound quality. Experiment with distance and angle to achieve the desired tone.
- Вокал: Start with the microphone 6-12 inches from the vocalist, slightly off-axis to reduce plosives. Use the cardioid pattern.
- Акустична гитара: Aim the microphone towards the 12th fret at a distance of 6-18 inches. Cardioid pattern is generally preferred.
- Амбијент собе: Use the omnidirectional pattern and place the microphone in the center of the room or at a distance that captures the desired room sound.
- Two Vocalists: Use the Figure-8 pattern with vocalists positioned on opposite sides of the microphone.
7. Одржавање
- Чишћење: Use a soft, dry cloth to clean the microphone body. Do not use liquid cleaners or solvents, as they may damage the finish or internal components.
- Складиштење: When not in use, store the B-2 Pro microphone in its aluminum carrying case to protect it from dust, moisture, and physical damage. Avoid extreme temperatures and humidity.
- Руковање: Always handle the microphone with care. Avoid dropping it or subjecting it to strong impacts.
КСНУМКС. Решавање проблема
| Проблем | Могући узрок | Решење |
|---|---|---|
| Нема излаза звука |
|
|
| Изобличен звук |
|
|
| Зујање или бука |
|
|
9. Спецификације
| Бранд | Бехрингер |
| Број модела | B2ProPk |
| Тип | Кондензаторски микрофон |
| Полар Паттернс | Cardioid, Omnidirectional, Figure-8 (Switchable) |
| Свитцхабле Пад | -10 дБ |
| Лов-Цут филтер | Да |
| Технологија повезивања | КСЛР |
| Повер Рекуиремент | +48В Фантомско напајање |
| Тежина артикла | 1 фунти (0.45 кг) |
| Компатибилни уређаји | Audio Interfaces, Mixers, Preamplifiers with XLR input |
| Подржани софтвер | Any DAW with microphone input |
| Компатибилност оперативног система | Виндовс, мацОС |
| Максимално С.ampле Рате | 192 КХз |
Напомена: Спецификације се могу променити без најаве.
10. Гаранција и подршка
За детаљне информације о гаранцији и техничкој подршци, обратите се званичном Behringer-овом webсајт или контактирајте локалног Behringer дистрибутера. Сачувајте рачун као доказ о куповини за евентуалне рекламације.
Behringer Official Webсајт: ввв.бехрингер.цом