Аргон Аудио ТТ МК2
Argon Audio TT MK2 Упутство за употребу грамофона
Model: TT MK2
Увод
Хвала вам на куповиниasing the Argon Audio TT MK2 Turntable. This manual provides essential information for the safe and optimal operation, setup, and maintenance of your new turntable. Please read this manual thoroughly before using the product and retain it for future reference.
The Argon Audio TT MK2 is designed to deliver high-fidelity audio playback from your vinyl records, featuring a built-in phono pre-amplifier, an Audio Technica AT3600 cartridge, and dual-speed control for 33 and 45 RPM records.
Важна безбедносна упутства
Да бисте смањили ризик од струјног удара, пожара или оштећења уређаја, молимо вас да се придржавате следећих мера безбедности:
- Не излажите овај уређај киши или влази.
- Не стављајте предмете напуњене течностима, као што су вазе, на уређај.
- Не блокирајте отворе за вентилацију. Инсталирајте у складу са упутствима произвођача.
- Не постављајте у близини извора топлоте као што су радијатори, грејни регистри, пећи или други уређаји (укључујући ampлифиерс) који производе топлоту.
- Заштитите кабл за напајање од налета или стезања, посебно на утикачима, практичним утичницама и месту на којем излазе из уређаја.
- Користите само додатке/прибор које је навео произвођач.
- Искључите овај уређај из струје током олуја са грмљавином или када га не користите дуже време.
- Све сервисирање препустите квалификованом сервисном особљу. Сервисирање је потребно када је уређај оштећен на било који начин, као што је оштећен кабл за напајање или утикач, ако је течност проливена или су предмети упали у апарат, ако је апарат био изложен киши или влази, не ради нормално , или је одбачено.
Шта је у кутији
Carefully unpack all components and ensure all items are present before discarding packaging materials:
- Argon Audio TT MK2 Turntable Unit
- Audio Technica AT3600 Cartridge (pre-mounted)
- Dust Lid
- РЦА кабл
- Повер Адаптер
- Противтежа
- Анти-скате Веигхт
- Platter and Drive Belt
- Фелт Мат

Image: The Argon Audio TT MK2 Turntable with its clear dust cover in place, showcasing its sleek black finish.
Водич за подешавање
КСНУМКС. Постављање
Place the turntable on a stable, level surface away from direct sunlight, heat sources, and strong vibrations. Ensure there is enough space around the unit for ventilation and operation.
2. Постављање плоче и каиша
- Carefully place the metal platter onto the spindle.
- Locate the drive belt. Gently stretch the belt around the inner rim of the platter and hook it onto the motor pulley. Ensure the belt is not twisted.
- Поставите простирку од филца на врх тањира.

Image: The Argon Audio TT MK2 Turntable with its dust cover removed, showing the platter and tonearm assembly.
3. Cartridge and Tonearm Setup
The Audio Technica AT3600 cartridge comes pre-mounted on the tonearm. Follow these steps to balance the tonearm and set the tracking force:
- Remove the stylus protector from the cartridge.
- Пажљиво отпустите ручицу из њеног наслона.
- Rotate the counterweight at the rear of the tonearm until the tonearm floats freely and is perfectly balanced horizontally.
- Once balanced, hold the counterweight steady and rotate the numbered ring on the front of the counterweight to "0".
- Rotate the entire counterweight (including the numbered ring) counter-clockwise until the desired tracking force is set. For the AT3600 cartridge, the recommended tracking force is typically 3.5 grams.

Слика: Крупни план view of the tonearm's counterweight and anti-skate mechanism, showing the numerical scale for adjustment.
4. Anti-Skate Adjustment
Attach the anti-skate weight to the small loop on the tonearm and hang it over the second groove of the anti-skate support rod. This helps prevent the stylus from skipping inwards.
5. Connecting to Audio System
The TT MK2 features a built-in phono pre-amplifier, allowing direct connection to powered speakers or an amplifier's line-level input. If your amplifier has a dedicated "Phono" input, you can bypass the internal pre-amp.
- Connect the supplied RCA cable from the "RCA OUT" jacks on the rear of the turntable to the corresponding input on your amplifier or powered speakers (e.g., "AUX", "LINE IN").
- Locate the "RIAA" switch on the rear of the turntable.
- Set the switch to "ON" if connecting to a line-level input (e.g., AUX, CD) on your amplifier or directly to powered speakers. This activates the internal phono pre-ampлифиер.
- Set the switch to "OFF" if connecting to a dedicated "Phono" input on your amplifier. This bypasses the internal phono pre-amplifier, as your amplifier will provide the necessary RIAA equalization.

Image: The rear panel of the Argon Audio TT MK2 Turntable, showing the RCA output jacks, the RIAA (Phono/Line) switch, and the DC 12V power input.
6. Прикључак за напајање
Connect the supplied power adapter to the "DC IN 12V" port on the rear of the turntable, then plug the adapter into a wall outlet.
Упутство за употребу
1. Укључивање/искључивање
Use the power switch located on the rear panel to turn the turntable ON or OFF.
2. Selecting Playback Speed
The TT MK2 supports two playback speeds: 33 1/3 RPM for LPs and 45 RPM for singles. Use the speed selection knob on the top right of the turntable to switch between "33" and "45".
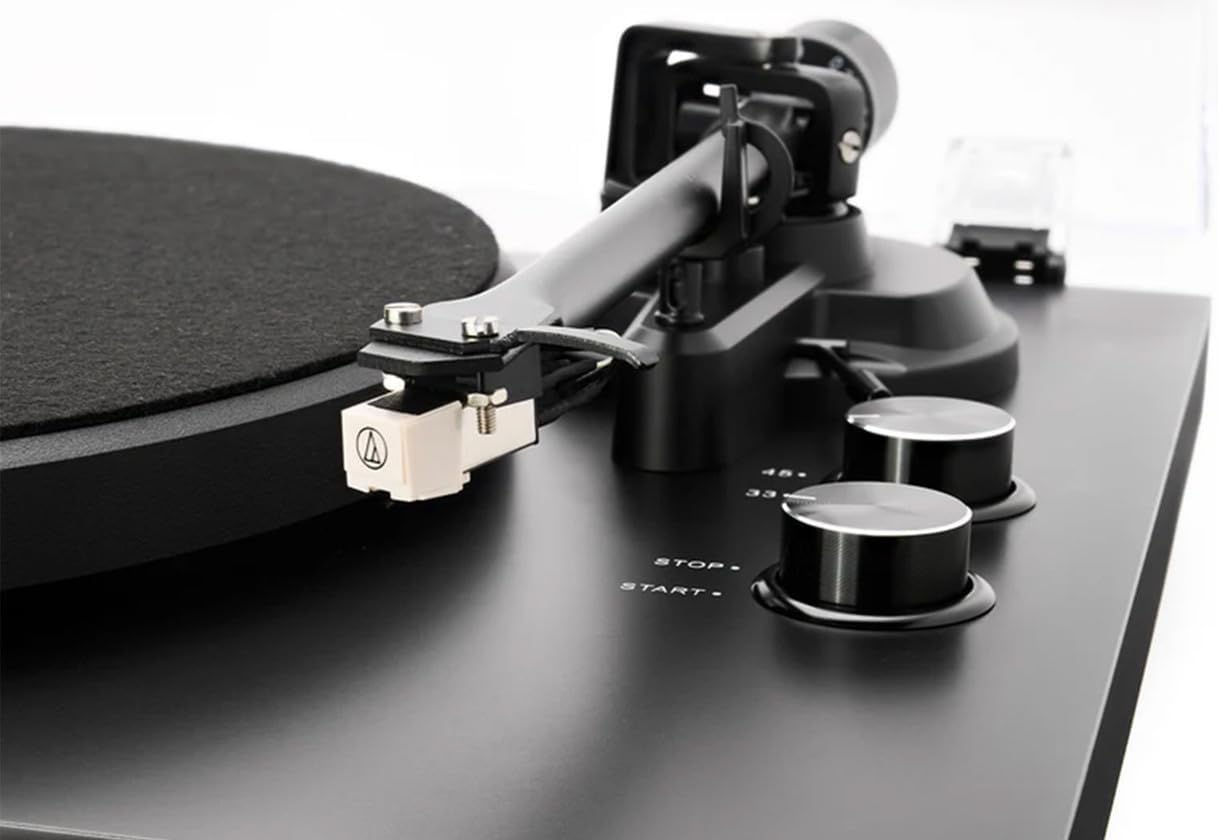
Image: A close-up of the Audio Technica AT3600 cartridge mounted on the tonearm, alongside the "STOP" and "START" buttons and the 33/45 RPM speed selection knob.
3. Репродукција плоче
- Поставите плочу на тањир, водећи рачуна да буде центрирана.
- Select the correct speed (33 or 45 RPM) using the speed knob.
- Press the "START" button. The platter will begin to rotate.
- Пажљиво подигните ручицу грамофона помоћу полуге за подешавање звука.
- Поставите ручицу грамофона преко жељеног почетног жлеба плоче.
- Slowly lower the cueing lever to gently drop the stylus onto the record.
4. Заустављање репродукције
- At the end of a record, the tonearm will not automatically return. Gently lift the tonearm using the cueing lever.
- Return the tonearm to its rest and secure it with the tonearm clip.
- Press the "STOP" button to halt platter rotation.
- Carefully remove the record.
Одржавање
1. Чишћење оловке
The stylus (needle) should be cleaned regularly to ensure optimal sound quality and prevent damage to your records. Use a soft brush designed for stylus cleaning, brushing gently from back to front (away from the cantilever).
2. Чишћење евиденције
Always handle records by their edges. Use a carbon fiber brush or a dedicated record cleaning solution and cloth to remove dust and debris before each play.
3. Чишћење грамофона
Обришите кућиште грамофона и поклопац за прашину меком, сувом крпом која не оставља влакна. За тврдокорне мрље, благоamp Може се користити крпа, а затим сува крпа. Избегавајте употребу јаких хемикалија или абразивних средстава за чишћење.
4. Нега заштитног поклопца
The dust cover protects your turntable from dust. When not in use, keep the dust cover closed. Clean it gently with a soft, damp cloth to avoid scratching the acrylic surface.
Решавање проблема
If you experience issues with your Argon Audio TT MK2 Turntable, please consult the following table before contacting support:
| Проблем | Могући узрок | Решење |
|---|---|---|
| Нема звука или је звук веома тих |
|
|
| Distorted or muffled sound |
|
|
| Плато се не окреће |
|
|
| Speed issues (too fast/slow) |
|
|
Спецификације
| Феатуре | Детаљ |
|---|---|
| Назив модела | ТТ МК2 |
| Бранд | Аргон Аудио |
| Димензије (Ш к Д к В) | 42 к 35 к 12 цм |
| Тежина артикла | 4.5 кг |
| Материјал | Engineered Wood, Aluminium |
| Боја | Црно |
| Цартридге | Audio Technica AT3600 (pre-fitted) |
| Пхоно Пре-amp | Built-in, switchable (RIAA ON/OFF) |
| Брзине ротације | 33 1/3 RPM, 45 RPM (electronic speed selection) |
| Повезивање | РЦА излаз |
| Укључене компоненте | Turntable, Audio Technica AT3600 Cartridge, Dust Lid, RCA Cable, Power Adapter |
| Произвођач | Аргон Аудио |
| Земља порекла | Данска |
Гаранција и подршка
Argon Audio products are designed and manufactured to the highest quality standards. This product is covered by a manufacturer's warranty. Please refer to the warranty card included with your product or visit the official Argon Audio webсајт за детаљне услове гаранције.
For technical support, troubleshooting assistance beyond this manual, or warranty claims, please contact your authorized Argon Audio dealer or Argon Audio customer service directly. Contact information can typically be found on the Argon Audio webсајту.
Ask a question about this manual
Ask about setup, troubleshooting, compatibility, parts, safety, or missing instructions. Manuals+ will review the question and use this page’s manual context to help answer it.