
1. Увод
The Biling 3W Solar Drip Irrigation System is a digital programmable smart watering kit designed to provide efficient and automated watering for up to 15 potted plants. Featuring a 3W high-efficiency solar panel and a built-in 2200mAh battery, this system operates continuously by intelligently switching between solar and battery power. This ensures reliable watering even on cloudy days, eliminating the need for external electricity. This manual provides detailed instructions for the proper setup, operation, and maintenance of your irrigation system.

Слика 1.1: Готовоview of the Biling 3W Solar Drip Irrigation System setup.
2. Садржај пакета
Молимо вас да проверите да ли су све доле наведене компоненте укључене у ваш пакет:
- КСНУМКС к Соларни панел
- 1 x Control Unit (with built-in 2200mAh battery)
- 1 x 15m Water Pipe
- 15 x Drippers
- 15 x Tee Connectors
- 1 x Water Level Sensor
- 1 x Anti-siphon Device
- 1 к филтер
- 1 x Ground Stake (for solar panel)
- Nails/Screws (for mounting control unit)
- Ties (for securing tubing)

Слика 2.1: Све компоненте укључене у пакет.
3. Упутства за подешавање
Follow these steps to set up your Biling Solar Drip Irrigation System:
- Prepare the Water Pipe: Cut the 15m water pipe to your desired lengths to reach each plant. Tip: Soaking the pipe ends in hot water for a few seconds can soften them, making connection easier.
- Install Anti-siphon Device: Connect the anti-siphon device to the outlet pipe of the control unit. This prevents water from continuously draining from your reservoir.
- Connect Pipes and Drippers: Use the Tee connectors to branch the main water pipe to individual plants. Attach a dripper to the end of each branch, positioning it near the base of the plant.
- Connect Water Level Sensor: Plug the water level sensor cable into the designated port on the control unit.
- Place Water Level Sensor and Filter: Submerge the water level sensor and filter into your water reservoir (e.g., a bucket or tank). Ensure the filter is fully immersed to prevent debris from entering the pump.
- Позиција соларног панела: Mount the solar panel in a location that receives maximum direct sunlight throughout the day. Use the provided ground stake or other suitable mounting method. Connect the solar panel cable to the control unit.
- Монтирај контролну јединицу: Secure the control unit in a convenient location, either by hanging it on a wall using the provided nails/screws or placing it on a stable surface.

Image 3.1: Step-by-step installation guide.

Слика 3.2: Примерample setup of the irrigation system in a greenhouse environment.
4. Упутство за употребу
The Biling Solar Drip Irrigation System features a digital controller for customizable watering schedules. Familiarize yourself with the control unit's interface:
- 1. Interval Time: Displays the frequency between watering cycles.
- 2. Watering Time: Displays the duration of each watering cycle.
- 3. '+': Button to increase numerical values during setting.
- 4. SET: Button to switch between interval and watering time settings. Long press for 3 seconds to turn the system on or off.
- 5. Out: Water Outlet port.
- 6. In: Water Inlet port.
- 7. Water detector connection cable: Port for the water level sensor.
- 8. Solar panel connection cable: Port for the solar panel.
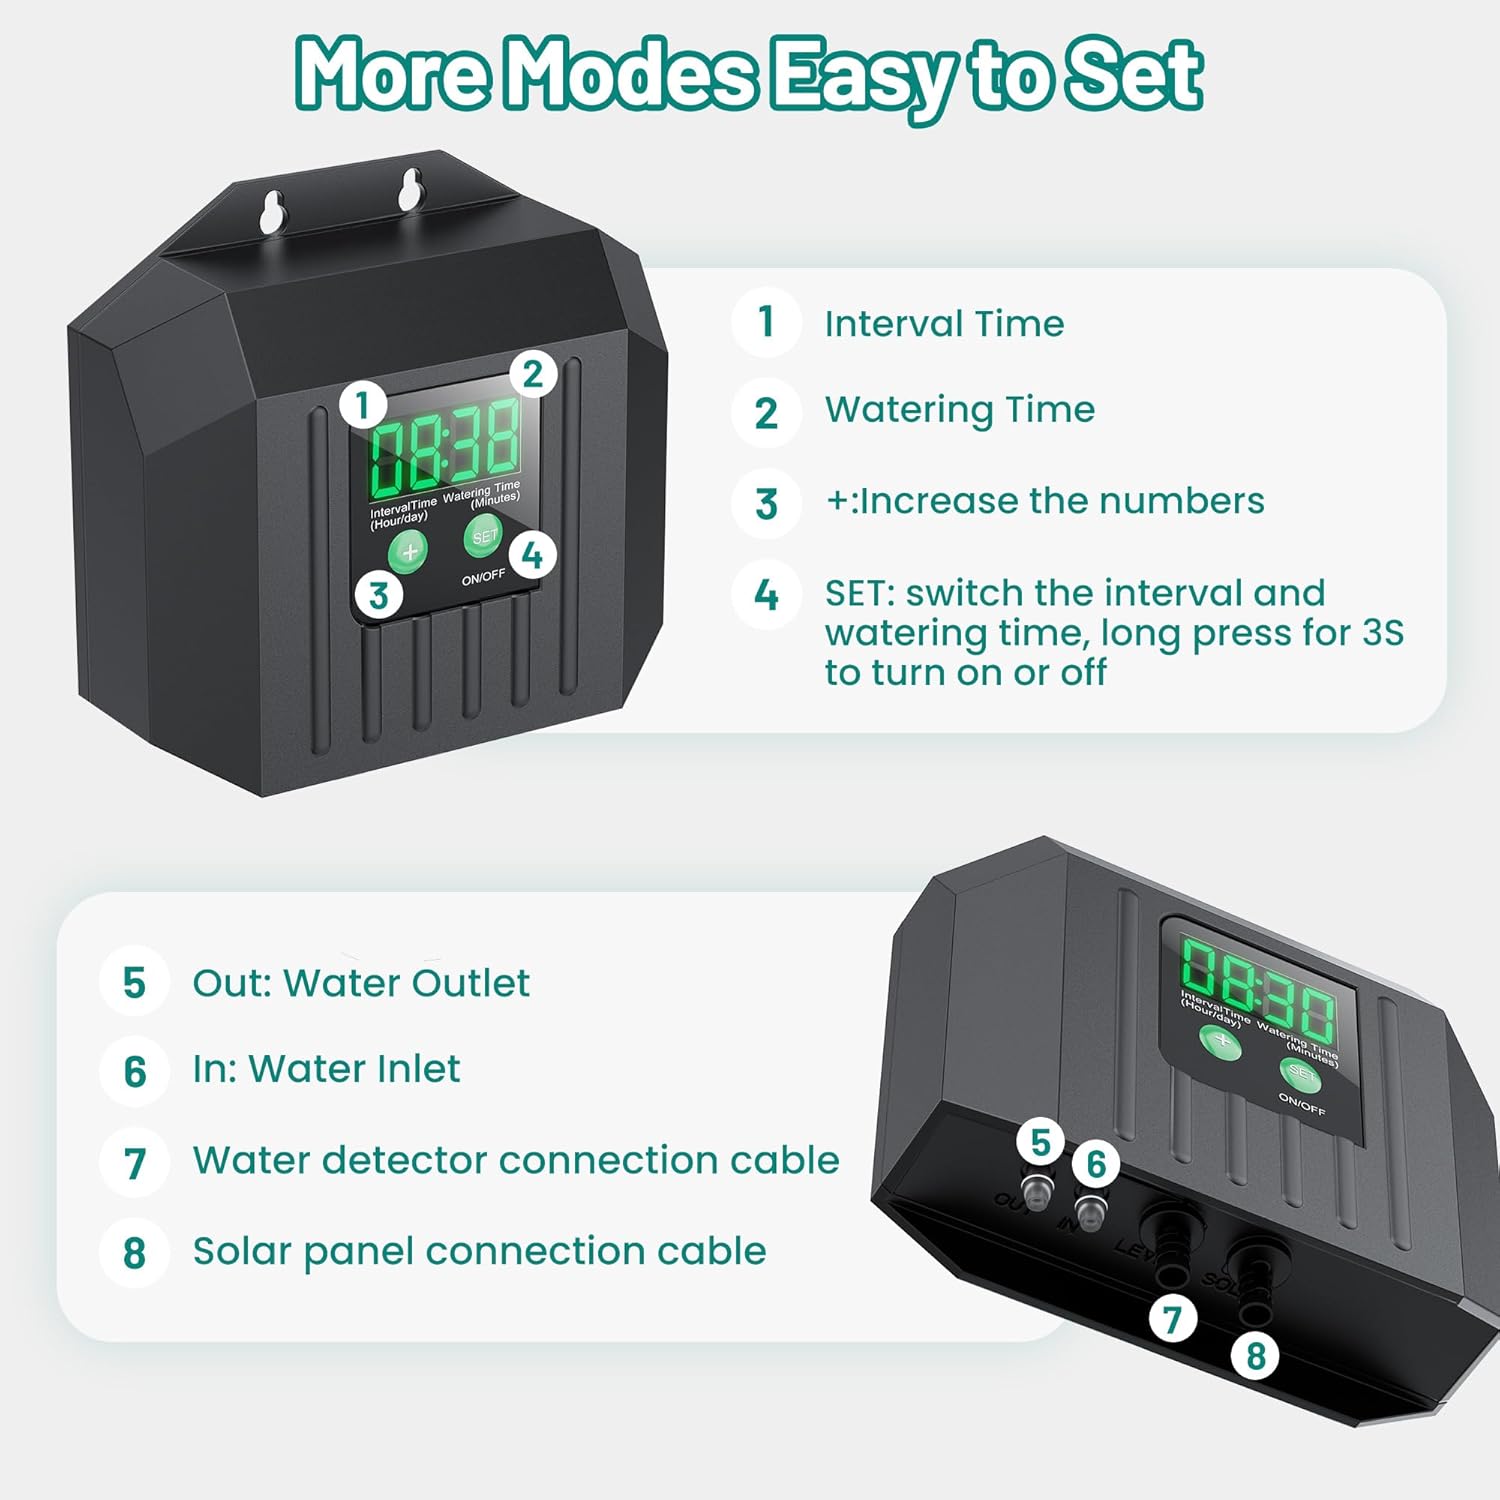
Image 4.1: Control unit interface and button functions.

Слика 4.2: Позади view of the control unit showing connection ports.
Setting the Watering Schedule:
- Укључи: Long press the "SET" button for 3 seconds to turn on the system.
- Set Interval Time: Press the "SET" button briefly to select the interval time setting. The display will show the current interval (e.g., '03H' for 3 hours, '1D' for 1 day). Use the "+" button to adjust the interval from 3 hours up to 7 days.
- Set Watering Time: Press the "SET" button again to select the watering time setting. The display will show the current watering duration (e.g., '01M' for 1 minute). Use the "+" button to adjust the watering time from 1 minute up to 30 minutes.
- Потврдите подешавања: The system will automatically save your settings after a few seconds of inactivity.

Image 4.3: Visual guide for setting interval and watering times.
The system will now operate according to your programmed schedule, providing precise irrigation to your plants.
5. Одржавање
Regular maintenance ensures the longevity and optimal performance of your irrigation system:
- Очисти филтер: Periodically check and clean the water filter to prevent clogging and ensure consistent water flow.
- Inspect Tubing and Connections: Regularly inspect all tubing and connections for leaks or blockages. Ensure all drippers are securely in place and delivering water as intended.
- Monitor Water Source: Ensure your water reservoir always has sufficient water. The water level sensor will alert you if the water level is low.
- Чишћење соларних панела: Keep the solar panel clean from dust, dirt, and debris to maximize charging efficiency.
- Зимовање (ако је применљиво): In freezing climates, disconnect and drain the system before winter to prevent damage from ice expansion. Store components in a dry, protected area.
КСНУМКС. Решавање проблема
If you encounter issues with your Biling Solar Drip Irrigation System, refer to the following common problems and solutions:
| Проблем | Могући узрок | Решење |
|---|---|---|
| System displays "Lo" error or shuts off quickly. | Низак ниво напуњености батерије. | Ensure solar panel is in direct sunlight for several hours to charge the battery. Check solar panel connection. |
| Нема протока воде или је проток слаб. | Clogged filter, kinked tubing, low water level in reservoir, or air in the pump. | Clean the filter. Check tubing for kinks or blockages. Refill water reservoir. Ensure pump is primed by submerging the inlet in water and running a short cycle. |
| Вода цури из прикључака. | Loose connections or improperly seated tubing. | Ensure all tubing is firmly pushed onto connectors. If tubing is stiff, try soaking ends in hot water before connecting. |
| Систем се не укључује. | System is off, or battery is completely depleted. | Long press the "SET" button for 3 seconds to turn on. Allow solar panel to charge the battery for a full day. |
7. Спецификације
- Назив модела: Biling 3W Solar Drip Irrigation System
- Снага: 3В соларни панел
- батерија: 2200 мАх (уграђено)
- Материјал: АБС
- Трајање заливања: 1 - 30 минута
- Watering Interval: 3 hours - 7 days
- Maximum Plants Supported: 15
- Број модела ставке: f29bd17c-388d-41e2-9032-a74646b415cb
- Димензије пакета: 9.72 к 8.23 к 2.2 инча
- Тежина артикла: 1.76 фунти
8. Гаранција и подршка
For warranty information or technical support, please contact Biling customer service through the retailer where the product was purchased. Please have your model number and purchase date available when contacting support.