1. Увод
This manual provides detailed instructions for the setup, operation, and maintenance of your ATTACK SHARK X8 Ultra Wireless Gaming Mouse. Designed for high-performance gaming, the X8 Ultra features a lightweight design, multiple connectivity options, and advanced sensor technology.

Слика 1.1: Врх view of the ATTACK SHARK X8 Ultra Wireless Gaming Mouse.
2. Садржај пакета
Проверите да ли су све ставке присутне у вашем пакету:
- ATTACK SHARK X8 Ultra Wireless Gaming Mouse
- 8K USB-C Receiver
- USB-A to USB-C Charging Cable (Paracord)
- Replacement Mouse Feet Skates
- Грип Тапе
- Кориснички приручник (овај документ)
3. Mouse Layout and Features
Familiarize yourself with the key components and features of your X8 Ultra mouse.

Слика 3.1: Готовоview of the X8 Ultra's internal components and external features.
- Леви/десни клик: Equipped with Omron micro switches for tactile feedback and durability.
- Точак за померање: Provides smooth scrolling with subtle tactile bumps.
- Бочна дугмад: Programmable buttons located on the left side for additional functions.
- Дугме ДПИ: Located on the underside of the mouse, allows cycling through preset DPI levels.
- Connectivity Switch: Located on the underside, allows switching between 2.4GHz wireless, Bluetooth, and wired modes.
- PAW3950MAX Sensor: High-precision optical sensor for accurate tracking.
- Nordic 52840 MCU: Advanced microcontroller for efficient performance and low latency.
- Nano-Ice Coating: Surface treatment designed to keep grip cool during extended use.
4. Водич за подешавање
4.1 Пуњење миша
- Connect the USB-C end of the charging cable to the mouse.
- Connect the USB-A end of the charging cable to an available USB port on your computer or a USB wall adapter.
- The mouse LED indicator will show charging status. A full charge provides up to 300 hours of intermittent use.
4.2 Повезивање миша
The X8 Ultra supports three connection modes: 2.4GHz Wireless, Bluetooth, and Wired USB.
2.4 ГХз бежични режим:
- Locate the 8K USB-C receiver.
- Укључите рисивер у слободан УСБ порт на рачунару.
- Set the connectivity switch on the underside of the mouse to the "2.4G" position.
- Миш би требало аутоматски да се повеже.

Image 4.1: The 8K USB-C receiver for 2.4GHz wireless connection.
Блуетоотх режим:
- Set the connectivity switch on the underside of the mouse to the "BT" position.
- На рачунару отворите подешавања за Bluetooth и потражите нове уређаје.
- Select "ATTACK SHARK X8 Ultra" from the list of available devices to pair.
Жичани УСБ режим:
- Connect the USB-C end of the charging cable to the mouse.
- Connect the USB-A end of the charging cable to an available USB port on your computer.
- Set the connectivity switch on the underside of the mouse to the "Wired" position.
- Миш ће функционисати као жични уређај и истовремено се пунити.
5. Упутство за употребу
5.1 ДПИ подешавање
The X8 Ultra features a PixArt PAW3950MAX sensor with adjustable DPI from 50 to 42,000. To change DPI settings:
- Press the DPI button on the underside of the mouse to cycle through preset DPI levels.
- The LED indicator on the mouse will change color to indicate the current DPI setting.
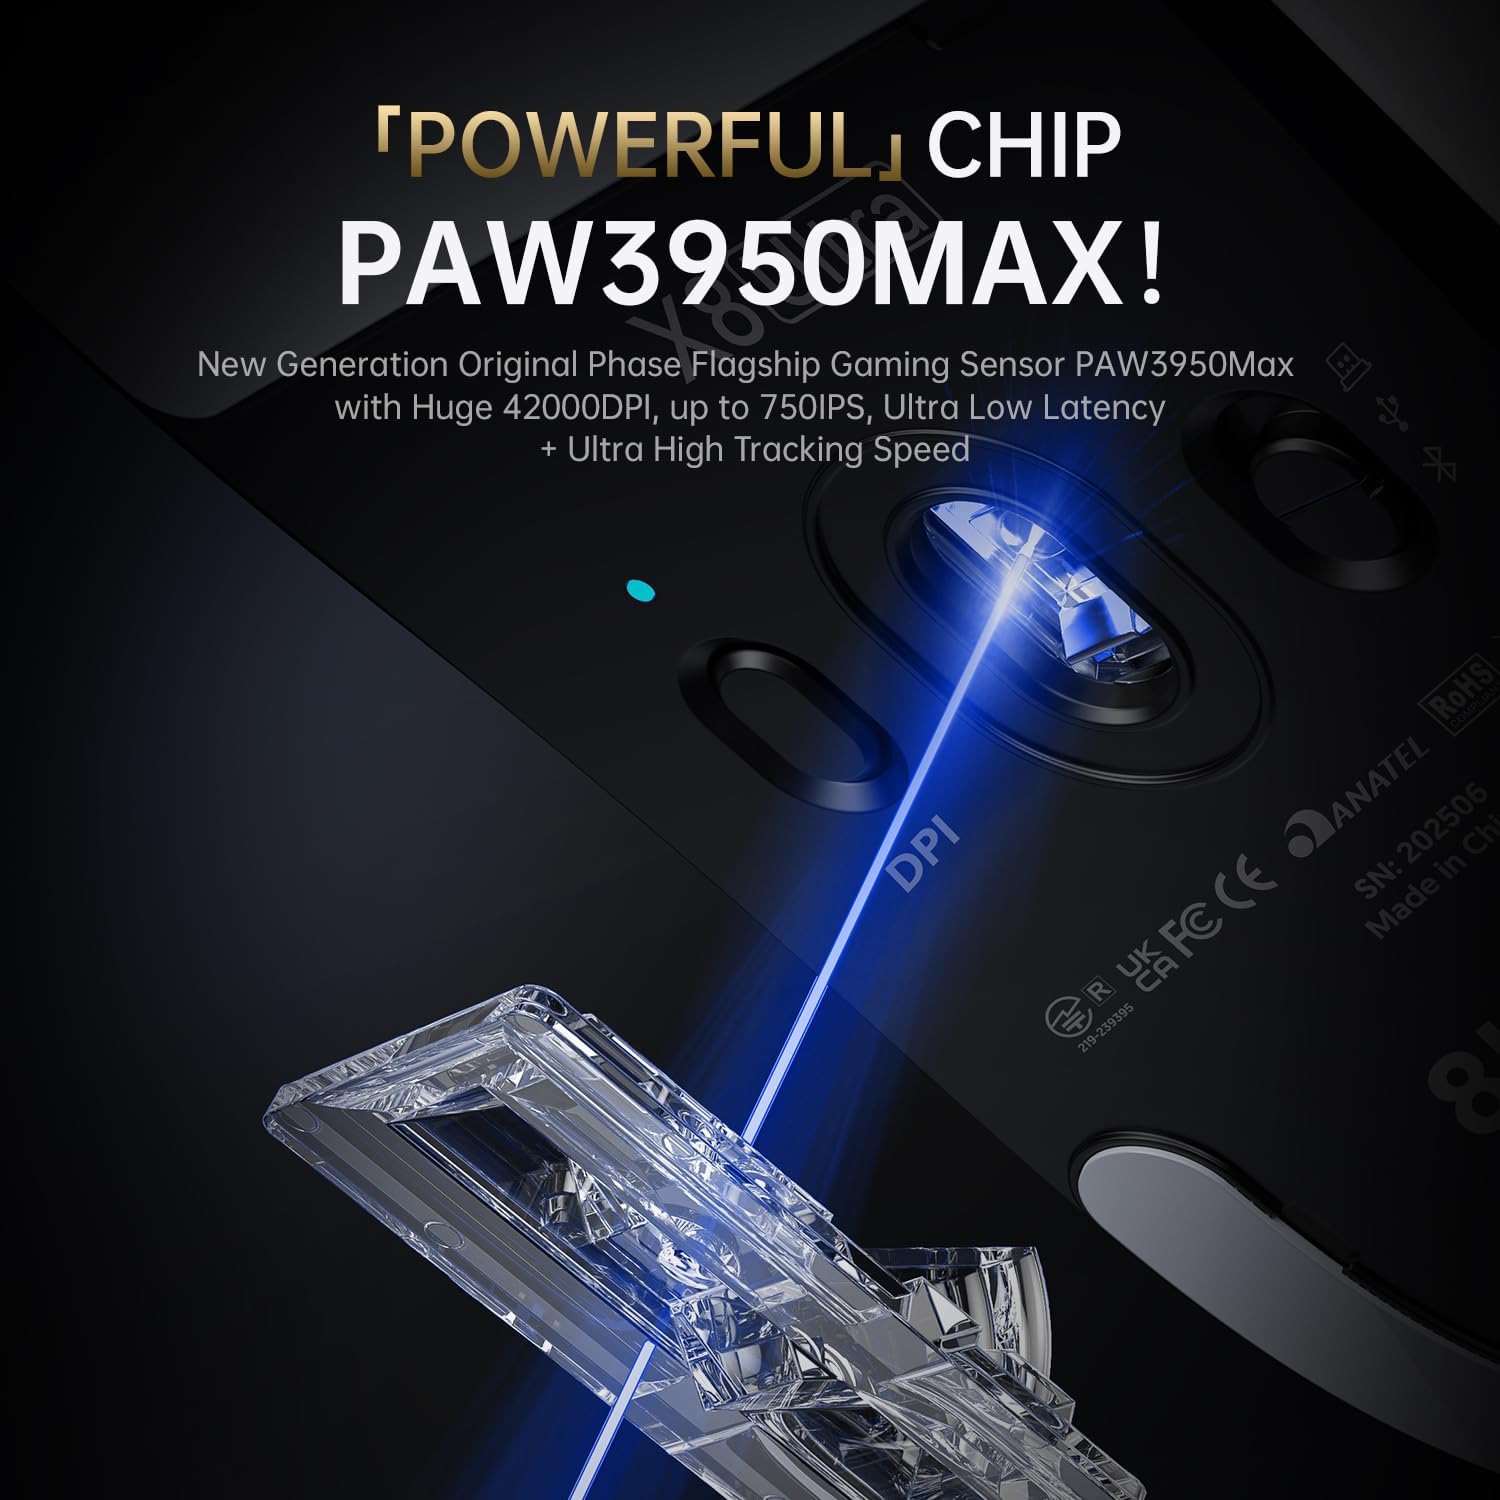
Image 5.1: The PixArt PAW3950MAX sensor for precise tracking.
5.2 Cloud Driver Software
For advanced customization, including DPI adjustment, polling rate, button remapping, macro recording, and competitive mode settings, use the web-based Cloud Driver software.
- Ensure your mouse is connected to your computer (preferably via 2.4GHz wireless or wired mode for full functionality).
- Отвори свој web browser and navigate to the official ATTACK SHARK webсајт (нпр. www.attackshark.pro).
- Locate the Cloud Driver section for the X8 Ultra model.
- Follow the on-screen instructions to customize your mouse settings. Settings are saved directly to the mouse's memory.

Image 5.2: The Cloud Driver interface for advanced mouse configuration.
5.3 Стопа анкетирања
The X8 Ultra supports an 8KHz wireless polling rate for ultra-low latency and faster response. In wired mode, it operates at 1KHz. The polling rate can be adjusted via the Cloud Driver software.

Image 5.3: Explanation of 8K Polling Rate technology.
6. Одржавање
6.1 Чишћење
- Користите меку, суву крпу да обришете површину миша.
- За тврдокорну прљавштину, благо дampи крпу са водом или благим раствором за чишћење.
- Avoid using harsh chemicals or abrasive materials that could damage the mouse's finish or sensor.
- Regularly clean the optical sensor area on the underside of the mouse with a cotton swab to ensure optimal tracking performance.
6.2 Одржавање батерије
- Да бисте продужили век трајања батерије, избегавајте често потпуно пражњење миша.
- Чувајте миш на хладном и сувом месту када га не користите дуже време.
- If the mouse will not be used for a long time, charge it to about 50% before storage.
6.3 Replacing Mouse Feet Skates
The package includes replacement PTFE mouse feet skates for maintaining smooth glide. When the existing skates show significant wear:
- Carefully peel off the old mouse feet using a thin tool.
- Clean the surface where the skates were attached to remove any adhesive residue.
- Peel the backing from the new skates and carefully apply them to the corresponding areas on the mouse's underside.
- Чврсто притисните да бисте осигурали правилно приањање.

Image 6.1: PTFE anti-slip footpads for smooth mouse movement.
КСНУМКС. Решавање проблема
| Проблем | Могуће решење |
|---|---|
| Миш не реагује у бежичном режиму. |
|
| Кашњење или повремена веза. |
|
| Inaccurate tracking. |
|
| Cloud Driver software not detecting mouse. |
|
8. Спецификације
Key technical specifications for the ATTACK SHARK X8 Ultra Wireless Gaming Mouse:

Image 8.1: Detailed technical specifications for the X8 Ultra and other X8 series models.
| Феатуре | Детаљ |
|---|---|
| Модел | Кс8 Ултра |
| Сензор | PixArt PAW3950MAX |
| DPI опсег | 50 - 42,000 DPI |
| Брзина кретања | КСНУМКС ИПС |
| Убрзање | 60Г |
| Буттон Лифеспан | 100 милиона кликова |
| Мицро Свитцх | Омрон Свитцх |
| Поллинг Рате | Wireless 8000Hz / Wired 1000Hz |
| МЦУ | Нордиц 52840 |
| Повезивање | Wired / 2.4GHz Wireless / Bluetooth |
| Тежина | 55г |
| Капацитет батерије | 500 мАх |
| Димензије | Приближно 125.5 к 63 к 40 мм (4.96 к 2.5 к 1.6 инча) |
9. Гаранција и подршка
ATTACK SHARK products are designed for reliability and performance. For warranty information, technical support, or service inquiries, please refer to the official ATTACK SHARK webсајт или директно контактирајте њихову корисничку службу.
Службено Webсајт: www.attackshark.pro
Продавница бренда: ATTACK SHARK Amazon Store
Сачувајте доказ о куповини за гаранцијске захтеве.