1. Увод
This manual provides detailed instructions for the setup, operation, and maintenance of your Urageuxy WiFi Weather Station. This device is designed to provide accurate, real-time weather data, including indoor and outdoor temperature, humidity, wind speed and direction, rainfall, UV index, light intensity, and barometric pressure. It features a 7-in-1 outdoor sensor and a clear VA type HD display console with Wi-Fi connectivity for data upload to online weather services.
2. Садржај пакета
Молимо вас да проверите да ли су све компоненте присутне пре него што наставите са инсталацијом:
- Дисплаи Цонсоле
- 7-in-1 Outdoor Sensor (includes rain gauge, anemometer, wind vane, solar panel, UV sensor, temperature, and humidity sensor)
- Mounting Pole and Hardware
- Power Adapter for Display Console
- Упутство за употребу (овај документ)
Note: 3x AAA batteries for the display console are not included and must be purchased separately.
3. Производ је готовview
3.1 Конзола за приказ
The display console provides a clear, color screen to view all collected weather data. It features buttons for settings, alarms, backlight adjustment, and channel selection.

Слика: Предња и задња страна view of the display console with labels for buttons, ports, and features like hanging holes and battery compartment.
The display shows outdoor temperature, outdoor humidity, sunshine intensity, UV index, rainfall, time, wind speed, wind direction, indoor temperature, indoor humidity, weather forecast, barometric pressure, moon phase, date, and week. It supports both desktop stand and wall-mount options.
3.2 7-у-1 спољни сензор
The outdoor sensor unit integrates multiple sensors to collect comprehensive weather data. It is designed for wireless transmission to the display console.

Image: Diagram of the 7-in-1 outdoor sensor, highlighting its components: Wind Cups, Wind Vane, Solar Panel, UV Sensor, Level Indicator, Antenna, Rain Collector, and Thermo-Hygrometer Radiation Shield.
The outdoor sensor includes a rain gauge, anemometer (wind cups), wind vane, solar panel for power, UV sensor, and a thermo-hygrometer for temperature and humidity readings. It transmits data wirelessly up to 328 feet (100 meters).
4. Подешавање
4.1 Outdoor Sensor Assembly
- Распакујте компоненте: Пажљиво уклоните све делове из паковања.
- Attach Wind Cups: Slide the wind cups onto the anemometer shaft until they click into place.
- Attach Wind Vane: Secure the wind vane to its designated shaft. Ensure it can rotate freely.
- Install Batteries (if applicable): The outdoor sensor is primarily solar-powered but may have a battery compartment for backup. Refer to the specific instructions for battery installation in the outdoor sensor if required.
4.2 Display Console Setup
- Укључено: Insert 3x AAA batteries (not included) into the battery compartment on the back of the display console. Alternatively, connect the provided power adapter to the console and a power outlet.
- Почетно покретање: The console will power on and begin searching for the outdoor sensor.

Image: Illustration showing the two power supply modes for the display console: via power adapter or 3x AAA batteries.
4.3 Упаривање сензора
The display console and outdoor sensor should pair automatically upon initial power-up. If pairing does not occur:
- Ensure both units are powered on and within range (up to 328ft/100m).
- Press and hold the 'CHANNEL' or 'SEARCH' button on the display console (refer to the console diagram for exact button).
- Reset the outdoor sensor by pressing its reset button (usually a small pinhole).
- The console should then detect and display data from the outdoor sensor.
4.4 Ви-Фи конфигурација
To enable data upload to Weather Underground, PWS Weather, and Weather Cloud:
- Ensure your display console is powered on.
- Access the Wi-Fi settings menu on the display console (refer to the manual for specific button presses, typically involving the 'SET' button).
- Connect the console to your 2.4G Wi-Fi router. Follow the on-screen prompts to enter your network name (SSID) and password.
- Once connected, the Wi-Fi icon on the display will become stable.
- Register your weather station on the desired online weather services (Weather Underground, PWS Weather, Weather Cloud) using the station ID and key provided by your console or in the full manual.
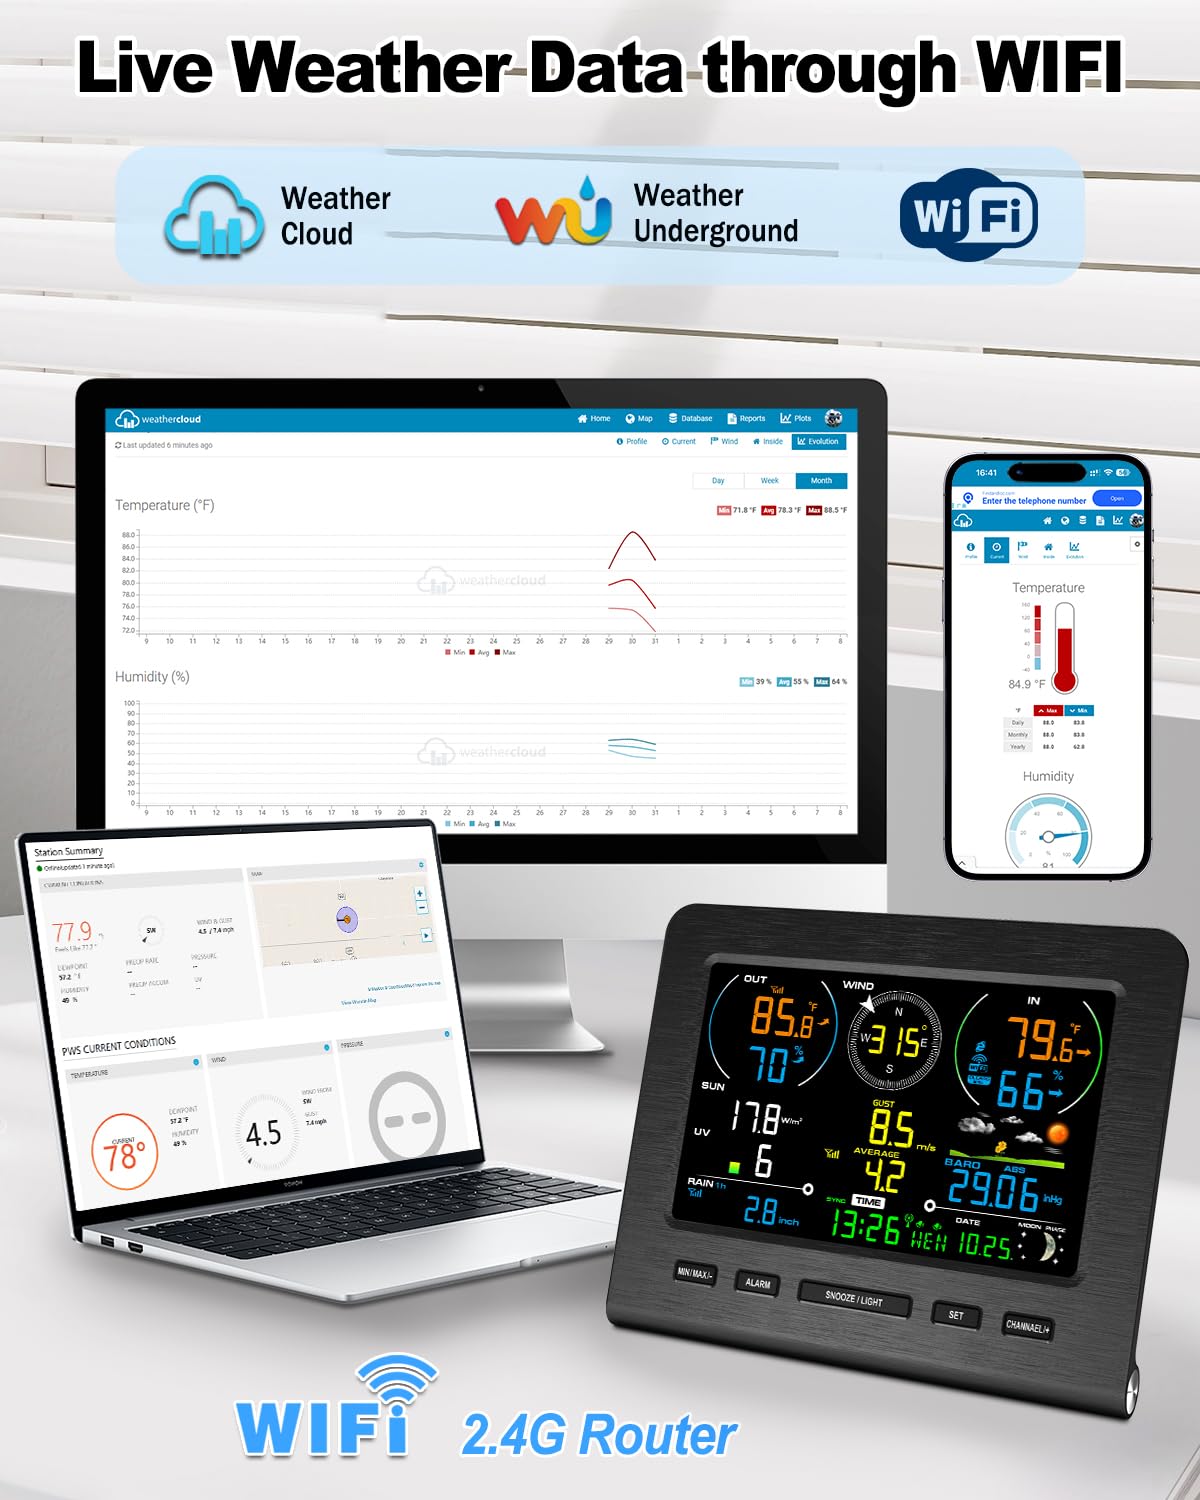
Image: The display console showing live weather data, with illustrations of a laptop and smartphone accessing Weather Cloud and Weather Underground via Wi-Fi.
4.5 Mounting the Outdoor Sensor
Proper placement of the outdoor sensor is crucial for accurate readings:
- Локација: Choose an open area, away from obstructions like buildings, trees, or fences, which could interfere with wind, rain, or sunlight readings.
- Висина: Mount the sensor at a height that allows for accurate wind speed and direction measurement, typically 5-10 feet (1.5-3 meters) above ground.
- Ниво: Use the built-in level indicator on the sensor to ensure it is perfectly horizontal. This is critical for accurate rain gauge readings.
- Оријентација: Ensure the wind vane is oriented correctly (e.g., facing North) as per the instructions in the full manual.
- Сигурна монтажа: Use the provided mounting pole and hardware to securely attach the sensor to a sturdy post or fence.

Слика: прamples of the outdoor sensor mounted in a garden, on a farm, and near a home, demonstrating its wireless transmission range.
5. Упутство за употребу
5.1 Приказ прекоview
The display console presents various weather parameters. Familiarize yourself with the layout:
- Подаци на отвореном: Temperature, Humidity, Wind Speed/Direction, Rainfall, UV Index, Light Intensity.
- Подаци о затвореном простору: Temperature, Humidity.
- Прогноза: Weather forecast icons (Sunny, Cloudy, Partly Cloudy, Rainy) based on barometric pressure trends.
- Време и датум: Current time, date, and moon phase.
- Остало: Barometric Pressure, Feels-like temperature, Dew Point.
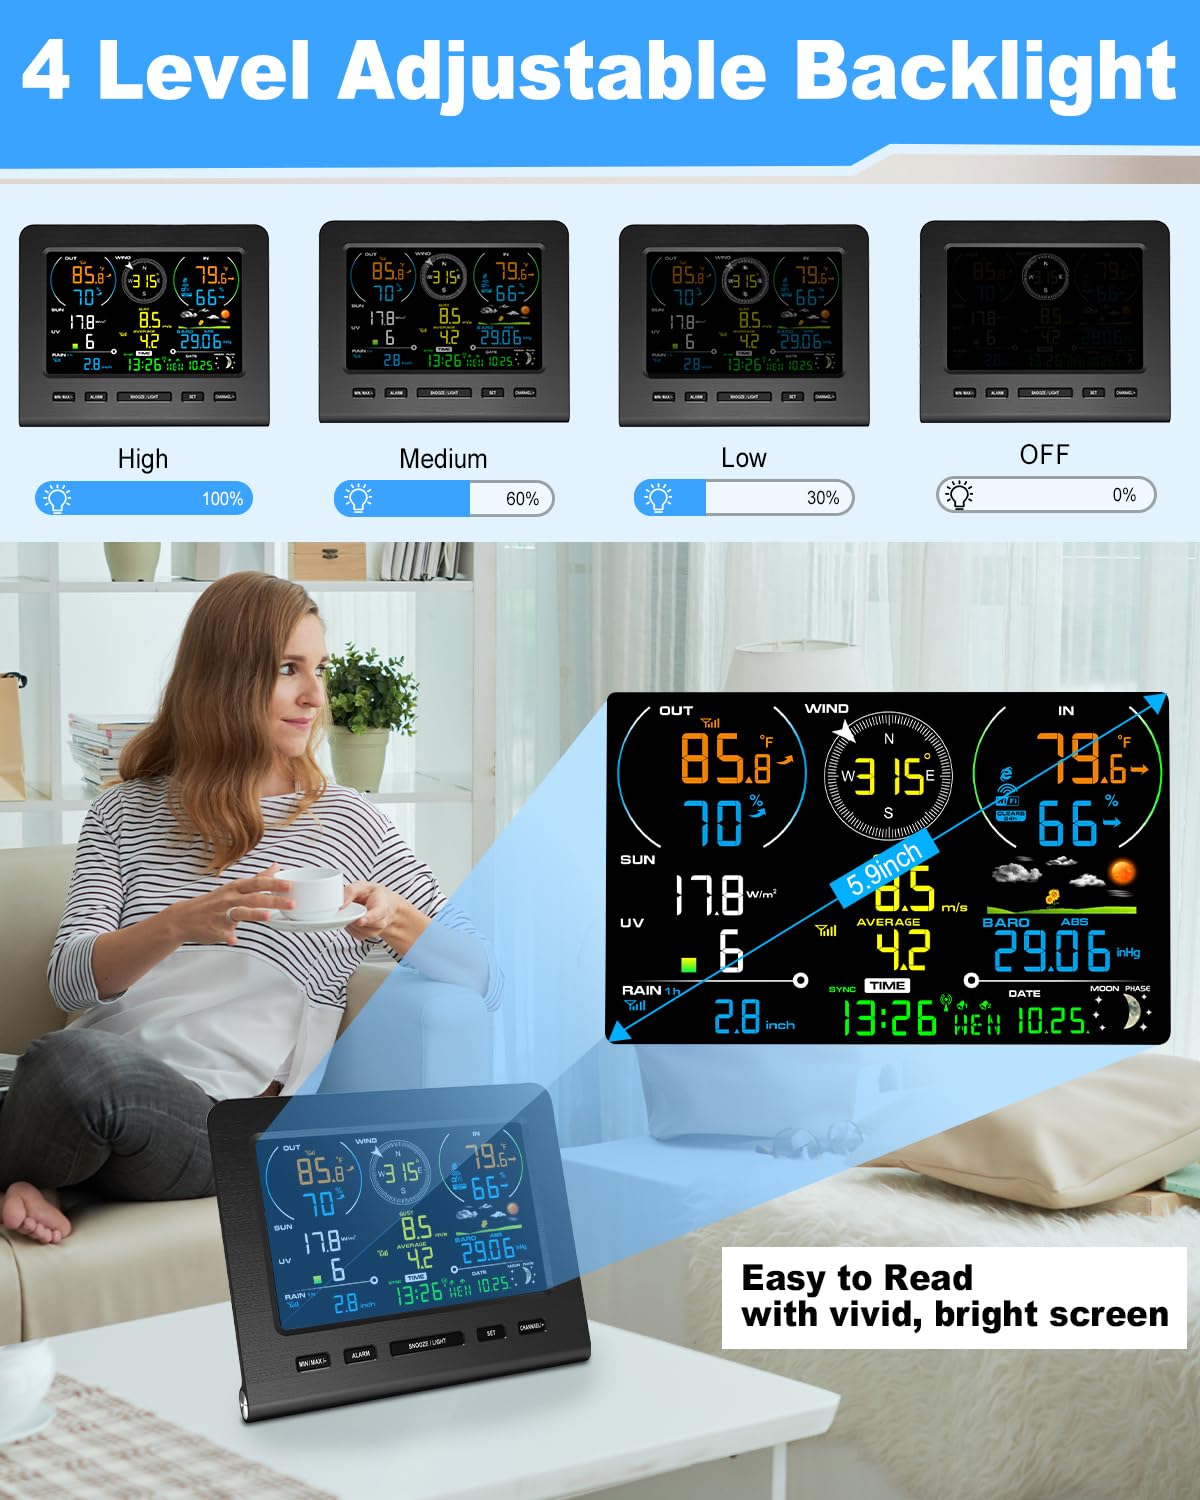
Image: The display console showing a comprehensive view of indoor and outdoor weather data, including temperature, humidity, wind, rain, UV, and forecast.
5.2 Подешавање позадинског осветљења
The display console features 4 levels of backlight brightness adjustment:
- високо (100%)
- средњи (60%)
- ниско (30%)
- Искључено (0%)
Press the 'LIGHT' button on the console to cycle through the brightness levels.

Image: The display console demonstrating its four adjustable backlight levels: High, Medium, Low, and Off, for optimal viewинг у различитим условима осветљења.
5.3 Viewинг Дата
- Current Data: All primary data is displayed continuously.
- Мин/Макс рекорди: Press the 'MAX/MIN' button to view daily or historical maximum and minimum values for various parameters.
- Историјски подаци: If connected to Wi-Fi, detailed historical data can be accessed via the online weather services.
5.4 Упозорења
The weather station supports customizable alerts for various weather conditions:
- Упозорења о температури: Set high/low temperature thresholds for indoor and outdoor readings.
- Humidity Alerts: Set high/low humidity thresholds.
- Упозорења о брзини ветра: Set a maximum wind speed threshold.
- Rainfall Alerts: Set a rainfall threshold for a specific period.
To set alerts, press and hold the 'ALARM' button and follow the on-screen instructions. An audible alarm and/or flashing icon will indicate when a set threshold is met.
5.5 Подешавања времена и датума
The weather station typically synchronizes time and date automatically via Wi-Fi or an atomic clock signal. If manual adjustment is needed:
- Press and hold the 'SET' button to enter time/date setting mode.
- Use the '+' or '-' buttons (or similar navigation buttons) to adjust values.
- Press 'SET' again to confirm each setting and move to the next parameter.
6. Одржавање
6.1 Замена батерије
- Дисплаи Цонсоле: Replace 3x AAA batteries when the low battery indicator appears on the screen. Ensure correct polarity.
- Спољни сензор: While primarily solar-powered, if your model includes backup batteries, replace them as indicated by the console's low battery warning for the outdoor sensor.
6.2 Чишћење сензора
- Сакупљач кише: Periodically check and clean the rain collector funnel to remove leaves, insects, or debris that could obstruct accurate rainfall measurement.
- Wind Cups & Vane: Ensure the wind cups and vane rotate freely. Remove any obstructions.
- Соларни панел: Keep the solar panel clean to ensure efficient charging. Wipe gently with a soft, damp тканина.
6.3 T/H Sensor Replacement
The thermo-hygrometer (T/H) sensor is a replaceable component. If temperature or humidity readings become inaccurate, it may need replacement.

Image: Step-by-step diagram illustrating the removal of the old T/H sensor and installation of a new one in the outdoor unit.
- Carefully unscrew and remove the old T/H sensor from its housing in the outdoor unit.
- Insert the new T/H sensor, ensuring it is properly seated and secured.
- The display console should automatically detect the new sensor.
КСНУМКС. Решавање проблема
| Проблем | Могући узрок | Решење |
|---|---|---|
| No outdoor data on display. | Outdoor sensor not powered, out of range, or not paired. | Check outdoor sensor batteries/solar panel. Move sensor closer to console. Re-pair sensor (Section 4.3). |
| Inaccurate rain readings. | Rain collector obstructed or sensor not level. | Clean rain collector. Ensure outdoor sensor is mounted level (Section 4.5). |
| Inaccurate wind readings. | Wind cups/vane obstructed or sensor not in an open area. | Clear obstructions. Relocate sensor to a more open area (Section 4.5). |
| Проблеми са Wi-Fi везом. | Incorrect Wi-Fi password, 5G network, or weak signal. | Verify password. Ensure connection to a 2.4G Wi-Fi network. Move console closer to router. |
| Екран је туман или празан. | Low batteries or power adapter issue. Backlight set to 'Off'. | Replace AAA batteries or check power adapter connection. Adjust backlight (Section 5.2). |
8. Спецификације
| Параметар | Домет | Прецизност | Резолуција |
|---|---|---|---|
| Собна температура | 0 до 60°Ц (32 до 140°Ф) | ± 1°Ц (± 2°Ф) | 0.1°Ц/°Ф |
| Оутдоор Температуре | -40 до 60°Ц (-40 до 140°Ф) | ± 1°Ц (± 2°Ф) | 0.1°Ц/°Ф |
| Индоор Хумидити | 10 до 99% | ± 5% (between 20-90%) | 1% |
| Оутдоор Хумидити | 10 до 99% | ± 5% (between 20-90%) | 1% |
| УВ индекс | 1 до 15+ | ± 1 | ± 1 |
| Киша | 0 до 9999 мм | ± 1mm (<15mm), ± 7% (>15mm) | 0.3mm (<1000mm), 1mm (>1000mm) |
| Винд Дирецтион | 0 - 360° | ± 10° (компас од 8 тачака) | 1° (8 point compass) |
| Брзина ветра | 0 до 50 м/с | ± 0.3m/s (2-10m/s), ± 10% (>10m/s) | 0.1 м/с |
| Барометарски притисак | 300 до 1100 хпа | ± 3 хпа | 0.1 хпа |
| Сунчева светлост | 0 до 200клук | ± 15% | ± 15% |

Image: Detailed table outlining the measurement specifications, including range, accuracy, and resolution for indoor/outdoor temperature, humidity, UV index, rain, wind direction, wind speed, barometric pressure, and sunlight.
- Димензије производа: 0.7"D x 6.5"W x 5.32"H (Display Console)
- Материјал: акрилонитрил бутадиен стирен (АБС)
- Повезивање: Wi-Fi (2.4G router support)
- Домет бежичне мреже: Up to 328ft (100m) between sensor and console
- Извор напајања: Display Console: Power Adapter (included) or 3x AAA batteries (not included); Outdoor Sensor: Solar Powered with backup.
9. Гаранција и подршка
Urageuxy products are designed for reliability and performance. For warranty information, please refer to the warranty card included in your product packaging or contact Urageuxy customer support directly.
If you encounter any issues or have questions regarding your Urageuxy WiFi Weather Station, please contact our customer support team:
- Подршка на мрежи: Visit the official Urageuxy webсајт за често постављана питања и ресурсе за подршку.
- Подршка путем е-поште: Погледајте паковање производа или званична упутства webсајт за адресу е-поште корисничке службе.
Please have your model number (NEWWS0365-UC) and purchase date ready when contacting support.