
1. Увод
This manual provides detailed instructions for the installation, operation, and maintenance of your plplaaoo 100A MPPT Solar Charge Controller. This advanced controller is designed to optimize energy harvest from your solar panels and manage battery charging efficiently for 12V, 24V, 36V, and 48V solar power systems. Please read this manual thoroughly before installation and use to ensure proper function and safety.
2. Безбедносна упутства
Please observe the following safety precautions during installation and operation:
- Ensure all wiring is correctly connected and securely fastened to prevent loose connections and overheating.
- Увек искључите соларни панел и батерију пре инсталирања или подешавања контролера.
- Use appropriate tools and wear protective gear, including eye protection, during installation.
- Install the controller in a well-ventilated area, away from flammable gases and liquids.
- Do not disassemble or attempt to repair the controller yourself. Contact qualified personnel for service.
- Ensure the battery bank is properly sized and compatible with the controller's voltagе и тренутне оцене.
- Avoid short-circuiting the solar panel, battery, or load terminals.
3. Карактеристике производа
- Maximum Power Point Tracking (MPPT): Achieves up to 98% conversion efficiency by intelligently tracking the maximum power point of solar panels under varying conditions.
- Аутоматиц Волtagе Адаптација: Automatically detects and adapts to 12V, 24V, 36V, or 48V battery systems.
- Multifunctional Control: Supports various operating modes including PWM charging, constant current output, and voltage regulacija.
- Integrated USB and DC Outputs: Features dual 5V 1A USB ports and a 2A DC output for charging external devices.
- Свеобухватна заштита: Includes safeguards against overvoltage, overcurrent, overtemperature, overload, short circuits, and reverse polarity.
- Интерфејс прилагођен кориснику: Equipped with a backlit LCD display for real-time monitoring and intuitive buttons for configuration.
- Издржљива конструкција: Features an aluminum heatsink for efficient cooling and robust design for harsh environments (0°C to 60°C).
- Компатибилност батерија: Compatible with gel, sealed lead-acid, and lithium batteries.
4. Садржај пакета
- 1 x plplaaoo 100A MPPT Solar Charge Controller
- 1 к Упутство за употребу
5. Производ је готовview и компоненте
Familiarize yourself with the main components and interface of the solar charge controller.

Слика 5.1: Фронт view of the solar charge controller, highlighting the LCD screen and various connection terminals.
The controller features an intuitive LCD display and clearly labeled ports for easy connection. The display provides real-time information about the system's status.
Слика 5.2: Детаљно view of the controller's connection ports.

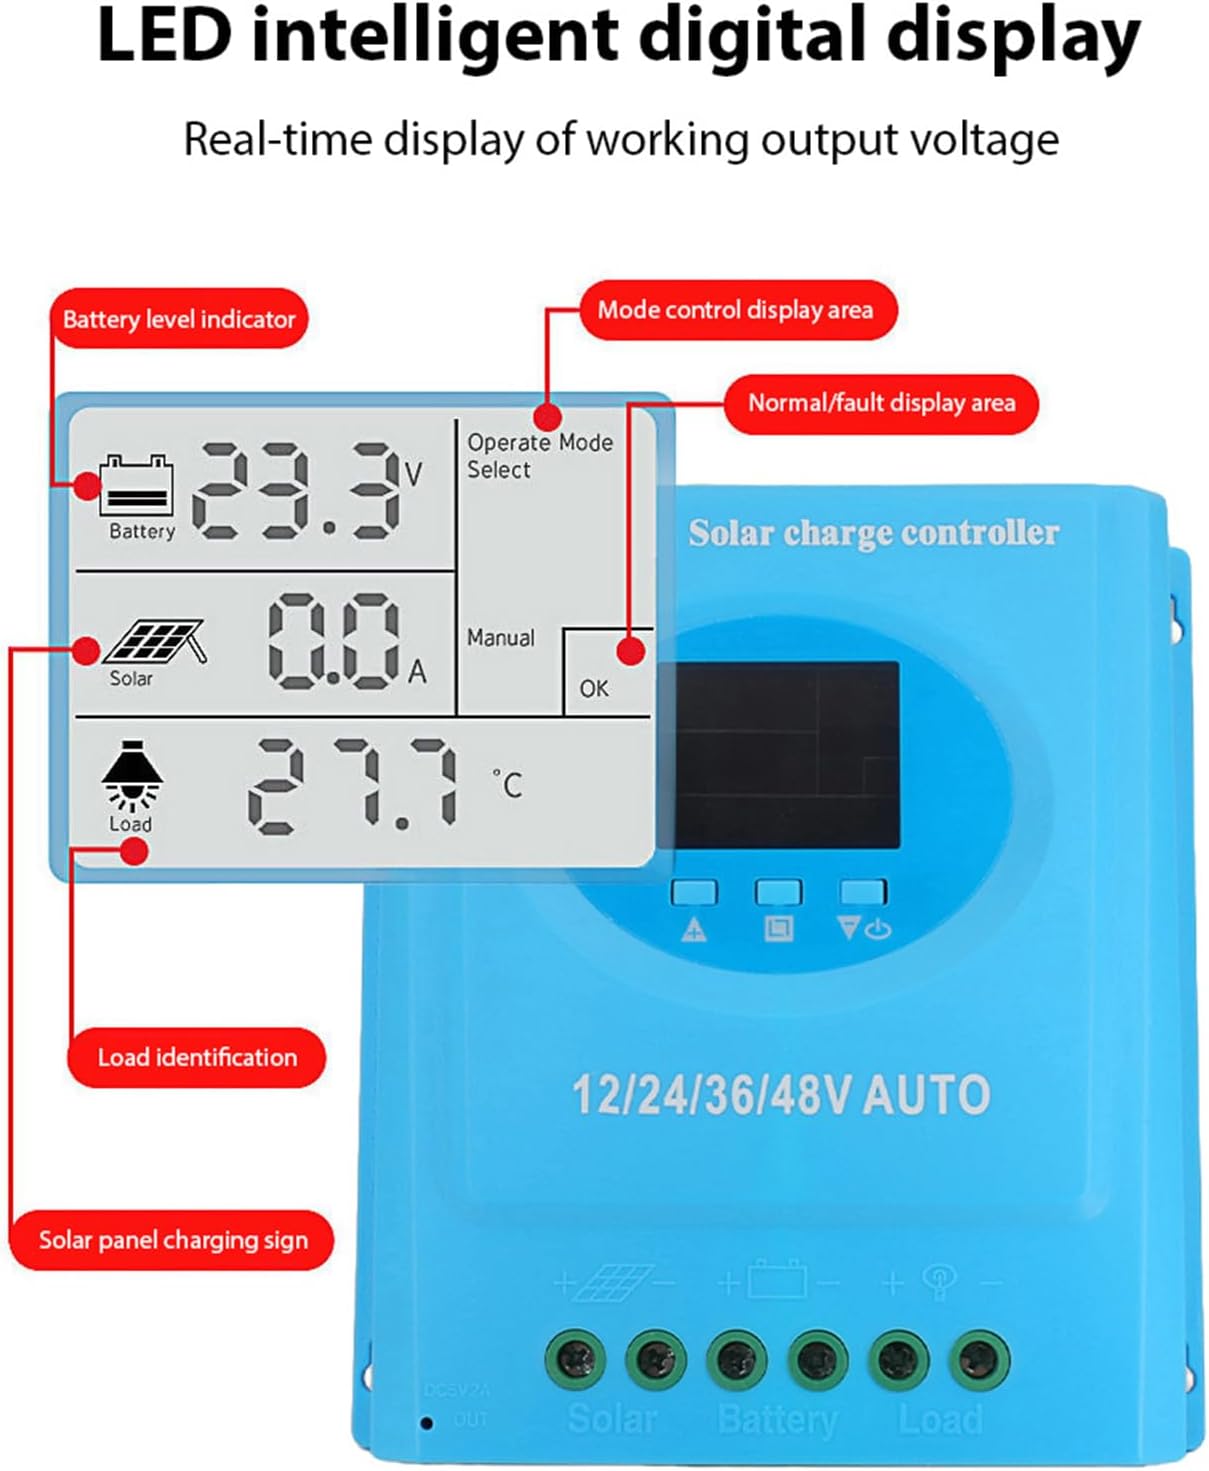
Слика 5.3: Детаљно view of the LCD display, indicating battery level, solar panel charging sign, load identification, operating mode, and real-time voltage.
5.1. Connection Ports
- Двоструки УСБ интерфејс: Two 5V 1A USB ports for charging mobile devices.
- Solar Panel Port: Connects to your solar panels (positive and negative).
- Порт за батерију: Connects to your battery bank (positive and negative).
- DC Load Port: Connects to your DC loads (positive and negative).
- ДЦ излазни порт: Additional DC output.
6. Подешавање и инсталација
Follow these steps for proper installation of the solar charge controller. Ensure all power sources are disconnected before beginning.
6.1. Метода ожичења
Connect the components in the following order to prevent damage:
- Повежите батерију: Connect the battery to the controller's battery terminals (positive to positive, negative to negative). The controller will automatically detect the battery voltage.
- Повежите соларну плочу: Connect the solar panel to the controller's solar panel terminals (positive to positive, negative to negative).
- Повежите једносмерно оптерећење: Connect the DC load to the controller's load terminals (positive to positive, negative to negative).
Важно: Увек прво повежите батерију, затим соларни панел, и на крају оптерећење. Искључите обрнутим редоследом.

Слика 6.1: Solar energy system wiring diagram. Note the correct polarity for all connections.
6.2. Монтажа
Mount the controller vertically on a flat surface in a well-ventilated area, ensuring adequate clearance for air circulation around the heatsink. Avoid direct sunlight, high temperatures, and humid environments.
7. Упутство за употребу
Once installed, the controller will automatically begin operating. The LCD display provides real-time system status.
7.1. Информације о ЛЦД екрану
The LCD screen displays various parameters:
- Индикатор нивоа батерије: Shows the current charge status of the battery.
- Solar Panel Charging Sign: Indicates when the solar panels are actively charging the battery.
- Load Identification: Shows the status of the connected DC load.
- Operating Mode Display Area: Приказује тренутни режим рада (нпр. ручни, аутоматски).
- Normal/Fault Display Area: Indicates normal operation or displays error codes if a fault occurs.
- Real-time Working Output Voltage: Приказује тренутну јачину звукаtage sistema.
7.2. Функције дугмета
The controller typically features multiple buttons for navigation and setting adjustments:
- Дугме менија: Used to enter and exit the menu settings.
- Дугмад за горе/доле: Користи се за навигацију кроз опције менија и подешавање вредности параметара.
- Дугме ОК: Used to confirm selections and save settings.
Refer to the on-screen menu for specific parameter adjustments such as battery type, load control mode, and charging thresholds.
8. Одржавање
Regular maintenance ensures optimal performance and longevity of your solar charge controller.
- Чишћење: Периодично чистите спољашњост контролера сувом крпом да бисте уклонили прашину и прљавштину. Уверите се да су вентилациони отвори чисти.
- Провера везе: Annually inspect all wiring connections for tightness and corrosion. Re-tighten if necessary.
- Провера животне средине: Ensure the installation environment remains within the specified operating temperature range and is free from excessive moisture or dust.
- Инспекција батерије: Regularly check the battery terminals for corrosion and ensure the battery is in good condition.
КСНУМКС. Решавање проблема
If you encounter issues with your solar charge controller, refer to the following common problems and solutions:
| Проблем | Могући узрок | Решење |
|---|---|---|
| Controller not powering on / LCD blank |
|
|
| Батерија се не пуни |
|
|
| Учитавање не ради |
|
|
| Приказан је код грешке | Специфична системска грешка. | Refer to the controller's display for the specific error code and consult the full product documentation or contact support for detailed interpretation and resolution. |
10. Спецификације
| Параметар | Валуе |
|---|---|
| Модел | plplaaoozi6egog4wm-0A |
| Бранд | плплааоо |
| Називна струја | 100А |
| Систем Волtage | 12V / 24V / 36V / 48V Automatic Adaptation |
| Цхаргинг Типе | MPPT (Праћење максималне тачке снаге) |
| Ефикасност конверзије | до 98% |
| УСБ излаз | Dual 5V 1A ports |
| ДЦ излаз | 2A |
| Радна температура | 0°Ц до 60°Ц |
| Димензије (приближно) | 19.5 цм к 18.3 цм к 6.8 цм (7.7 ин к 7.2 ин к 2.7 ин) |

Слика 10.1: Approximate dimensions of the solar charge controller.
11. Гаранција и подршка
За информације о гаранцији, техничку подршку или упите у вези са сервисирањем, обратите се продавцу или директно произвођачу. Сачувајте рачун као доказ о куповини.