1. Производ је готовview
The MONTECH HyperFlow Digital 240 CPU Liquid Cooler is an all-in-one (AIO) liquid cooling solution designed for efficient heat dissipation in computer systems. It features a powerful pump, two 120mm E28 ARGB fans, and a real-time digital display for monitoring CPU and GPU temperatures. This cooler is compatible with various Intel and AMD platforms.
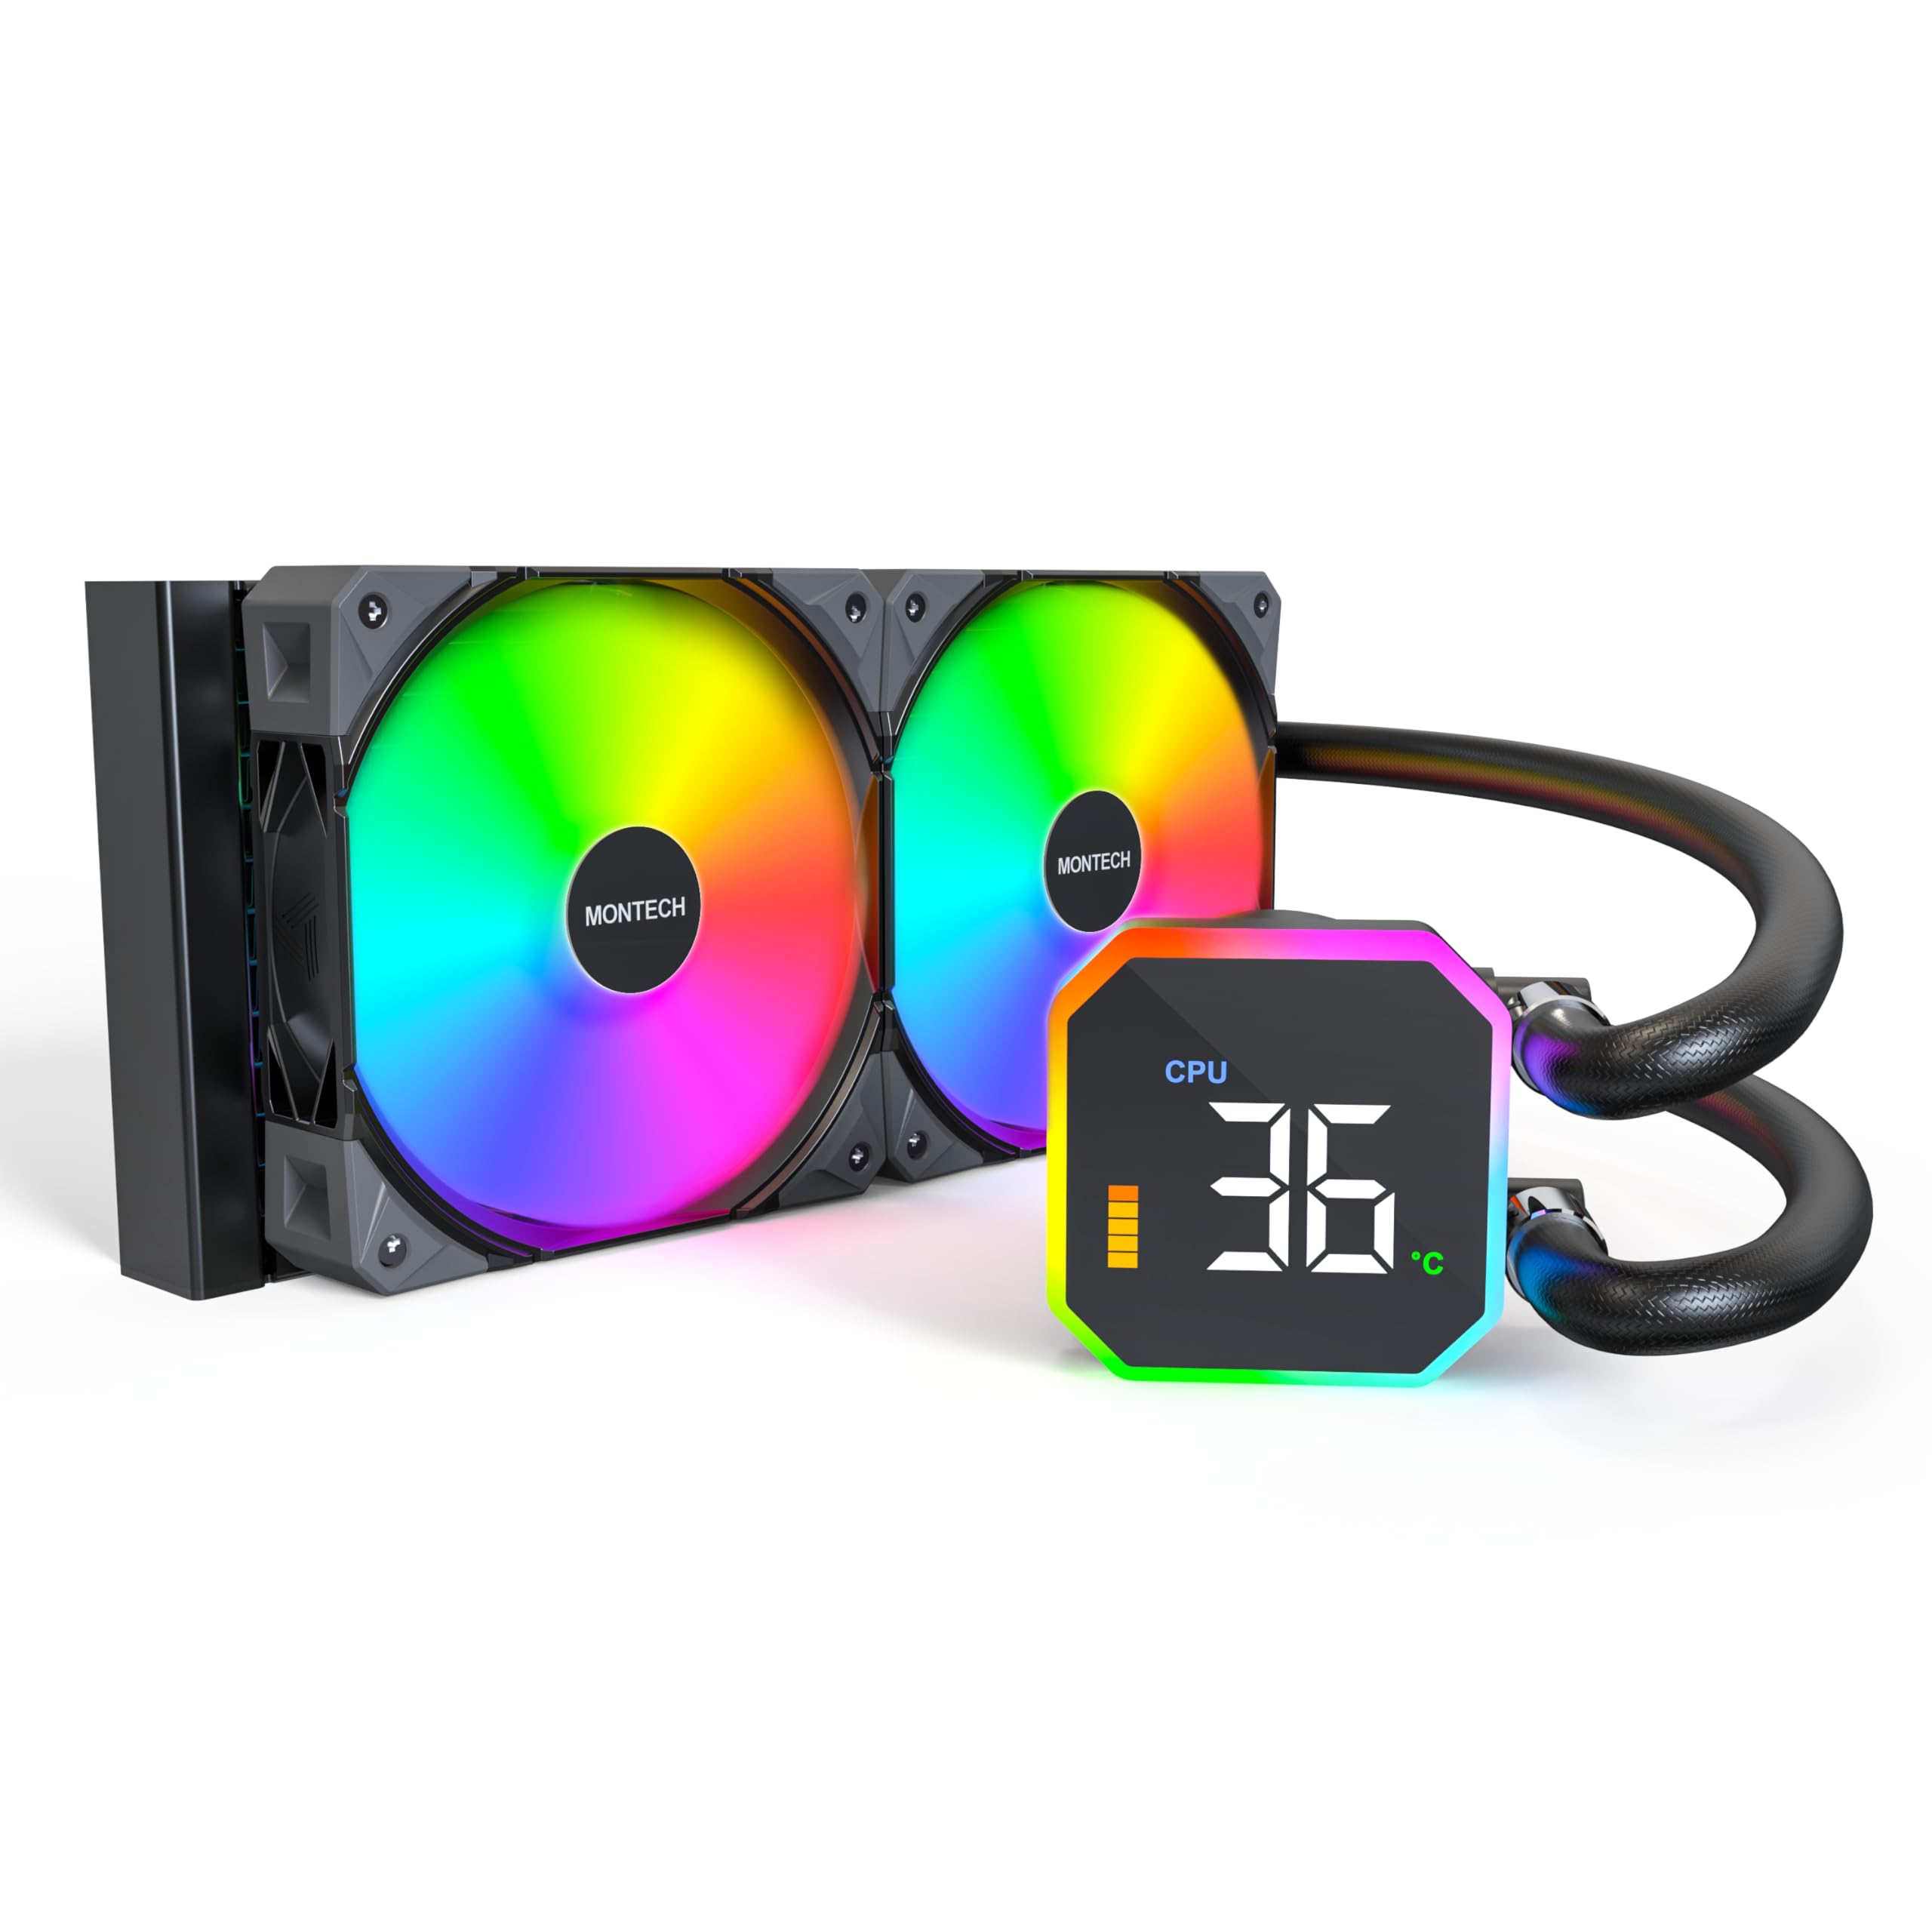
Image: The MONTECH HyperFlow Digital 240 CPU Liquid Cooler, showcasing the radiator, fans, pump, and digital display.
2. Садржај пакета
Пре него што наставите са инсталацијом, проверите да ли су све компоненте присутне у пакету.
- MONTECH HyperFlow Digital 240 AIO Liquid Cooler (Radiator, Pump with Digital Display, Pre-installed Fans)
- Mounting Hardware for Intel Sockets (1151/1200/1700/1851/20XX)
- Mounting Hardware for AMD Sockets (AM3/AM4/AM5)
- Cables (Fan power, ARGB, USB for display)
- Упутство за употребу (овај документ)

Слика: Оверview diagram illustrating the main components and features of the HyperFlow Digital AIO cooler.
3. Техничке спецификације
| Феатуре | Спецификација |
|---|---|
| Димензије производа | 11.08 cm D x 1.07 cm Š x 4.8 cm V |
| Метод хлађења | Вода |
| Пумп Спеед | 3100 РПМ (±10%) |
| Тип вентилатора | E28 ARGB Fans |
| Величина вентилатора | 120мм |
| Maximum Fan Rotational Speed | 2200 РПМ (±10%) |
| Капацитет протока ваздуха | 96.27 кубних стопа у минути (ЦФМ) |
| Статички притисак | 4.13 ммХ₂О |
| Ниво буке | 36.25 децибела (макс.) |
| Radiator Thickness | 27мм |
| Radiator FPI | 20 FPI (Fins Per Inch) |
| Тип конектора за напајање | 4-пински ПВМ |
| Волtage | 12 Волтс |
| Материјал | Алуминијум (Радијатор) |
| Компатибилни уређаји | CPU, Desktop |
| Intel Socket Support | 1151/1200/1700/1851/20XX |
| AMD Socket Support | AM3/AM4/AM5 |
| Тежина артикла | 4.6 фунти |
4. Водич за инсталацију
The MONTECH HyperFlow Digital 240 is designed for hassle-free installation with pre-installed fans and pre-applied thermal paste.
4.1. Припремите свој систем
- Искључите рачунар и искључите све каблове.
- Open your computer case to access the motherboard and CPU area.
- Remove any existing CPU cooler. Clean the CPU surface if necessary.
4.2. Монтирајте радијатор и вентилаторе
The fans are pre-installed on the radiator. Determine the optimal mounting location in your case (e.g., top, front) ensuring adequate clearance.

Image: Illustration of radiator and fan dimensions (27mm radiator, 28mm fan thickness) to ensure proper fit within a PC case.

Image: A visual guide demonstrating how the radiator and fans fit into a computer case, highlighting the total thickness of 55mm.
4.3. Install the Pump/Cold Plate
The cold plate has pre-applied thermal paste. Select the appropriate mounting brackets for your CPU socket (Intel or AMD).

Слика: Крупни план view of the pump and cold plate, showing the pre-applied thermal paste for convenience.

Image: Visual representation of the different mounting brackets for Intel (1151/1200/1700/1851/20XX) and AMD (AM3/AM4/AM5) sockets.

Image: A detailed diagram showing the compatibility of the cooler with various Intel and AMD CPU sockets.
4.4. Повежите каблове
Connect the pump's USB cable to a Motherboard USB 2.0 header. Connect the fan and ARGB cables to appropriate headers on your motherboard or a compatible controller.

Image: Step-by-step guide for connecting the pump to the motherboard's USB 2.0 header and installing the necessary software.
5. Упутство за употребу
5.1. Digital Display Monitoring
The integrated digital display provides real-time monitoring of your CPU and GPU temperatures. This allows for quick assessment of your system's thermal performance.
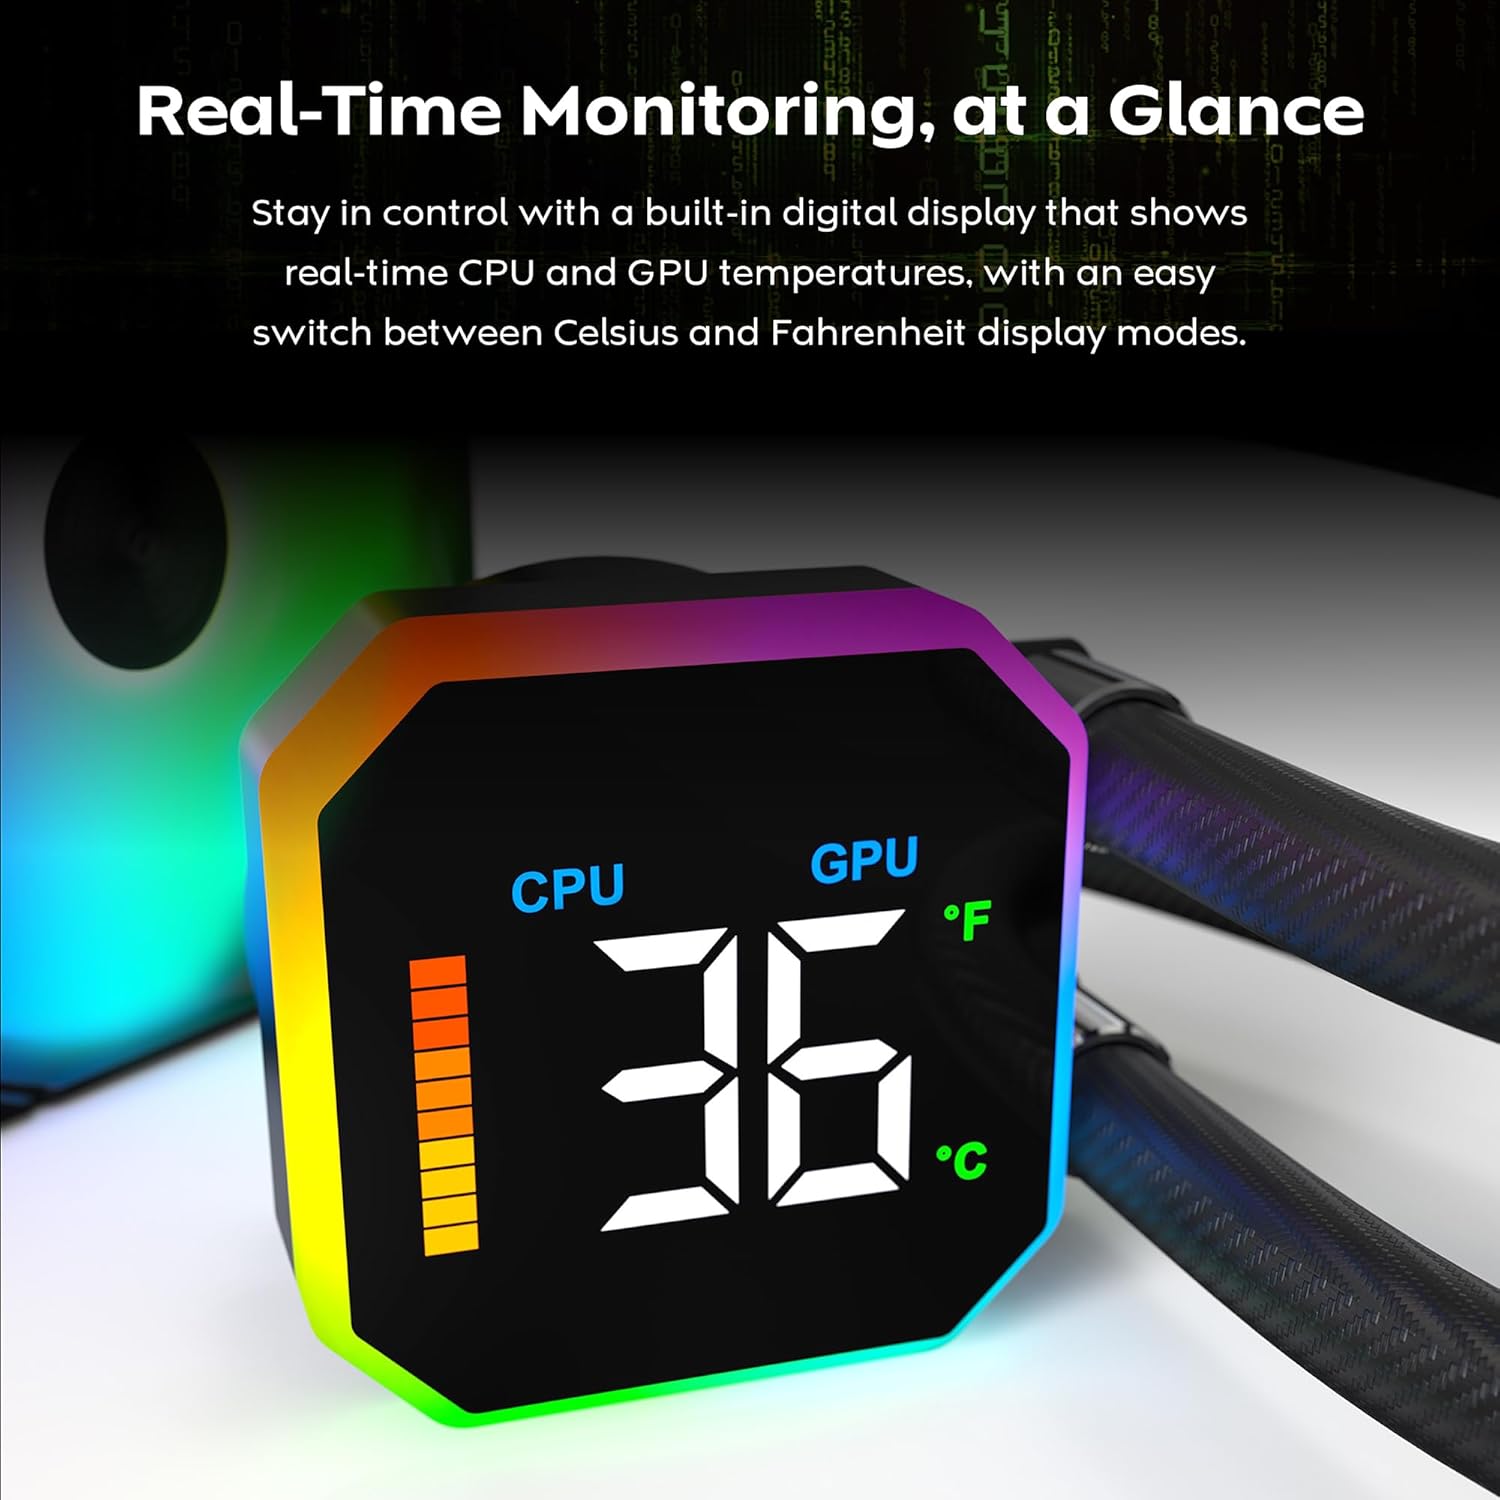
Image: The digital display on the pump head showing real-time CPU temperature and a temperature bar graph.

Слика: Крупни план view of the digital display, clearly showing the CPU temperature reading.
5.2. Temperature Unit Switching
The display allows for quick switching between Celsius (°C) and Fahrenheit (°F) temperature units. Refer to the software interface for this setting.

Image: The software interface demonstrating the options to switch between CPU/GPU temperature display and Celsius/Fahrenheit units.
5.3. Fan Performance
The E28 performance fans operate up to 2200 RPM, providing strong airflow and static pressure for efficient heat dissipation. Fan speeds are typically controlled via PWM signals from the motherboard or dedicated fan controller.

Image: Details of the E28 ARGB Performance Fan, highlighting its fan speed, static pressure, and airflow capabilities.

Image: A visual representation of the fan's operational speed range (800-2200 RPM) and its 28mm thickness.
6. Одржавање
Редовно одржавање помаже у обезбеђивању оптималних перформанси и дугог века трајања вашег расхладног уређаја.
- Чишћење прашине: Periodically clean dust from the radiator fins and fan blades using compressed air. Ensure fans are not spinning during cleaning to prevent damage.
- Визуелни преглед: Regularly check the tubing for any signs of kinks, leaks, or damage. Inspect the pump block for secure mounting.
- Термална паста: The cooler comes with pre-applied thermal paste. If you need to remount the cold plate, clean off the old thermal paste from both the CPU and cold plate, and apply a new layer of high-quality thermal paste.
КСНУМКС. Решавање проблема
If you encounter issues with your MONTECH HyperFlow Digital 240, refer to the following common troubleshooting steps:
- No Display/Incorrect Temperature Readings:
- Ensure the USB 2.0 cable from the pump is securely connected to a motherboard header.
- Verify that the MONTECH software is correctly installed and running.
- Check for any software updates for the cooler.
- Високе температуре процесора/графичке картице:
- Confirm that the pump is running (you may feel a slight vibration or hear a low hum).
- Check that the fans are spinning correctly and are not obstructed.
- Ensure the cold plate is making proper contact with the CPU. Re-seat the cooler if necessary, applying new thermal paste.
- Verify that the radiator is free of dust and has adequate airflow.
- Прекомерна бука вентилатора:
- Check if any cables are interfering with the fan blades.
- Ensure fans are securely mounted and not vibrating against the case.
- Adjust fan curves in your motherboard's BIOS or fan control software to reduce speeds at lower temperatures.
- ARGB Lighting Not Working:
- Ensure all ARGB cables are correctly connected to the motherboard's ARGB header or a dedicated controller.
- Check your motherboard's ARGB software or dedicated controller software for lighting settings.
8. Гаранција и подршка
The MONTECH HyperFlow Digital 240 CPU Liquid Cooler comes with a 6 година гаранције од дана куповине. Ова гаранција покрива недостатке у материјалу и изради при нормалној употреби.
For technical support, warranty claims, or further assistance, please visit the official Montech webсајт или контактирајте њихову службу за кориснике. Такође можете посетити Montech Store on Amazon за информације о производу и ресурсе за подршку.
9. Званични видео производа
Видео: Званична видео презентација производаasing the features and functionality of the MONTECH HyperFlow Digital Liquid AIO CPU Cooler. This video demonstrates the real-time temperature display, fan performance, and overall design.