
1. Увод
This manual provides detailed instructions for the installation, operation, and maintenance of your MakeSkyBlue 60A MPPT Solar Charge Controller V124 with CloudBOX. This advanced controller is designed for stable, efficient, and intelligent solar charging in various applications, including home, RV, cabin, and off-grid power systems.
Кључне карактеристике:
- Upgraded 60A MPPT Controller with CloudBOX: New generation controller for stable, efficient, and intelligent solar charging.
- Advanced MPPT Charging Technology: True 100% MPPT algorithm and intelligent DSP control for faster, more precise power point tracking, improving efficiency by up to 30% compared to PWM controllers.
- Паметно управљање батеријом: Automatic detection of 12V/24V/48V systems and 3-stage charging (Bulk, Absorption, Float). Supports AGM, Gel, and Flooded batteries.
- Свеобухватни систем заштите: Protection against overcharge, over-discharge, overheating, reverse polarity, and short circuit.
- User-Friendly & Expandable Design: LCD display for real-time data and charging status. Supports parallel connection.
2. Безбедносне информације
Please read all instructions and warnings carefully before installation and operation. Failure to follow these instructions may result in electric shock, fire, or severe injury.
Опште мере предострожности:
- Install the controller in a well-ventilated area, away from flammable materials.
- Обезбедите правилно уземљење система.
- Do not disassemble or attempt to repair the controller. Contact qualified personnel for service.
- Keep children away from the solar power system components.
електрична безбедност:
- Always disconnect the solar panel array and battery bank before installing or servicing the controller.
- Use appropriate circuit breakers and fuses for all connections.
- Ensure all wiring is correctly polarized (+ to + and - to -). Reverse polarity can damage the controller and other components.
- Use insulated tools to prevent accidental short circuits.
- Verify that the solar panel open-circuit voltage (VOC) does not exceed the controller's maximum input voltagе (160ВДЦ).
3. Производ је готовview
The MakeSkyBlue 60A MPPT Solar Charge Controller V124 is a robust device designed for optimal solar energy harvesting. It features a durable aluminum casing for heat dissipation and an intuitive LCD display for monitoring.
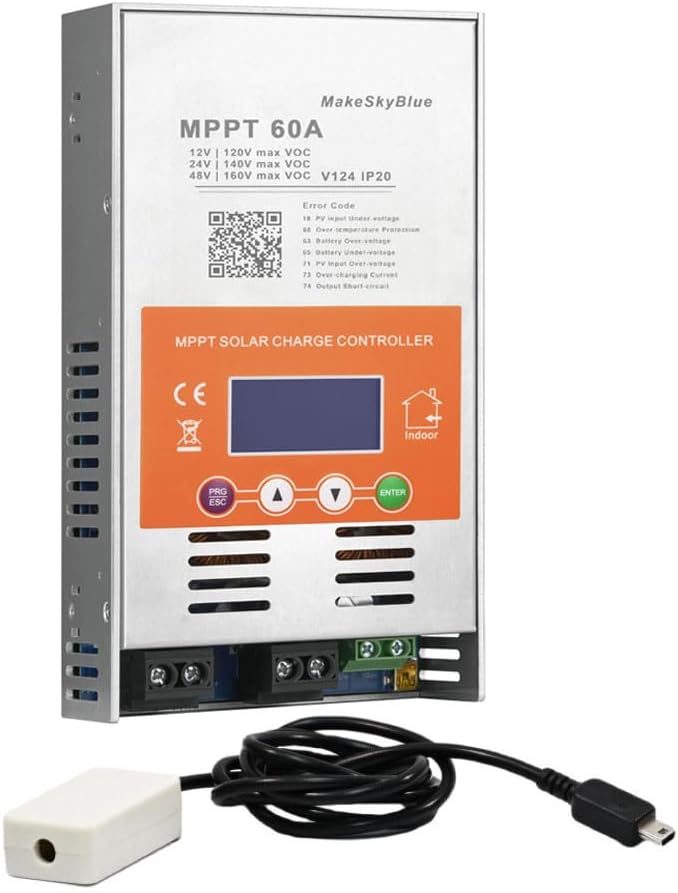
Figure 1: MakeSkyBlue 60A MPPT Solar Charge Controller V124 with CloudBOX
Компоненте:
- MPPT Solar Charge Controller Unit
- CloudBOX (for remote monitoring/control)
- Упутство за употребу
Физички опис:
The controller features a metallic enclosure with ventilation slots and a cooling fan for temperature management. The front panel includes an LCD display and control buttons. Connection terminals for solar input, battery, and DC load are located at the bottom.

Figure 2: Controller Dimensions (8.46 x 4.52 x 1.96 inches)
ЛЦД екран:
The LCD provides real-time data and status indicators. It typically shows:
- ПВ Инпут Волtagе (ПВ)
- Баттери Волtage (BATT)
- Charging Current (CHARGE)
- Load Output (LOAD)
- Operating Mode (e.g., 24H for continuous load, 00H for light control)
- Температура (TEMP)
- Error Codes (FAULT)
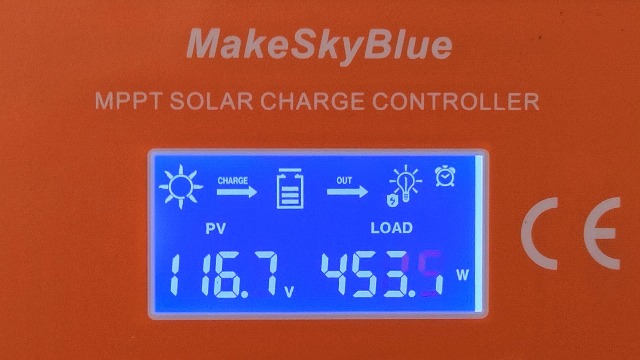
Figure 3: LCD Display Interface
4. Подешавање и инсталација
Proper installation is crucial for the safe and efficient operation of your solar charge controller. Follow these steps carefully.
4.1 Mounting the Controller:
- Choose a dry, well-ventilated indoor location, protected from direct sunlight, high temperatures, and moisture.
- Ensure adequate clearance (at least 75mm) around all sides of the controller for proper airflow and heat dissipation.
- Securely mount the controller to a stable surface using appropriate screws.

Figure 4: Temperature Protection and Mounting Considerations
4.2 Повезивање ожичења:
Connect the components in the following order to prevent damage:
- Повежите батерију: Connect the battery to the controller's battery terminals (+ to + and - to -). Ensure a secure connection. The controller will automatically detect the system voltagе (12 В/24 В/48 В).
- Повежите соларне панеле: Connect the solar panel array to the controller's PV input terminals (+ to + and - to -). Ensure the PV open-circuit voltagе не прелази 160ВДЦ.
- Повежите једносмерно оптерећење (опционо): Connect your DC loads to the controller's load terminals (+ to + and - to -).

Слика 5: Типичан дијаграм ожичења система
4.3 Parallel Connection (Optional):
The controller supports parallel connection for expanding your solar power system. Refer to the official video for detailed instructions on parallel setup and communication line configuration.
Video 1: HHJ60-PRO Paralleling Guide. This video demonstrates the installation and configuration of multiple controllers for parallel operation, including wiring and communication settings.
5. Упутство за употребу
After successful installation, the controller will power on and display the main interface. Use the control buttons to navigate and adjust settings.
5.1 LCD Display Navigation:
Use the "Up" and "Down" arrow buttons to cycle through different display interfaces, showing PV voltagе, запремина батеријеtage, charging current, load status, temperature, and error codes.
Video 2: MPPT Controller Connected | Real-Time LCD Display Demo. This video illustrates how to navigate the LCD display to view real-time system data.
5.2 Подешавања параметара:
To enter the settings interface, press the "PRG/ESC" button. Use the "Up" and "Down" arrows to adjust values and "ENTER" to confirm. Key settings include:
- d00 (Load Operating Mode): Configure how the DC load operates (e.g., 24H for continuous, 00H for light control, 1H-23H for timed operation).
- d01 (Charging Voltagе): Подесите јачину појачаног пуњењаtage.
- d02 (Float Charging Voltagе): Подесите запремину пуњења са пловкомtage.
- d03 (Low Voltagе Заштита): Set the battery low voltage disconnect (LVD) threshold.
- d04 (Battery Voltage Calibration): Calibrate the displayed battery voltage if it differs from a multimeter reading.
- d05 (Parallel Communication Code): Define the communication address for parallel operation (lowest code acts as master).
- d06 (Battery Type): Select the battery type (e.g., Sealed, Gel, Flooded, Lithium Iron Phosphate). Choosing "USE" allows manual settings for d01, d02, and d03.
- d07 (System Voltagе): Configure the system voltagе (нпр., 12V, 24V, 48V).
Video 3: D01-D06 Parameter Setting Information. This video guides you through adjusting various operational parameters of the controller.
6. Одржавање
Regular maintenance ensures optimal performance and longevity of your solar charge controller.
- чистоћа: Одржавајте контролер чистим и без прашине и прљавштине. Користите суву крпу за чишћење.
- Везе: Периодично проверавајте све спојеве ожичења на чврстоћу и корозију.
- вентилација: Ensure the ventilation openings are not blocked to allow for proper heat dissipation.
- Ажурирања фирмвера: Проверите произвођача webсајт за сва доступна ажурирања фирмвера за побољшане перформансе или нове функције.
КСНУМКС. Решавање проблема
If you encounter issues with your controller, refer to the following common problems and their solutions. The LCD display may show error codes to help diagnose the problem.
Кодови грешака:
| Код | Опис | Могући узрок / решење |
|---|---|---|
| E1 | ПВ улаз преко-волtage | ПВ арраи волtage exceeds maximum allowed. Reduce the number of solar panels in series. |
| E2 | PV input under-voltage | ПВ арраи волtage is too low. Check solar panel connections, ensure sufficient sunlight. |
| E3 | Заштита од превисоке температуре | Controller is overheating. Ensure adequate ventilation and ambient temperature. |
| E4 | Пренапонска батеријаtage | Баттери волtagе прелази постављену преко-волtage protection. Check battery settings (d01, d02). |
| E5 | Батерија испод волtage | Баттери волtage is below the set low voltage protection. Charge battery or reduce load. |
| E6 | ПВ улазна прекомерна струја | PV array current exceeds maximum allowed. Check PV array configuration. |
| E7 | Кратак спој на излазу | Short circuit detected on the load output. Disconnect load, check wiring, and reconnect. |
| E8 | Преоптерећење излаза | Load current exceeds maximum allowed. Reduce the connected load. |
General Troubleshooting Tips:
- If the controller is not charging, ensure solar panels are receiving adequate sunlight and all connections are secure.
- If the load is not working, check the load operating mode (d00) and ensure the battery has sufficient charge.
- For persistent issues, power cycle the controller by disconnecting the solar panels, then the battery, waiting a few minutes, and reconnecting in the correct order (battery first, then solar).
8. Спецификације
| Феатуре | Спецификација |
|---|---|
| Модел | 60А-В124 |
| Систем Волtage | 12V/24V/48V Auto-detection |
| Мак ПВ Инпут Волtage | 160ВДЦ |
| Називна струја пуњења | 60А |
| Подржани типови батерија | AGM, Gel, Flooded, Lithium |
| Алгоритам пуњења | 3-Сtage (Bulk, Absorption, Float) |
| Дисплаи Типе | ЛЦД |
| Материјал | Алуминијум |
| Тежина артикла | 3.5 фунти |
| Димензије пакета | 8.46 к 4.52 к 1.96 инча |
| Укључене компоненте | Solar Charge Controller, CloudBOX, User Manual |
9. Гаранција и подршка
For warranty information, technical support, or service inquiries, please contact MakeSkyBlue customer service through the retailer where the product was purchased or visit the official MakeSkyBlue webсајт. Молимо вас да приликом контактирања подршке припремите модел производа и датум куповине.