
1. Увод
This manual provides essential information for the safe and efficient operation, assembly, and maintenance of your Geemax Electric Tricycle, model DDSLC002. Please read this manual thoroughly before using the tricycle to ensure proper function and to prevent injury or damage.
The Geemax Electric Tricycle is designed for adult use, featuring 20-inch by 4.0-inch fat tires, a 36V 350W motor, and a 13Ah lithium battery. It is suitable for various terrains including urban roads, beaches, and light snow.

Figure 1.1: Geemax Electric Tricycle DDSLC002
This image shows the Geemax Electric Tricycle, model DDSLC002, in white. It features large 20-inch fat tires, a comfortable seat with a backrest, and a spacious rear cargo basket. The design highlights its robust construction suitable for various terrains.

Figure 1.2: Versatile Terrain Capability
This image demonstrates the tricycle's adaptability to various environments, showcasing it on a paved road, a sandy beach, a snowy path, and a grassy field, emphasizing its fat tire design for multi-terrain use.
2. Безбедносне информације
Your safety is paramount. Adhere to all warnings and instructions in this manual.
- Увек носите кацигу и одговарајућу заштитну опрему приликом вожње.
- Уверите се да су све компоненте добро причвршћене пре сваке вожње.
- Do not operate the tricycle under the influence of alcohol or drugs.
- Придржавајте се свих локалних саобраћајних закона и прописа.
- Avoid riding in adverse weather conditions, such as heavy rain or ice, unless the tricycle is specifically designed and equipped for such conditions.
- The maximum load capacity for this tricycle is 350 lbs (158 kg). Do not exceed this limit.
- Keep hands and feet away from moving parts during operation.
- Regularly inspect brakes, tires, and battery for wear and damage.
3. Садржај пакета
Приликом распакивања, проверите да ли су све компоненте присутне и да ли су неоштећене. Ако неки делови недостају или су оштећени, одмах контактирајте корисничку подршку.
- Geemax Electric Tricycle (partially assembled)
- 36В 13Ах литијумска батерија
- Пуњач батерија
- Задња корпа за одлагање ствари
- Монтажни алати
- Упутство за употребу
4. Идентификација компоненте
Familiarize yourself with the various parts of your Geemax Electric Tricycle using the diagram below.
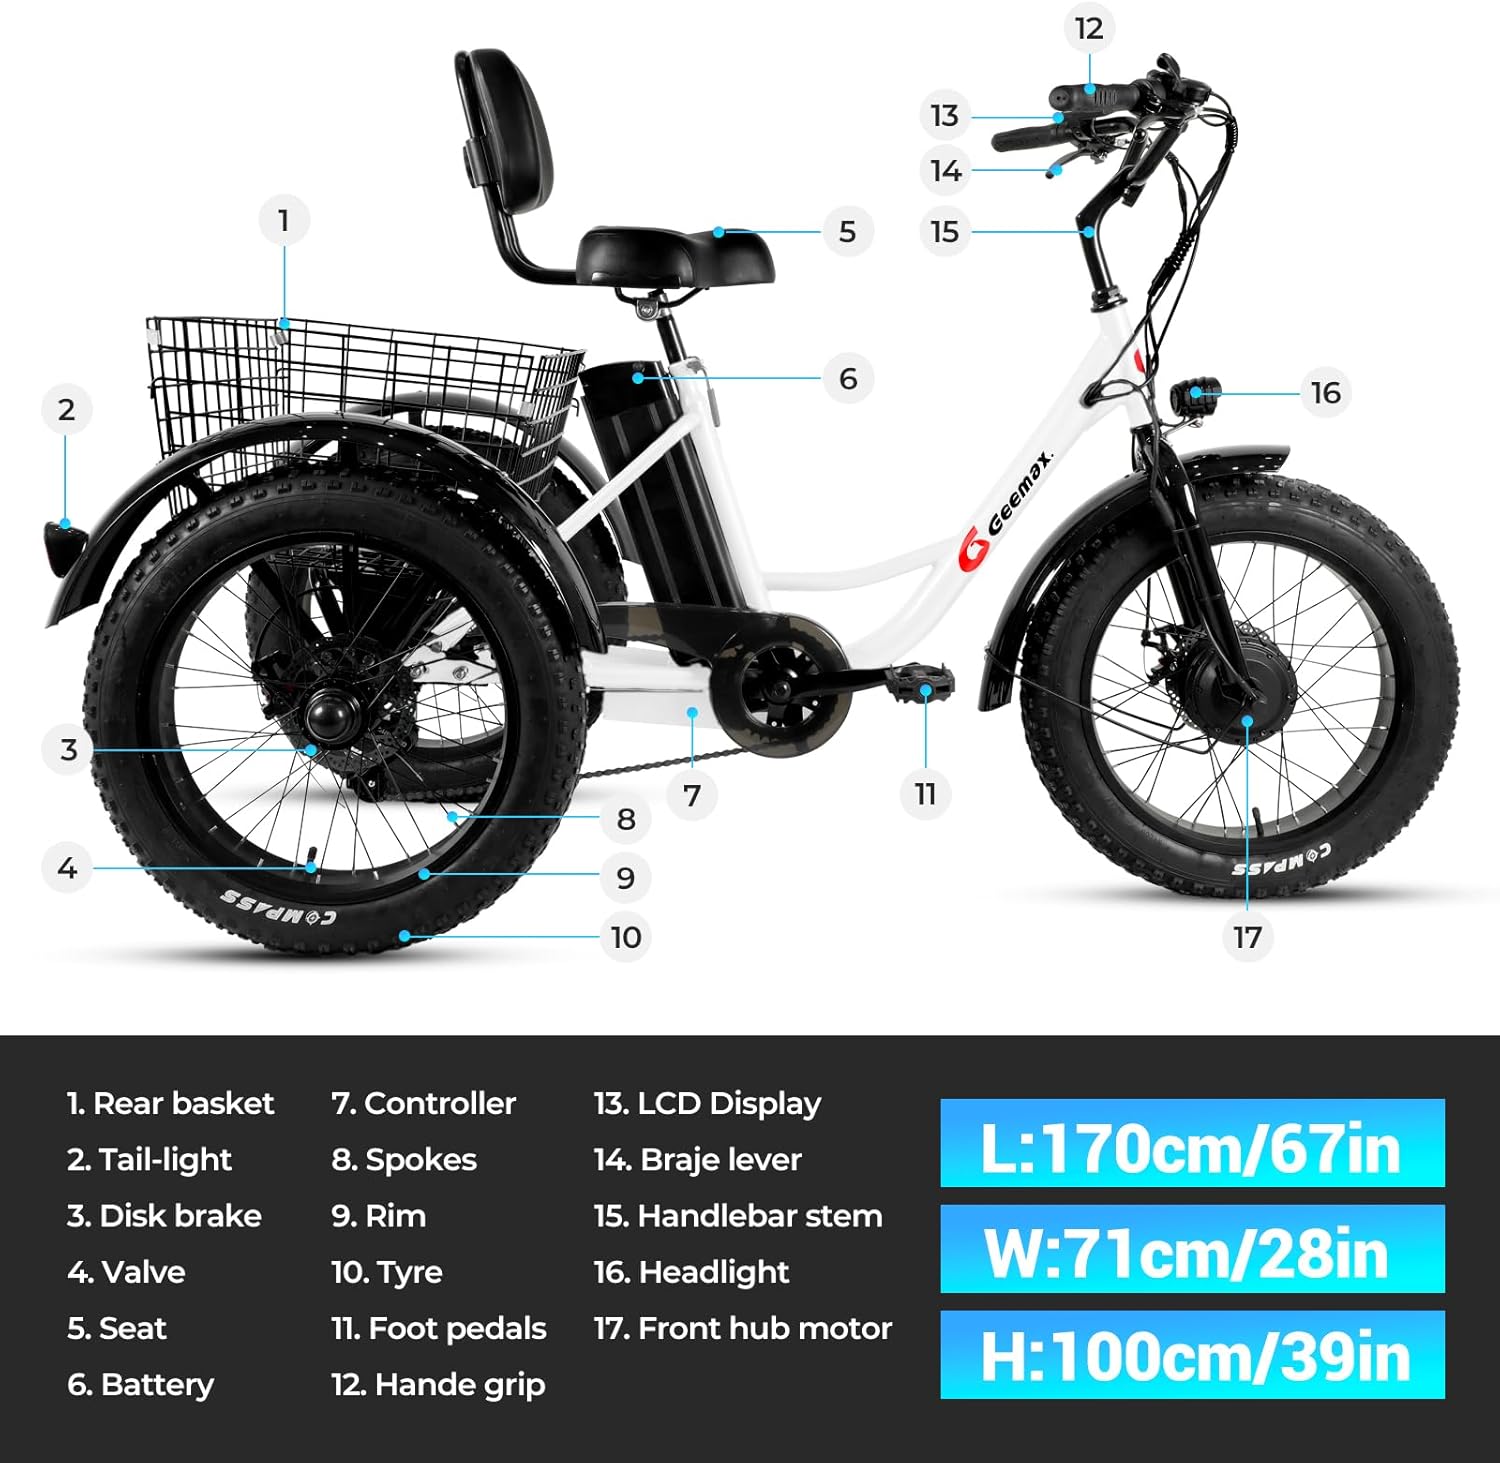
Figure 4.1: Tricycle Component Diagram
This image displays a detailed diagram of the Geemax Electric Tricycle, highlighting its key components with numbered labels for easy identification. The diagram includes the rear basket, tail-light, disk brake, valve, seat, battery, controller, spokes, rim, tire, foot pedals, handle grip, LCD display, brake lever, handlebar stem, headlight, and front hub motor. Dimensions are also provided: Length 170cm/67in, Width 71cm/28in, Height 100cm/39in.
- Задња корпа
- Задње светло
- Диск кочница
- Вентил
- Сеат
- Батерија
- Контролор
- Спокес
- Рим
- Тире
- Ножне педале
- Дршка ручке
- ЛЦД екран
- Полуга кочнице
- Стабло управљача
- Фар
- Мотор предње главчине
5. Подешавање и монтажа
The Geemax Electric Tricycle arrives approximately 50% assembled. Follow these steps for final assembly.
5.1 Распакивање
- Пажљиво уклоните све компоненте из паковања.
- Place all parts on a clean, flat surface.
- Verify all parts are present against the package contents list.
5.2 Инсталација управљача
- Loosen the bolts on the handlebar stem.
- Уметните управљач у вретено, водећи рачуна да је центриран и поравнат.
- Добро затегните завртње.
5.3 Seat and Backrest Adjustment
Adjust the seat height and backrest for optimal comfort and riding posture.

Figure 5.1: Adjustable Seat and Backrest
This image illustrates the adjustable mechanism for the tricycle's seat and backrest, allowing riders to customize their seating position for comfort and ergonomics.
- Loosen the quick-release lever or bolt for the seat post.
- Adjust the seat to a comfortable height where your feet can touch the ground.
- Securely tighten the quick-release lever or bolt.
- Adjust the backrest angle for lumbar support.
5.4 Rear Basket Attachment
Attach the rear basket to the designated mounting points on the tricycle frame.

Figure 5.2: Rear Storage Basket
This image shows the spacious rear basket of the tricycle, demonstrating its capacity by being filled with various groceries, highlighting its utility for carrying items.
- Align the basket with the mounting holes on the rear frame.
- Use the provided bolts and nuts to secure the basket firmly.
- Ensure the basket is stable and does not wobble.
5.5 Уградња предњих и задњих светала
Install the headlight and taillight for improved visibility and safety.

Figure 5.3: Front Headlight
This image focuses on the tricycle's bright LED headlight, demonstrating its illumination capability for nighttime riding or low-light conditions.
- Mount the headlight to the front of the tricycle, typically on the handlebars or front fork.
- Mount the taillight to the rear of the tricycle, usually on the rear fender or basket.
- Connect the lights to the tricycle's electrical system as per the wiring instructions (refer to detailed wiring diagram if provided separately).
5.6 Завршне провере
- Ensure all bolts and fasteners are tightened.
- Проверите притисак у гумама.
- Test brake functionality.
- Verify the battery is fully charged and properly installed.
6. Информације о батерији
The Geemax Electric Tricycle is powered by a 36V 13Ah Lithium Battery, UL Certified for safety.

Figure 6.1: 36V 13Ah Lithium Battery
This image displays the 36V 13Ah lithium battery pack, highlighting its internal cell structure and UL certification, indicating its safety and quality standards. The battery provides an electric range of 28-35 miles and an assist range of 35-45 miles.
6.1 Пуњење батерије
- Прикључите пуњач на стандардну зидну утичницу.
- Connect the charger output to the battery charging port.
- Индикаторска лампица на пуњачу ће приказивати статус пуњења (нпр. црвена за пуњење, зелена за потпуно напуњено).
- Не препуњавајте батерију. Искључите пуњач када се пуњење заврши.
- Charging time typically ranges from 4-6 hours for a full charge.
6.2 Инсталација и уклањање батерије
- To install: Slide the battery into its designated slot on the tricycle frame until it clicks securely into place. Ensure the battery is locked to prevent theft.
- To remove: Unlock the battery with the provided key, then slide it out of the frame.
7. Упутство за употребу
7.1 Укључивање/искључивање
- To power on: Press and hold the power button on the LCD display.
- To power off: Press and hold the power button again.
7.2 Функције ЛЦД екрана
The LCD display provides real-time information about your ride.

Figure 7.1: LCD Display Interface
This image shows the multi-function LCD display (S866 model) mounted on the handlebars. It clearly indicates current speed, battery level, distance covered, and the selected pedal assist level (0-5). The display also features power and mode buttons.
- брзина: Приказује тренутну брзину вожње.
- Ниво батерије: Означава преостало пуњење батерије.
- Удаљеност: Приказује пређену удаљеност или укупно очитавање километраже.
- Ниво асистенције на педалу: Displays the current assist level (0-5).
7.3 Riding Modes and Speed Assist
Your tricycle offers three riding modes and five levels of pedal assist.

Figure 7.2: Speed Assist Controls
This close-up image shows the LCD display and the control buttons (+, -, power) on the handlebar, used to adjust the pedal assist level from 1 to 5, and to power the system on or off.
- Electric Tricycle Mode (e-trike): Provides full motor power without pedaling.
- Assisted Tricycle Mode: The motor provides assistance as you pedal. Use the '+' and '-' buttons on the display to adjust the assist level from 1 (minimal assistance) to 5 (maximum assistance).
- Normal Tricycle Mode: The motor is off, and you pedal manually like a traditional tricycle.
7.4 Кочиони систем
The tricycle is equipped with disc brakes for reliable stopping power.

Figure 7.3: Disc Brake System
Ова слика пружа крупни план view of the disc brake system on the tricycle's wheel, showing the rotor and caliper mechanism, which ensures effective and responsive braking.
- Squeeze the brake levers on the handlebars to engage the brakes.
- Apply both front and rear brakes simultaneously for balanced stopping.
- Avoid sudden, hard braking, especially at high speeds or on slippery surfaces.
8. Одржавање
Редовно одржавање осигурава дуготрајност и безбедан рад вашег трицикла.
8.1 Чишћење
- Обришите оквир огласомamp крпа. Избегавајте директно коришћење перача под високим притиском на електричним компонентама.
- Clean the chain and lubricate it regularly.
8.2 Нега гума
- Maintain recommended tire pressure (refer to tire sidewall for specifications).
- Пре сваке вожње проверите гуме да ли имају хабања, пробушења или оштећења.
- The 4-inch wide fat tires provide excellent traction across various terrains.
8.3 Преглед кочница
- Проверите кочионе плочице на истрошеност и замените их ако је потребно.
- Ensure brake levers are responsive and cables are not frayed.
8.4 Одржавање батерије
- Чувајте батерију на хладном и сувом месту када није у употреби.
- Charge the battery at least once every two months, even if not used, to maintain its health.
- Избегавајте често потпуно пражњење батерије.
КСНУМКС. Решавање проблема
| Проблем | Могући узрок | Решење |
|---|---|---|
| Tricycle does not power on | Battery not charged or improperly installed; loose electrical connection. | Ensure battery is fully charged and securely seated. Check all visible connections. |
| Мотор не помаже | Pedal assist level set to 0; brake levers engaged; motor or controller issue. | Increase pedal assist level on LCD. Release brake levers. If problem persists, contact support. |
| Кочнице су слабе | Worn brake pads; loose brake cables; air in hydraulic system (if applicable). | Inspect and replace brake pads. Adjust brake cable tension. Consult a professional for hydraulic brake issues. |
| Необични звуци током вожње | Loose components; dry chain; tire rubbing. | Check all fasteners. Lubricate chain. Inspect for tire rubbing against frame or fenders. |
10. Спецификације
Detailed technical specifications for the Geemax Electric Tricycle DDSLC002.

Figure 10.1: Rider Height and Load Capacity
This image illustrates the recommended rider height range of 5'2" to 6'4" and the maximum load capacity of 350 lbs for the Geemax Electric Tricycle. It also shows the adjustable seat height from 30.5 inches to 38.5 inches.

Figure 10.2: Tricycle Dimensions
This image provides the overall dimensions of the tricycle: Length 170cm (67in), Height 100cm (39in), and Width 71cm (28in). It also reiterates the recommended rider height and maximum load capacity.
| Феатуре | Спецификација |
|---|---|
| Назив модела | DDSLC002 |
| Бике Типе | Електрични трицикл |
| Аге Ранге | Адулт |
| Мотор | 36V 350W Brushless High-Speed Motor |
| Батерија | 36V 13Ah Lithium Battery (UL Certified) |
| Мак Спеед | До 20 мпх (32 км/х) |
| Range (Assist Mode) | До 40 миље (64 км) |
| Range (Electric Mode) | До 28 миље (45 км) |
| гуме | 20" x 4.0" Puncture-Resistant Fat Tires |
| Материјал оквира | Carbon Steel / Alloy Steel |
| Браке Стиле | Дисц Бракес |
| Тип суспензије | Чврсто |
| Број брзина | 20 (implied by product data, likely referring to gear combinations or assist levels) |
| Посебна карактеристика | ЛЦД екран |
| Укључене компоненте | Баскет |
| Максимални капацитет оптерећења | 350 фунти (158 кг) |
| Препоручена висина возача | 170 цм - 178 цм |
| УПЦ | 760762256946 |
11. Гаранција и подршка
11.1 Информације о гаранцији
The Geemax Electric Tricycle DDSLC002 comes with a One Year Warranty from the date of purchase. This warranty covers manufacturing defects in materials and workmanship. It does not cover damage due to misuse, accidents, normal wear and tear, or unauthorized modifications.
11.2 Корисничка подршка
For technical assistance, warranty claims, or replacement parts, please contact Geemax customer support. Refer to your purchase documentation for specific contact details or visit the official Geemax webсајту.