
Увод
This manual provides instructions for the RAINPOINT ITP159 Automatic Plant Waterer. This device is designed to provide automated drip irrigation for 10-15 plants, suitable for both indoor and outdoor use. It features adjustable water output, battery power, and an IP54 waterproof rating.
Безбедносне информације
The RAINPOINT ITP159 uses a water container as its water source. It is не designed for direct connection to a water tap. Ensure the water source is stable and the device is placed on a level surface to prevent spills or damage.
Шта је у кутији
- 1x Auto Watering Pump
- 1x 32.81ft (10m) Long 1/6 inch Tubing
- 10x T Barb Fittings
- 10x Adjustable Drip Emitters
- 10x Support Stakes
- 1x T Cross Barb Fitting
- 1x Anti-Siphon Valve
- 1к филтер
- 3x Tubing End Plugs
This kit provides accessories for watering up to 10 plants. An additional accessory kit can be purchased separately to expand coverage to 15 plants.

Image: All components of the RAINPOINT ITP159 Automatic Plant Waterer kit, including the pump, tubing, emitters, and fittings, laid out on a wooden surface.
Упутства за подешавање
Погледајте овај видео за брзи прегледview of the RAINPOINT ITP159 Automatic Plant Waterer setup:
Video: An instructional video demonstrating the setup process for the RAINPOINT ITP159 Automatic Plant Waterer.
-
Уметни филтер: Attach the filter to the end of the main tubing that will be submerged in your water reservoir.

Image: A hand inserting the filter into the end of the black tubing, preparing it for the water reservoir.
-
Install Anti-Siphon Valve: Connect the anti-siphon valve into the tubing line. This prevents water from siphoning back into the reservoir unintentionally.

Image: A hand connecting the blue and white anti-siphon valve into the black tubing, ensuring proper water flow direction.
-
Cut Tubing: Cut the 1/6 inch tubing to the desired lengths to reach each plant from the main pump unit. Ensure enough slack for proper placement.

Image: A hand using scissors to cut the black tubing to customize the length for plant placement.
-
Connect Sections with Fittings: Use the T barb fittings to create branches in your tubing system, directing water to multiple plants. Secure connections firmly.

Image: A hand connecting two pieces of black tubing with a white T-shaped barb fitting to create a branching irrigation line.
-
Attach and Adjust Emitters: Insert an adjustable drip emitter into the end of each tubing line for individual plants. Use the support stakes to position the emitters near the plant's base. Adjust the emitter to control the flow rate for each plant.

Image: A hand inserting a black and orange adjustable drip emitter into the soil next to a plant, ready for watering.
-
Поставите пумпу: Place the main pump unit near your water reservoir. The unit can be countertop-friendly, hook-mountable, or wall-mountable.

Слика: Три бившаamples showing the pump unit placed on a countertop, hooked onto a shelf, and mounted on a wall, demonstrating versatile placement options.
Напајање уређаја
The ITP159 can be powered by its rechargeable battery or via USB-C for continuous power supply. Ensure the device is charged or connected to power before use.

Image: Illustrations showing the device being powered by its internal rechargeable battery and connected via USB-C for continuous power, highlighting its flexible power options.
Операција
Setting the Watering Schedule
The ITP159 features a simple dual-dial control for setting watering duration and frequency.
-
Подесите трајање: Use the "HOW LONG" dial to select the watering duration. Options range from 15 seconds to 20 minutes. Turn the dial to your desired time.
-
Подесите фреквенцију: Use the "HOW OFTEN" dial to select the watering frequency. Options range from every 6 hours to every 14 days. Turn the dial to your desired interval.
Once both dials are set, the system will automatically follow the programmed schedule.

Слика: Детаљна view of the control panel with two green dials, illustrating how to set the watering duration and frequency.
Ручно заливање
To initiate manual watering without interrupting the preset schedule, press the "MANUAL" button located on the control panel. This will provide an on-demand watering cycle.

Image: Two panels illustrating the automatic watering mode (set and forget) and the manual watering mode (hands-on irrigation), demonstrating flexible operation.
Adjusting Drip Emitters
Each drip emitter can be adjusted to control the water flow rate, allowing you to customize watering for different plant needs. Rotate the orange cap on the emitter to increase or decrease the flow.

Image: A close-up showing how to adjust the drip emitter, with visual examples of slow and fast water output, highlighting customization for plant needs.
Одржавање
Water Reservoir Monitoring
The pump timer is equipped with a low water LED indicator. When this light is on, it indicates that the water reservoir is running dry. Refill the reservoir promptly to prevent pump damage and ensure continuous plant hydration.
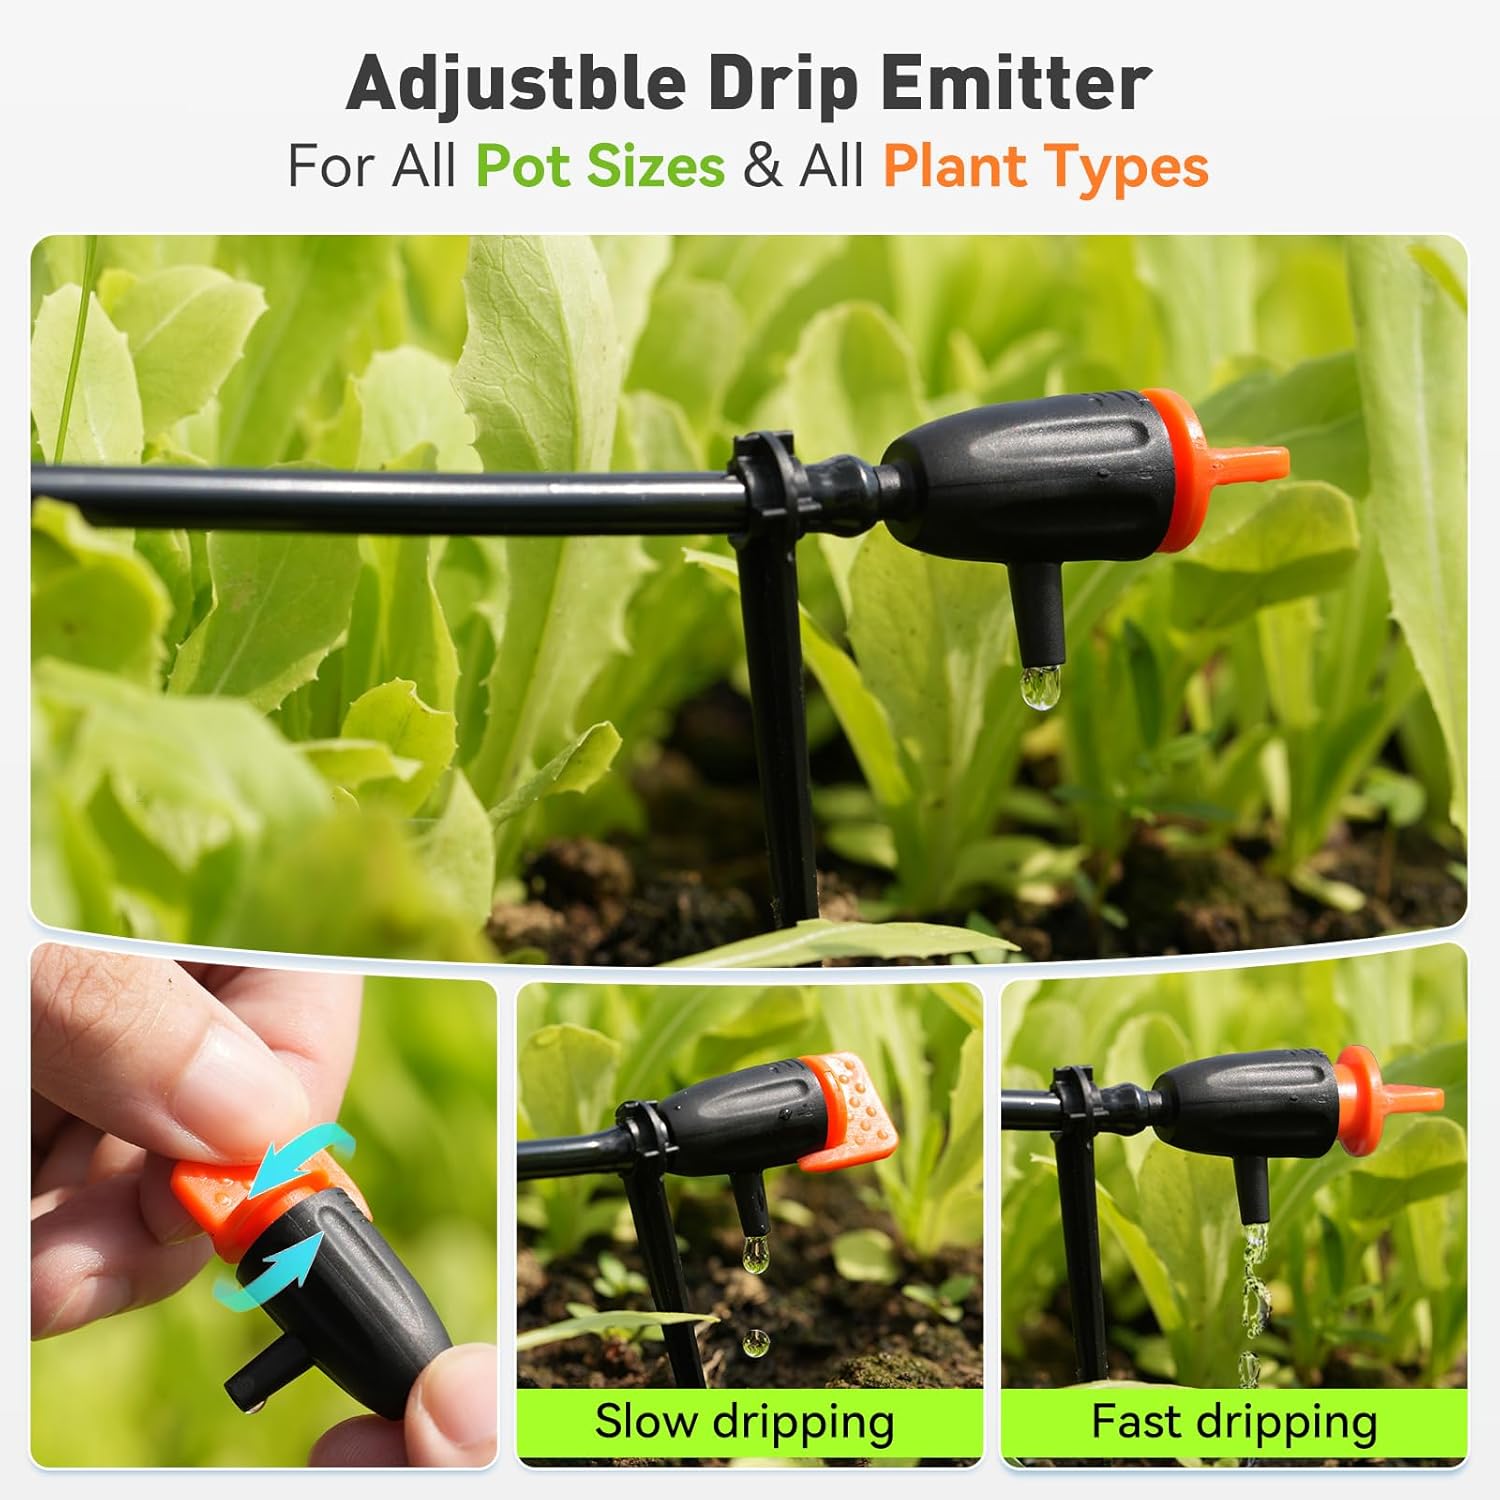
Image: A diagram illustrating the internal pump mechanism and the external low water indicator light on the control panel, emphasizing the low water alert feature.
Чишћење филтера
Periodically check and clean the filter at the end of the intake tubing to prevent blockages and ensure efficient water flow. A clogged filter can reduce pump performance.
Tubing and Emitter Inspection
Regularly inspect the tubing and emitters for any blockages, kinks, or damage. Ensure all connections are secure to prevent leaks.
Решавање проблема
| Проблем | Могући узрок | Решење |
|---|---|---|
| No water flow to plants. |
|
|
| Неравномерна расподела воде. |
|
|
| Вода цурење. |
|
|
| Low water indicator always on. |
|
|
Спецификације
| Феатуре | Детаљ |
|---|---|
| Бранд | РАИНПОИНТ |
| Број модела | ИТП159 |
| Материјал | Пластика |
| Димензије артикла (Д к Ш к В) | 5.71 к 5.71 к 2.95 инча |
| Извор напајања | Battery Powered & Plug-in (USB-C) |
| Дужина црева | 32.81 стопа (10 метара) |
| Посебне карактеристике | Automatic Watering, Leak Resistant, Programmable, Weather Resistant (IP54) |
| Подесите име | Automatic Plant Watering Kit (10-Plant) |
| Компатибилност паметног дома | Not Smart Home Compatible |
Гаранција и подршка
Овај производ долази са а 1-годишња ограничена гаранција against manufacturing defects in materials and workmanship. You can obtain an additional two years of extended warranty by registering your product on the official RAINPOINT webсајту.
For technical support or warranty claims, please visit the RAINPOINT Store on Amazon или погледајте контакт информације које се налазе на паковању вашег производа.