
1. Увод
This manual provides detailed instructions for the Aideepen ESP32-S3-CAM Development Board. This board integrates an ESP32-S3-WROOM N16R8 module with an OV3660 camera, offering robust capabilities for various embedded projects. It is designed for applications requiring Wi-Fi, Bluetooth, and camera functionality, suitable for IoT, MicroPython, DIY, and AI projects.
2. Кључне карактеристике
- High-Performance Dual-Core Processor: Integrated Xtensa 32-bit LX7 dual-core processor for powerful computing with low power consumption.
- 3-Megapixel OV3660 Camera: Equipped with an OV3660 camera module for clear image capture and real-time video streaming, ideal for smart surveillance, face recognition, and AI computer vision.
- Wi-Fi and Bluetooth Dual Mode Support: Supports Wi-Fi 802.11 b/g/n and Bluetooth 5.0. Its Bluetooth Low Energy subsystem supports Bluetooth 5 (LE) and Bluetooth Mesh. Equipped with a low-power coprocessor and a high-power mode of up to 20 dBm, it can meet the requirements of a variety of application scenarios.
- Побољшани дизајн: Compared to other ESP32-S3 development boards, this board features enhanced capabilities and additional external antenna interfaces, to meet more user requirements.
- Велики капацитет складиштења: The ESP32 module integrates 8 MB RAM and 16 MB Flash and provides enough storage for the development of complex applications.
- Dual USB-C Interface: Includes two USB-C ports for versatile connectivity and power.
- TF Card Holder: Onboard slot for TransFlash (MicroSD) cards for expanded storage.
3. Производ је готовview
The Aideepen ESP32-S3-CAM development board is a compact and feature-rich module. Below are diagrams illustrating its dimensions and key components.

Figure 3.1: ESP32-S3-CAM Development Board Dimensions. The board measures approximately 67mm (2.66 inches) in length and 28mm (1.1 inches) in width, with a height of 12mm (0.5 inches) including components.

Слика 3.2: Предња и задња страна View of the ESP32-S3-CAM Board with Labeled Components. Key components include the ESP32-S3 N16R8 module, OV3660 camera, W2812B LED, TX/Power lamps, CH340 USB-to-serial chip, Reset key, BOOT button, OTG and TTL USB-C ports, and a TF Card Holder on the back.
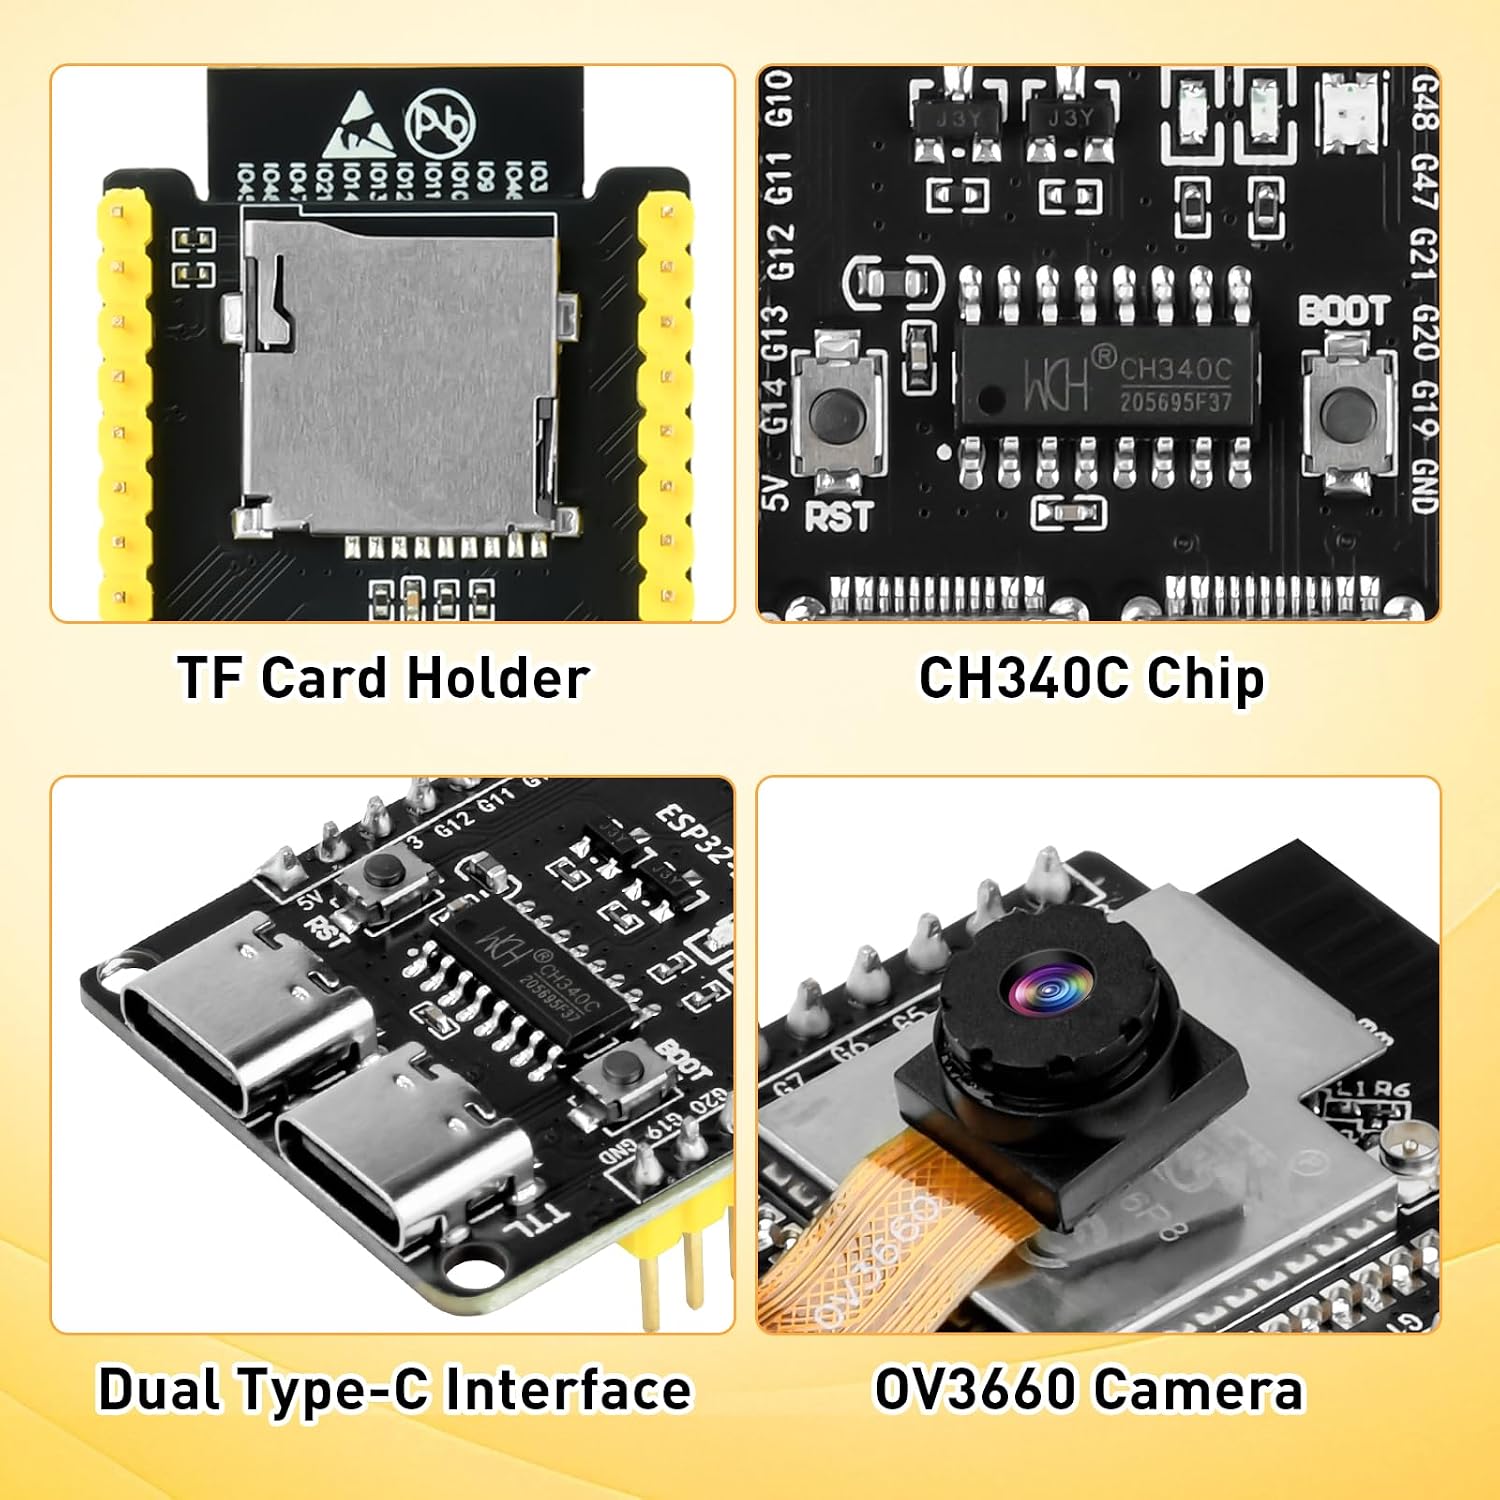
Слика 3.3: Детаљно Views of TF Card Holder, CH340C Chip, Dual Type-C Interface, and OV3660 Camera. These close-ups highlight the integrated TF card slot for storage, the CH340C USB-to-serial converter, the two USB-C ports (OTG and TTL), and the OV3660 camera module.
3.1 Pinout Diagram
Understanding the pinout is crucial for connecting external components and programming the board. Refer to the diagram below for a comprehensive pin assignment.

Figure 3.4: ESP32-S3-CAM Pinout Diagram. This diagram details the functions of each pin, including Power (PWD), Ground (GND), Serial (for Debugging/Programming), Analog-to-Digital Converter (ADCX CH), Reset, GPIO (General Purpose Input/Output), Touch Sensor Input Channel (TOUCHX), Strapping Pin Functions (STRAP), SD Card Pin, On-board LED Pin, On-board WS2812 LED, PSRAM, USB Function Pin, Camera Pin, JTAG for Debugging, and PWM Capable Pin.
3.2 Конфигурација антене
The board comes with an onboard antenna. For applications requiring an external antenna, a modification is necessary.

Figure 3.5: Antenna Selection. The default configuration uses the onboard antenna (Location ①) with a gain of 2dB. To use an external antenna (Location ②), DIY welding is required to switch the antenna connection.
4. Упутства за подешавање
- Инсталација драјвера: Before connecting the board, download and install the necessary CH340 driver for your operating system. This driver enables communication between your computer and the ESP32-S3-CAM board via the USB-C (TTL) port.
- Software Environment Setup:
- Install the Arduino IDE or ESP-IDF (Espressif IoT Development Framework) on your computer.
- Configure the IDE to support ESP32-S3 boards. This typically involves adding the ESP32 board manager URL in Arduino IDE preferences and installing the ESP32 boards package.
- For MicroPython development, install the esptool.py utility and flash the MicroPython firmware onto the board.
- Повезивање плоче: Connect the ESP32-S3-CAM board to your computer using a USB-C cable. Use the USB-C port labeled "TTL" for programming and serial communication. The "OTG" port can be used for USB Host/Device functionalities.
- Почетни тест: After driver and software setup, upload a basic "blink" sketch or a simple camera example program to verify proper communication and functionality.
5. Упутство за употребу
The ESP32-S3-CAM board is versatile and can be used for a wide range of projects. Here are general guidelines for its operation:
- Програмирање:
- Use the Arduino IDE or ESP-IDF to write and upload your code. Select the correct board model (ESP32-S3 Dev Module) and COM port in your IDE.
- For MicroPython, use a tool like ampy or thonny to upload scripts to the board after flashing the MicroPython firmware.
- Рад камере:
- Integrate camera libraries (e.g., esp32-camera for Arduino) into your project.
- Configure the OV3660 camera settings such as resolution, frame rate, and image quality within your code.
- Implement functions for capturing still images or streaming video over Wi-Fi.
- Ви-Фи и Блуетоотх повезивање:
- Utilize the ESP-IDF or Arduino Wi-Fi/Bluetooth libraries to connect to networks, create access points, or establish Bluetooth Low Energy (BLE) connections.
- Ensure proper antenna configuration for optimal wireless performance.
- Употреба СД картице:
- Insert a formatted TF (MicroSD) card into the card holder.
- Use SD card libraries in your code to read from and write to the card, useful for storing images, video, or data logs.
- GPIO Control:
- Refer to the pinout diagram (Figure 3.4) to identify available GPIO pins.
- Program these pins to control external sensors, actuators, or other peripherals.
The board is suitable for various AIoT projects, as demonstrated in the exampлесови испод:

Figure 5.1: ESP32-S3-CAM in AIoT Projects. This image shows the board integrated into various applications, including displaying video on an external screen, running a "Hello World" TFT test, and connecting to a breadboard for sensor integration.
6. Одржавање
- Одржавајте суво: Protect the board from moisture and humidity to prevent short circuits and corrosion.
- чистоћа: Keep the board free from dust and debris. Use a soft, dry brush or compressed air for cleaning. Avoid liquid cleaners.
- Пажљиво рукујте: Avoid dropping or subjecting the board to physical shocks. Handle by the edges to prevent damage to components.
- Статичко пражњење: Always use anti-static precautions (e.g., anti-static wrist strap) when handling the board to prevent damage from electrostatic discharge.
- Ажурирања фирмвера: Regularly check for and apply firmware updates for the ESP32-S3 module and camera drivers to ensure optimal performance and security.
КСНУМКС. Решавање проблема
| Проблем | Могући узрок | Решење |
|---|---|---|
| Board not recognized by computer | Missing or incorrect CH340 driver. Faulty USB-C cable or port. | Install the correct CH340 driver. Try a different USB-C cable and port. Ensure the board is connected to the "TTL" USB-C port. |
| Failed to upload code | Incorrect board selection or COM port. BOOT button not pressed during upload (for some configurations). | Verify board and port settings in your IDE. Try holding the BOOT button while initiating upload, then release. Ensure the CH340 driver is installed. |
| Camera not working or showing distorted images | Incorrect camera initialization in code. Loose camera ribbon cable. Insufficient power supply. | Check camera initialization parameters in your code. Ensure the OV3660 ribbon cable is securely connected. Provide adequate power (e.g., 5V, 1A). |
| Проблеми са повезивањем преко Wi-Fi/Bluetooth-а | Incorrect network credentials. Antenna issues. Interference. | Double-check Wi-Fi SSID and password. Ensure the correct antenna (onboard or external) is selected and properly connected (Figure 3.5). Reduce interference sources. |
| Board resets unexpectedly | Power supply instability. Software errors. | Ensure a stable 5V power supply. Review your code for potential memory leaks or infinite loops. |
8. Техничке спецификације
| Феатуре | Детаљ |
|---|---|
| Назив модела | ESP32 S3 CAM |
| Процесор | Xtensa 32-bit LX7 dual-core (Espressif) |
| Брзина процесора | 2.4 ГХз |
| Величина инсталиране РАМ меморије | 8 МБ ПСРАМ |
| Фласх меморија | 16 МБ |
| Цамера Модуле | OV3660 (3 Megapixel) |
| Бежично повезивање | Wi-Fi 802.11 b/g/n, Bluetooth 5.0 (LE, Mesh) |
| УСБ портови | Dual USB-C (TTL for programming/serial, OTG for host/device) |
| Подршка за оперативни систем | MicroPython, Arduino, ESP-IDF |
| Димензије (приближно) | КСНУМКСмм х КСНУМКСмм х КСНУМКСмм (Д к Ш к В) |
| Произвођач | Аидеепен |
9. Гаранција и подршка
9.1 Информације о гаранцији
The Aideepen ESP32-S3-CAM Development Board comes with a 1 година гаранције from the date of purchase. This warranty covers manufacturing defects and malfunctions under normal use. It does not cover damage caused by misuse, accidents, unauthorized modifications, or improper handling.
9.2 Корисничка подршка
For technical assistance, troubleshooting, or warranty claims, please contact Aideepen customer support. Refer to the "User Guide" document provided with your purchase or visit the official Aideepen store on Amazon for contact information.
Напомена: To use this development board, you may need to download the SH344 driver. If you require assistance, please contact us or refer to the "User Guide" document.