1. Увод
Thank you for choosing the BLACK+DECKER Multievo Multi-tool Inflator Attachment MTNF9-XJ. This attachment is designed to provide efficient inflation for various items, including vehicle tires and sports equipment. It is an integral part of the BLACK+DECKER 18V Multievo system, offering versatility and convenience by transforming your Multievo base unit into a powerful inflator.
This manual provides essential information for the safe and effective use of your inflator attachment. Please read it thoroughly before operation and retain it for future reference.

Figure 1: The BLACK+DECKER Multievo Multi-tool Inflator Attachment MTNF9-XJ, shown connected to a compatible Multievo base unit (base unit sold separately).
2. Безбедносне информације
Always observe basic safety precautions when using power tools and attachments to reduce the risk of fire, electric shock, and personal injury.
Општа безбедносна упозорења:
- Прочитајте сва упутства: Familiarize yourself with the operation and limitations of the tool and the specific potential hazards associated with this attachment.
- Одржавајте радни простор чистим и добро осветљеним: Претрпане или мрачне области изазивају несреће.
- Не радите у експлозивним атмосферама: Не користите алат у присуству запаљивих течности, гасова или прашине.
- Држите децу и посматраче подаље: Ометања могу узроковати да изгубите контролу.
- Обуците се правилно: Не носите широку одећу или накит. Држите косу, одећу и рукавице даље од покретних делова.
- Користите сигурносну опрему: Always wear eye protection. Use a dust mask, non-skid safety shoes, hard hat, or hearing protection when appropriate.
- Избегавајте случајно покретање: Ensure the switch is in the off-position before connecting to a power source or picking up the tool.
- Не претерујте: У сваком тренутку одржавајте правилан положај и равнотежу.
- Пажљиво одржавајте алате: Држите алате за сечење оштрим и чистим. Пратите упутства за подмазивање и замену прибора.
- Искључите батеријски пакет: Remove the battery pack from the Multievo base unit before making any adjustments, changing accessories, or storing the tool.
- Проверите да ли има оштећених делова: Before further use, a guard or other part that is damaged should be carefully checked to determine that it will operate properly and perform its intended function.
- Never direct air stream at people or animals: High-pressure air can cause injury.
- Do not overinflate: Always check the recommended pressure for the item being inflated to prevent bursting and potential injury.
3. Садржај пакета
Your BLACK+DECKER Multievo Multi-tool Inflator Attachment MTNF9-XJ package includes the following items:
- 1 x BLACK+DECKER Multievo Multi-tool Inflator Attachment
- 2 x Accessory Adapters (e.g., needle inflator, tapered nozzle)
The Multievo base unit and battery are sold separately.

Figure 2: Included accessory adapters for various inflation needs.
4. Подешавање
Before using the inflator attachment, ensure your BLACK+DECKER Multievo base unit is fully charged and ready for use.
Attaching the Inflator Head:
- Ensure the Multievo base unit is switched OFF and the battery pack is removed.
- Align the inflator attachment with the front of the Multievo base unit.
- Push the attachment firmly onto the base unit until it clicks securely into place.
- Verify that the attachment is securely fastened and does not wobble.
- Insert the charged battery pack into the Multievo base unit.

Figure 3: The inflator attachment securely connected to the Multievo base unit.
Selecting and Attaching an Adapter:
- Identify the appropriate accessory adapter for the item you intend to inflate (e.g., Schrader valve for car tires, needle for sports balls, tapered nozzle for inflatables).
- Screw the chosen adapter onto the threaded end of the inflator hose. Ensure it is tightened securely to prevent air leaks.
- The inflator attachment features on-board accessory storage to keep the two accessory adapters safe and easily accessible, eliminating the risk of loss.
5. Упутство за употребу
This section details how to use your inflator attachment for various tasks.
Надувавање гума:
- Ensure the correct adapter is attached to the inflator hose. For car tires, the standard Schrader valve connector is typically used.
- Check the recommended tire pressure (PSI or Bar) for your vehicle, usually found on a sticker inside the driver's side door jamb or in the owner's manual.
- Connect the adapter firmly to the tire valve stem.
- Press the trigger on the Multievo base unit to begin inflation.
- Monitor the pressure gauge on the inflator attachment. The gauge displays pressure in both Bar and PSI, allowing you to accurately inflate to the desired level.
- Release the trigger once the desired pressure is reached.
- Disconnect the adapter from the tire valve.
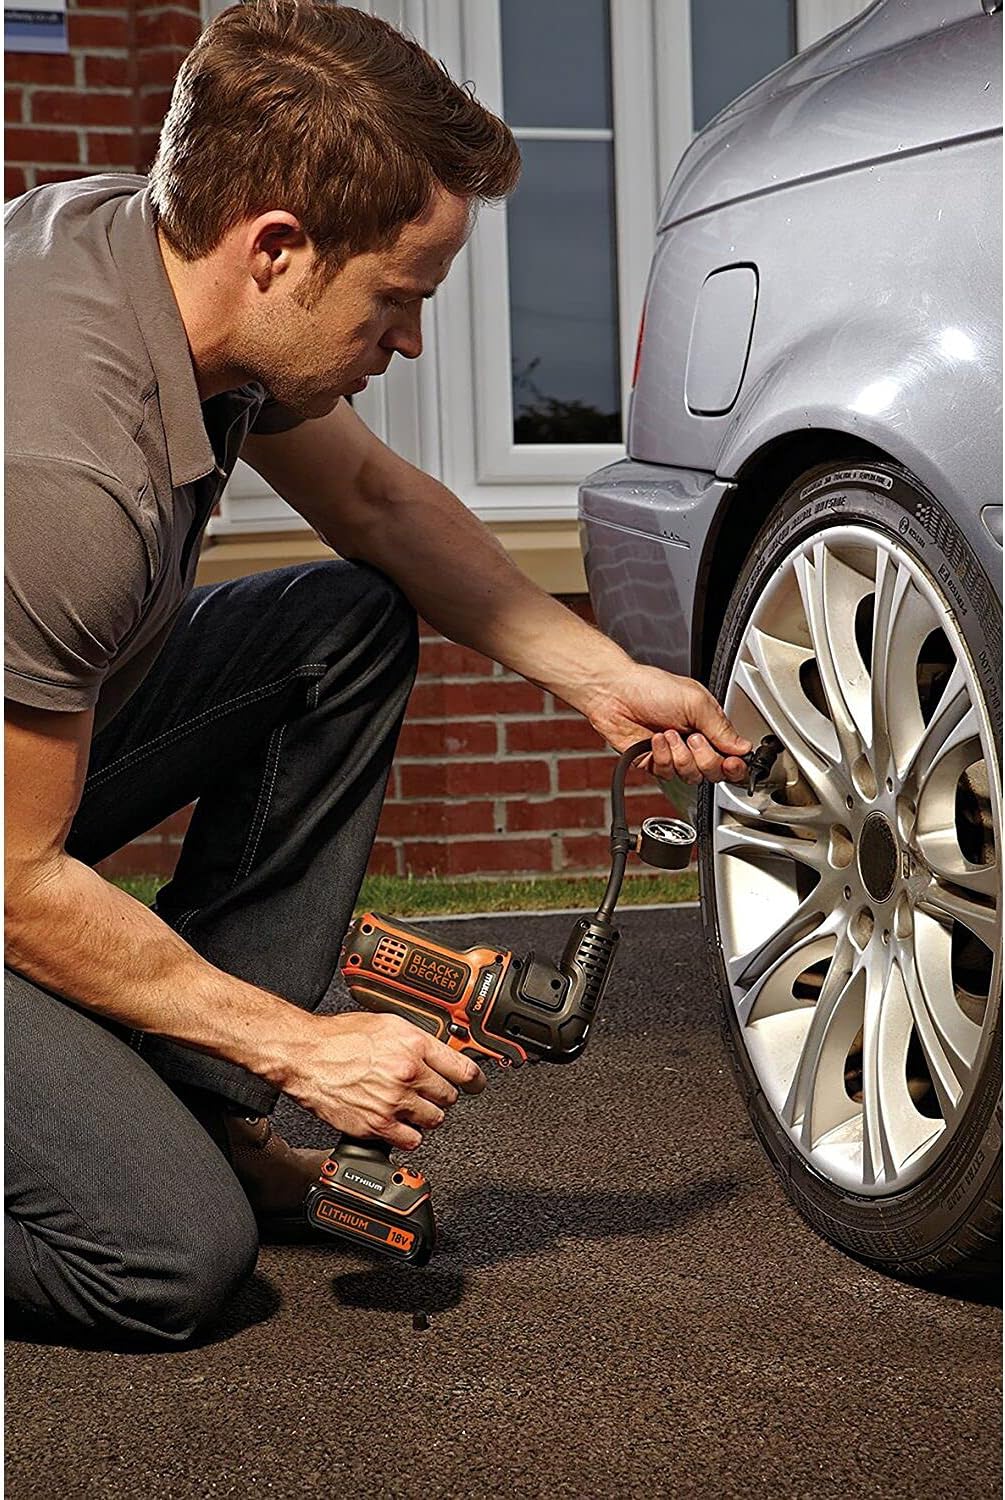
Figure 4: Inflating a car tire with the Multievo inflator attachment.
Надувавање спортске опреме:
- Select the appropriate adapter (e.g., needle for sports balls, tapered nozzle for inflatable toys).
- Attach the chosen adapter to the inflator hose.
- Insert the adapter into the item to be inflated.
- Press the trigger to begin inflation.
- Inflate gradually, checking the item's firmness or using the pressure gauge if applicable, to avoid overinflation.
- Release the trigger when the item is sufficiently inflated.
- Уклоните адаптер.

Figure 5: The Multievo system offers a range of attachments for diverse tasks.
6. Одржавање
Proper maintenance ensures the longevity and optimal performance of your inflator attachment.
Чишћење:
- Always disconnect the inflator attachment from the Multievo base unit and remove the battery before cleaning.
- Wipe the exterior of the attachment with a clean, damp тканина. Немојте користити јаке хемикалије или абразивна средства за чишћење.
- Ensure no moisture enters the air vents or internal components.
Складиштење:
- Store the inflator attachment in a dry, cool place, away from direct sunlight and extreme temperatures.
- Keep the accessory adapters stored in their designated on-board storage slots to prevent loss.
- Чувати ван домашаја деце.
КСНУМКС. Решавање проблема
If you encounter issues with your inflator attachment, refer to the following common problems and solutions:
| Проблем | Могући узрок | Решење |
|---|---|---|
| Инфлатор се не укључује. | Battery not charged or improperly inserted. Attachment not securely connected. | Ensure battery is fully charged and correctly inserted. Re-attach the inflator head to the Multievo base unit until it clicks. |
| Цурење ваздуха током надувавања. | Adapter not securely tightened. Adapter not properly seated on valve stem. Damaged hose or adapter. | Tighten the adapter onto the hose. Ensure the adapter is fully and correctly seated on the item's valve. Inspect hose and adapters for damage; replace if necessary. |
| Спора надуваност или низак притисак. | Low battery charge. Partial air leak. Obstruction in hose or adapter. | Recharge the Multievo battery. Check for air leaks as described above. Inspect hose and adapters for blockages. |
| Pressure gauge not reading correctly. | Квар мерача. | If the gauge consistently provides inaccurate readings, contact customer support for assistance. |
Ако проблем и даље постоји након покушаја ових решења, обратите се корисничкој подршци BLACK+DECKER.
8. Спецификације
The following are the technical specifications for the BLACK+DECKER Multievo Multi-tool Inflator Attachment MTNF9-XJ:
- Бренд: БЛАЦК+ДЕЦКЕР
- Број модела: MTNF9-XJ
- Извор напајања: Battery Powered (via Multievo 18V base unit)
- Волtage: 18 Volts (when connected to Multievo base unit)
- Тежина артикла: 500 грама
- Тип материјала: Пластика
- Укључене компоненте: 1 x Inflator Attachment, 2 x Accessory Adapters
- Додатне карактеристике: Pressure gauge (Bar/PSI), On-board accessory storage
9. Гаранција и подршка
BLACK+DECKER products are manufactured to high-quality standards and are guaranteed against manufacturing defects. For detailed warranty information, including terms, conditions, and duration, please refer to the warranty card included with your original Multievo base unit or visit the official BLACK+DECKER webсајту.
For technical assistance, spare parts, or to locate an authorized service center, please contact BLACK+DECKER customer support:
- Webсајт: ввв.блацканддецкер.цом
- Служба за кориснике: Refer to your region-specific BLACK+DECKER website for contact numbers and hours of operation.
When contacting support, please have your product model number (MTNF9-XJ) and purchase information readily available.


