1. Увод
This manual provides detailed instructions for the setup, operation, and maintenance of your Ambient Weather WS-10 Wireless Indoor/Outdoor 8-Channel Thermo-Hygrometer. This device is designed to monitor temperature and humidity in up to eight remote locations, offering comprehensive environmental data for your home or other desired areas.
2. Производ је готовview
The Ambient Weather WS-10 is a versatile thermo-hygrometer system that includes a main display console and three remote sensors (F007TH). It allows for simultaneous monitoring of indoor temperature and humidity, along with readings from the remote sensors. Key features include:
- Indoor/Outdoor temperature and humidity monitoring.
- Ability to read and update up to eight remote thermo-hygrometer sensors.
- Audible and visual alarms for pre-set minimum and maximum temperature and humidity levels.
- Min/Max Memory for indoor/outdoor temperature and humidity, with manual reset capability.
- Scroll mode to automatically display each sensor's data at 5-second intervals.
- Dip switch selectable remote channels for easy configuration.
- Sensor search mode for re-synchronization without battery removal.
- Transmission range of up to 300 feet line of sight (100 feet under most conditions).

Image: The Ambient Weather WS-10 main display unit and three remote sensors, showing the complete system.
3. Садржај пакета
Your Ambient Weather WS-10 package includes the following components:
- 1x WS-10 Main Display Console
- 3x F007TH Remote Thermo-Hygrometer Sensors
- Кориснички приручник (овај документ)
Напомена: Batteries are not included. The Main Unit requires 4x AAA batteries, and each Remote Sensor requires 2x AAA batteries.
4. Подешавање
4.1 Инсталација батерије
Install batteries in both the main display console and the remote sensors. Ensure correct polarity.
- Main Display Console: Open the battery compartment on the back and insert 4x AAA batteries.
- Даљински сензори: Open the battery compartment on the back of each sensor and insert 2x AAA batteries.

Image: The open battery compartment of the main display unit, showing where to insert 4x AAA batteries.
4.2 Setting Remote Sensor Channels
Each remote sensor (F007TH) has dip switches inside its battery compartment to select its channel (1-8) and units of measure (°F vs °C). It is crucial to set each sensor to a unique channel to avoid interference and ensure accurate readings on the main console.
- Remove the battery cover from a remote sensor.
- Locate the small dip switches (usually labeled 1-4) inside the compartment.
- Refer to the chart provided on the back of the sensor or in the manual to set the switches for your desired channel (e.g., Channel 1, Channel 2, Channel 3 for the included sensors).
- Set the unit of measure switch (usually switch 4) to 'UP' for Celsius or 'DOWN' for Fahrenheit.
- Repeat for all remote sensors, ensuring each is on a different channel.
- Replace the battery covers securely.
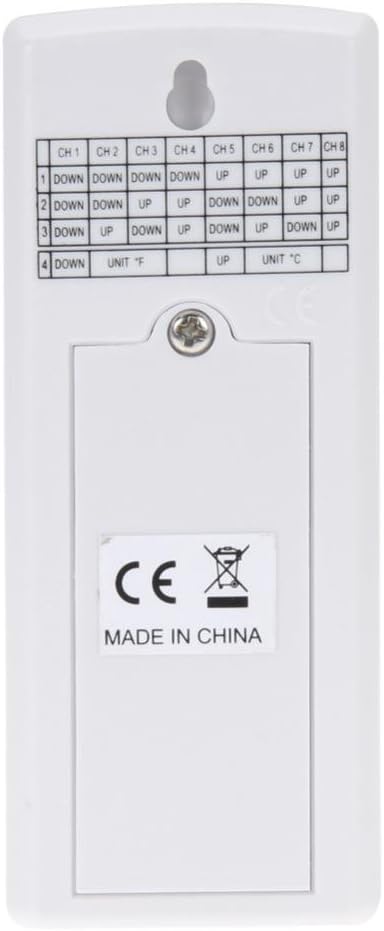
Image: The back of a remote sensor with the battery cover removed, revealing the dip switches for channel and unit selection.
4.3 Постављање сензора
For accurate readings, place remote sensors in shaded areas, away from direct sunlight, which can cause falsely high temperature readings. The sensors are designed for outdoor use but should be protected from direct rain and extreme weather conditions if possible. The transmission range is up to 300 feet line of sight, or approximately 100 feet with obstructions like walls.
Allow approximately 30 minutes for all sensors and the main unit to acclimate to their environment and stabilize readings after initial setup.
Video: This video demonstrates the setup and placement of the Ambient Weather WS-10 system, including setting dip switches and optimal sensor locations for various environments like garages, greenhouses, and sheds.
5. Операција
5.1 Приказ прекоview
The main display console shows indoor temperature and humidity, along with readings from each active remote sensor. Each sensor's data is displayed on a separate line, clearly indicating its channel number.

Image: The main display unit showing real-time temperature and humidity readings for indoor and multiple outdoor channels.
5.2 Scroll Mode
То view all indoor and detected outdoor sensor data sequentially without pressing buttons, activate the scroll mode. In this mode, the display will automatically cycle through each channel, showing its temperature and humidity for five-second intervals.
5.3 Min/Max Memory
The console records the minimum and maximum temperature and humidity values for both indoor and outdoor sensors. Press the МИН / МАКС дугме за view these recorded values. To reset the Min/Max memory, press and hold the МИН / МАКС button until the values clear.
5.4 Подешавања аларма
You can set customizable high and low alarms for temperature and humidity for each channel. When a reading exceeds or falls below your pre-set limits, the console will provide an audible and visual alert. Refer to the full product manual for detailed instructions on setting specific alarm thresholds.
5.5 Избор канала
Користите ЦХАННЕЛ button to manually cycle through the different sensor channels or to activate the scroll mode. The '+' and '-' buttons (often integrated with MIN/MAX and ALARM) may also be used for adjustment within settings.
6. Одржавање
6.1 Замена батерије
Replace batteries in the main unit (4x AAA) and remote sensors (2x AAA each) when the low battery indicator appears on the display. Using fresh, high-quality batteries ensures optimal performance and transmission range, especially in colder temperatures.
6.2 Чишћење
Wipe the display console and sensors with a soft, damp cloth. Do not use abrasive cleaners or solvents, as these may damage the plastic casing or LCD screen. Ensure no moisture enters the battery compartments or sensor vents.
6.3 Заштита сензора
While remote sensors are designed for outdoor use, prolonged exposure to extreme direct sunlight or heavy precipitation can affect their lifespan and accuracy. Consider placing them under an overhang or in a protective enclosure that still allows for proper air circulation.
КСНУМКС. Решавање проблема
- No readings from a remote sensor:
- Ensure batteries are correctly installed and not depleted in both the sensor and main unit.
- Verify the remote sensor's dip switches are set to a unique channel and match the console's detection.
- Check the distance and any obstructions between the sensor and the main unit. Try moving them closer.
- Use the sensor search mode on the main unit to re-sync sensors (refer to the full manual for specific steps).
- Нетачна очитавања температуре/влажности:
- Allow at least 30 minutes for sensors to acclimate to their environment after setup or relocation.
- Ensure remote sensors are not in direct sunlight, which can significantly inflate temperature readings.
- Verify that sensor vents are not blocked by debris or moisture.
- Повремени губитак сигнала:
- Signal strength can be affected by thick walls, metal structures, or other electronic devices. Try repositioning the sensor or main unit.
- Low battery levels can reduce transmission range. Replace batteries if necessary.
8. Спецификације
| Бранд | Амбијентално време |
| Број модела | ВС-10 |
| Технологија повезивања | 433 МХз бежични |
| Outdoor Temperature Range (Lithium Batteries) | -40°Ф до 140°Ф (-40°Ц до 60°Ц) |
| Outdoor Temperature Range (Non-Lithium Batteries) | -4°Ф до 140°Ф (-20°Ц до 60°Ц) |
| Распон влажности у затвореном/спољашњем простору | 10% до 99% |
| Прецизност температуре | ±2°Ц (±3.6°Ф) |
| Стопа ажурирања | 60 секунди |
| Распон преноса | Up to 300 feet line of sight (100 feet under most conditions) |
| Main Console Power Requirements | 4к ААА батерије (нису укључене) |
| Remote Sensor Power Requirements | 2к ААА батерије (нису укључене) |
| Console Dimensions (LxHxW) | 4.50 к 5.0 к 1.00 инча |
| LCD Dimensions (LxW) | 3.75 к 3.50 инча |
| Материјал | Пластика |
9. Гаранција и подршка
The Ambient Weather WS-10 comes with a Двогодишња гаранција произвођача. For warranty claims, technical support, or additional product information, please contact Ambient Weather customer service directly. Details can typically be found on the manufacturer's official webсајту или преко вашег продавца у којем сте купили.


