1. Увод
This manual provides detailed instructions for the installation, operation, and maintenance of your Avision FL-1501B document scanner. Please read this manual thoroughly before using the scanner to ensure proper and safe operation. Keep this manual for future reference.

Figure 1: Avision FL-1501B Document Scanner with its automatic document feeder (ADF) and output tray extended.
2. Безбедносне информације
Observe the following safety precautions to prevent damage to the scanner and ensure user safety:
- Користите само адаптер за напајање који се испоручује са скенером.
- Не излажите скенер води или прекомерној влажности.
- Поставите скенер на стабилну, равну површину.
- Избегавајте блокирање вентилационих отвора.
- Не покушавајте сами да растављате или поправљате скенер. Обратите се квалификованом сервисеру.
- Држите скенер даље од директне сунчеве светлости и извора топлоте.
3. Садржај пакета
Проверите да ли су све ставке присутне у пакету:
- Avision FL-1501B Scanner Unit
- Повер Адаптер
- УСБ кабл
- Водич за брзи почетак
- ЦД са софтвером (или упутства за преузимање)
4. Подешавање
4.1 Распакивање и постављање
- Пажљиво извадите скенер из паковања.
- Remove all protective tapes and packing materials.
- Поставите скенер на равну, стабилну површину са довољним простором за увлачење и извођење докумената.

Figure 2: The Avision FL-1501B scanner in its closed position, suitable for storage or before extending trays.
4.2 Повезивање скенера
- Connect the power adapter to the scanner's power input port and then to an electrical outlet.
- Connect the USB cable to the scanner's USB port and then to an available USB port on your computer.
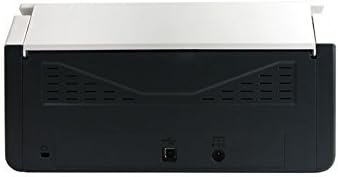
Figure 3: Rear panel of the scanner, illustrating the power input and USB connection ports.
4.3 Инсталација драјвера и софтвера
Before using the scanner, you must install the necessary drivers and scanning software on your computer.
- Insert the provided Software CD into your computer's optical drive, or download the latest drivers and software from the official Avision webсајту.
- Follow the on-screen instructions to complete the installation process. It is recommended to install all bundled software for full functionality.
- Поново покрените рачунар ако се то од вас затражи.
5. Операција
5.1 Учитавање докумената
- Extend the input tray and output tray of the scanner.
- Подесите вођице за папир тако да одговарају ширини ваших докумената.
- Place the documents face down, top edge first, into the automatic document feeder (ADF). Ensure the stack is neatly aligned. The scanner supports a maximum input sheet capacity of 100 sheets.

Слика 4: Бочни професионалацfile of the scanner, showing the fully extended input and output trays ready for document feeding.
5.2 Коришћење контролне табле
The scanner features a control panel for quick access to common scanning functions.

Слика 5: Детаљно view of the scanner's control panel, featuring a digital display, function selection buttons, Cancel, Scan, and Power buttons.
- Дугме за напајање: Press to turn the scanner on or off.
- Function Buttons (Up/Down Arrows): Use these to select different scanning profiles or functions displayed on the digital screen.
- Дугме за скенирање: Initiates the scanning process based on the currently selected function.
- Дугме за отказивање: Зауставља тренутну операцију скенирања.
5.3 Скенирање
- Уверите се да је скенер укључен и повезан са рачунаром.
- Load your documents into the ADF as described in section 5.1.
- Open the Avision scanning software on your computer (e.g., Button Manager, Capture Tool).
- Select your desired scanning settings (e.g., color mode, resolution, destination folder, single-sided/duplex).
- Click the "Scan" button in the software or press the Скенирај button on the scanner's control panel to begin scanning.
- The scanned images will be processed and saved according to your software settings.
6. Одржавање
6.1 Чишћење скенера
Regular cleaning helps maintain optimal scanning performance.
- Turn off the scanner and disconnect the power cable before cleaning.
- Лагано користите меку крпу која не оставља длачице дampводом или благим, неабразивним средством за чишћење да бисте обрисали спољашњост скенера.
- To clean the glass platen (if applicable) and rollers, open the scanner cover. Use a specialized scanner cleaning kit or a soft cloth with isopropyl alcohol.
- Allow all components to dry completely before reconnecting power.
6.2 Ажурирања фирмвера
Periodically check the Avision website for firmware updates. Firmware updates can improve performance, add features, or resolve issues. Follow the instructions provided with the firmware update package carefully.
КСНУМКС. Решавање проблема
Ако наиђете на проблеме са скенером, погледајте следеће уобичајене проблеме и решења:
| Проблем | Могући узрок | Решење |
|---|---|---|
| Скенер се не укључује. | Кабл за напајање није повезан; утичница је неисправна. | Уверите се да је кабл за напајање безбедно повезан. Покушајте са другом утичницом. |
| Рачунар не детектује скенер. | USB кабл лабав; драјвери нису инсталирани или су оштећени. | Проверите везу USB кабла. Поново инсталирајте управљачке програме скенера. Покушајте са другим USB портом. |
| Скениране слике су мутне или пругасте. | Scanner glass or rollers are dirty; document misfeed. | Clean the scanner's internal components (refer to Section 6.1). Ensure documents are loaded correctly. |
| Documents jam in the ADF. | Documents are wrinkled or stapled; paper guides not adjusted. | Straighten documents. Remove staples/clips. Adjust paper guides to fit document width. |
8. Спецификације
| Феатуре | Детаљ |
|---|---|
| Бранд | Нотифицатион |
| Модел | ФЛ-1501Б |
| Тип скенера | Скенер докумената |
| Резолуција скенера | 600 дпи |
| Максимални капацитет улазног листа | 100 листова |
| Медиа Типе | Папир |
| Ватtage | 24 вати |
| Димензије производа | 33 к 32.32 к 80.94 цм |
| Тежина артикла | 5.67 кг |
| Датум првог доступног | 6. јун 2016 |
9. Гаранција и подршка
9.1 Информације о гаранцији
Avision products are manufactured to high-quality standards. This product is covered by a limited warranty against defects in materials and workmanship. The specific terms and duration of the warranty may vary by region. Please refer to the warranty card included with your product or visit the official Avision webза детаљне информације о гаранцији.
9.2 Техничка подршка
For technical assistance, driver downloads, or further information, please visit the official Avision support website or contact your local Avision service center. Contact details can typically be found on the Avision webсајту или у документацији вашег производа.


