1. Увод
This manual provides comprehensive instructions for the installation, operation, and maintenance of your Anlapus H.265+ 8-Channel 1080P DVR Surveillance System. This system is designed to offer reliable 24/7 video recording with four high-definition IP66 weatherproof outdoor cameras, ensuring detailed monitoring of your property.
Key features include crystal-clear 1080p video resolution, advanced H.265+ video compression for efficient storage, robust night vision capabilities, and remote access via the Anlapus mobile application for live viewинг и упозорења.
2. Безбедносне информације
- Напајање: Use only the specified power adapters. Incorrect voltagможе оштетити уређај и представљати безбедносни ризик.
- Инсталационо окружење: Ensure the DVR is placed in a well-ventilated area, away from direct sunlight, heat sources, and moisture. Cameras are IP66 rated for outdoor use but should not be submerged in water.
- Управљање кабловима: Route cables carefully to prevent tripping hazards and damage. Avoid placing heavy objects on cables.
- Чишћење: Искључите напајање пре чишћења. Користите меку, суву крпу. Не користите течна или аеросолна средства за чишћење.
- Сервисирање: Do not attempt to service this product yourself. Refer all servicing to qualified personnel.
3. Садржај пакета
Проверите да ли су све ставке наведене у наставку укључене у ваш пакет. Ако неке ставке недостају или су оштећене, обратите се корисничкој подршци.

Image: Anlapus DVR and a single camera unit.

Image: Diagram showing all components included in the Anlapus security system package.
- 1 x 8-Channel 1080P DVR
- 4 x 1080P IP66 Outdoor Cameras
- 4 x 60ft BNC Video Cables
- 2 x 12V 2A Power Adapters
- 1 x 1-to-4 Power Splitter Cable
- 1 к УСБ миш
- 1 x Instruction Manual (Quick Start Guide)
- 4 x Mounting Screw Bags
- 4 x Warning Stickers
4. Производ је готовview
4.1 DVR (Digital Video Recorder)
The DVR is the central unit of your surveillance system, responsible for recording, storing, and managing video footage from all connected cameras. It supports up to 8 channels, allowing for future expansion with additional cameras.

Image: Detailed diagram illustrating the ports on the Anlapus DVR and the features of the camera.
DVR Rear Panel Ports:
- Видео улаз (BNC): Connects to surveillance cameras.
- Аудио улаз (RCA): Connects to external microphones (if applicable).
- Аудио излаз (RCA): Повезује се са звучницима.
- Monitor (VGA): Повезује се на ВГА монитор.
- Monitor (HDMI): Connects to an HDMI monitor or TV.
- Мрежа (РЈ45): Connects to your router for internet access and remote viewинг.
- УСБ портови: For connecting the USB mouse and for USB backup.
- Улазно напајање (DC 12V): Повезује се на адаптер за напајање.
4.2 Surveillance Cameras
The included cameras are 1080P HD, providing clear and detailed images. They are designed for both indoor and outdoor use with an IP66 weatherproof rating.
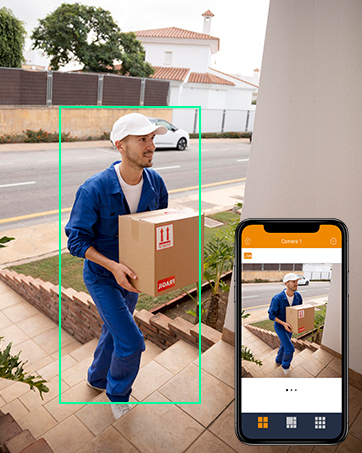
Image: An Anlapus camera shown with rain, highlighting its IP66 weatherproof rating.
Карактеристике камере:
- Резолуција: 1920 x 1080p (2.0MP) for high-definition video.
- Ноћни вид: Equipped with 24 IR-LEDs, providing up to 20 meters (65.62 feet) of clear night vision.
- Објектив: 3.6mm HD lens with a 90-degree wider viewугао уласка.
- Отпоран на временске услове: IP66 rated, ensuring protection against dust and water for reliable outdoor performance.
- Стаклени поклопац: Designed to prevent fogging and maintain clear vision in various weather conditions.
5. Подешавање
5.1 Почетно повезивање
Follow these steps to connect your DVR and cameras for initial setup.

Image: Diagram illustrating the simple connection process for the Anlapus DVR and cameras.
- Повежите камере: Connect each camera to a BNC video input port on the DVR using the provided 60ft BNC cables.
- Power Cameras: Use the 1-to-4 power splitter cable and one 12V 2A power adapter to power the cameras.
- Повежи монитор: Connect a monitor (TV or PC display) to the DVR using either an HDMI or VGA cable.
- Повежите миш: Plug the USB mouse into one of the DVR's USB ports.
- Connect Network (Optional but Recommended): Connect the DVR to your router using an Ethernet cable for remote access and online features.
- Power DVR: Connect the second 12V 2A power adapter to the DVR's power input. The system will power on automatically.
5.2 First-Time Configuration
Upon first boot, the system will guide you through initial setup steps, including language selection, password creation, and network settings. Follow the on-screen prompts.
5.3 Mobile App Setup (Anlapus App)
За даљински viewing and alerts, download and configure the Anlapus mobile application.

Image: Screenshot of the Anlapus mobile application interface showing live camera feeds.
- Преузми апликацију: Тражи "Anlapus" in the App Store (iOS) or Google Play Store (Android) and install the application.
- Региструјте налог: Open the app and register a new user account.
- Додај уређај: Follow the in-app instructions to add your DVR by scanning the QR code displayed on the DVR's monitor or by manually entering its device ID.
- Configure Alerts: Enable motion detection alerts and email notifications within the app settings to receive real-time updates.
6. Руковање системом
6.1 Уживо View
Када се повежете, можете view ливе фооtage from your cameras on a connected monitor or via the Anlapus mobile app.

Слика: Људи viewнадзор уживоtage on smartphones, tablets, and laptops.
6.2 Режими снимања
The DVR supports several recording options:
- Continuous Recording (24/7): Records constantly, overwriting older footagе када је складиште пуна.
- Снимање детекције покрета: Records only when motion is detected, saving storage space. You can configure motion detection zones and sensitivity.
- Планирано снимање: Снима током одређеног доба дана или недеље.
- Ручно снимање: Start and stop recording manually as needed.

Image: A person and child playing in a yard, with green boxes indicating motion detection zones.
6.3 Репродукција
Review снимљено фооtage directly from the DVR or through the mobile app.

Image: Screenshots showing video playback on a monitor and a mobile phone app.
6.4 H.265+ видео компресија
The system utilizes H.265+ video compression technology, which significantly reduces file sizes compared to H.264, allowing for up to four times longer recording times and faster remote viewing without compromising video quality.

Image: A comparison showing H.265+ requiring 50% less storage than H.264 for the same video content.
6.5 Ноћни вид
The cameras automatically switch to infrared night vision in low-light conditions, providing clear black and white images up to 20 meters (65.62 feet).
Image: A split image showing a scene in full color during the day and in black and white with infrared illumination at night.
7. Одржавање
- Чишћење камере: Периодично чистите сочива камере меком крпомamp крпом како бисте осигурали јасан квалитет слике. Избегавајте абразивна средства за чишћење.
- Вентилација ДВР-а: Ensure the DVR's ventilation openings are clear of dust and obstructions to prevent overheating.
- Ажурирања фирмвера: Check the Anlapus official website or app for available firmware updates to ensure optimal performance and security. Follow update instructions carefully.
- Резервна копија података: Редовно правите резервне копије важних видео записаtage to an external USB drive to prevent data loss.
КСНУМКС. Решавање проблема
| Проблем | Могући узрок | Решење |
|---|---|---|
| Нема слике на монитору | Loose cable connection, incorrect input source, power issue. | Проверите HDMI/VGA кабловске везе. Уверите се да је монитор на исправном улазу. Проверите напајање DVR-а. |
| Cameras not displaying video | Camera power issue, BNC cable issue, camera fault. | Check camera power connections and power adapter. Inspect BNC cables for damage. Test camera on a different channel if possible. |
| Нема даљинског приступа преко апликације | DVR not connected to network, incorrect network settings, app configuration issue. | Ensure DVR is connected to router via Ethernet. Check DVR network settings. Verify app device ID and network permissions. Restart DVR and router. |
| Детекција покрета не ради | Motion detection not enabled, sensitivity too low, detection zone not set. | Enable motion detection in DVR settings. Adjust sensitivity. Define detection zones. |
| Слаб ноћни вид | IR LEDs obstructed, camera lens dirty, insufficient power. | Clear any obstructions from IR LEDs. Clean camera lens. Ensure camera is receiving adequate power. |
9. Спецификације
| Феатуре | Спецификација |
|---|---|
| Број модела | AJ-AM8A4B-4B40E-202S |
| Видео Цомпрессион | Х.265 + |
| DVR канали | 8 канала |
| Резолуција камере | 1080п (1920 к 1080) |
| Цамера Куантити | 4 |
| Ноћни вид | До 20 метара (65.62 стопе) |
| Оцена отпорности камере на временске услове | ИП66 |
| Камера Viewинг Англе | 90 степени |
| Фраме Рате | 30 fps or more |
| Повер Волtage | 12 Волтс |
| Технологија повезивања | Wired, Wireless (for remote access) |
| Тип монтаже | Валл Моунт |
| Димензије производа (Д к Ш к В) | 20.09 к 30.61 к 44.4 цм; 4.53 килограма |
10. Информације о гаранцији
Anlapus products are covered by a limited warranty from the date of purchase. This warranty typically covers defects in materials and workmanship under normal use. Please refer to the warranty card included with your product or visit the official Anlapus website for specific terms and conditions, including warranty duration and claim procedures.
Сачувајте рачун као доказ о куповини за потребе гаранције.
11. Корисничка подршка
If you encounter any issues or have questions regarding your Anlapus surveillance system, please contact our customer support team. Our dedicated support staff can assist you with technical queries, troubleshooting, and warranty services.

Image: A customer support representative wearing a headset, ready to assist.
For the most up-to-date contact information, including email, phone, and online chat options, please visit the official Anlapus webсајт или погледајте контакт податке наведене на паковању вашег производа.
Онлине ресурси:
- Anlapus Official Webсајт: ввв.анлапус.цом (Прample URL, please refer to actual product documentation)
- Anlapus App Support Section


