1. Увод
Welcome to the user manual for your Ulefone Armor X9 Rugged Phone. This guide provides essential information on setting up, operating, maintaining, and troubleshooting your device. The Ulefone Armor X9 is designed for durability and performance, featuring robust protection and advanced functionalities.
Key features of your Ulefone Armor X9 include:
- IP68/IP69K Grade 360 All Round Protection: Направљен да издржи тешка окружења.
- Оперативни систем Андроид 11: Enjoy the latest Android experience.
- 4 ГБ РАМ-а + 128 ГБ РОМ-а: Ample memory and storage for your applications and data.
- Трострука задња камера од 16 МП: Capture high-quality photos and videos.
- Massive 5580mAh Battery Capacity: Extended usage time.
- Triple Navigation System: Enhanced positioning accuracy.
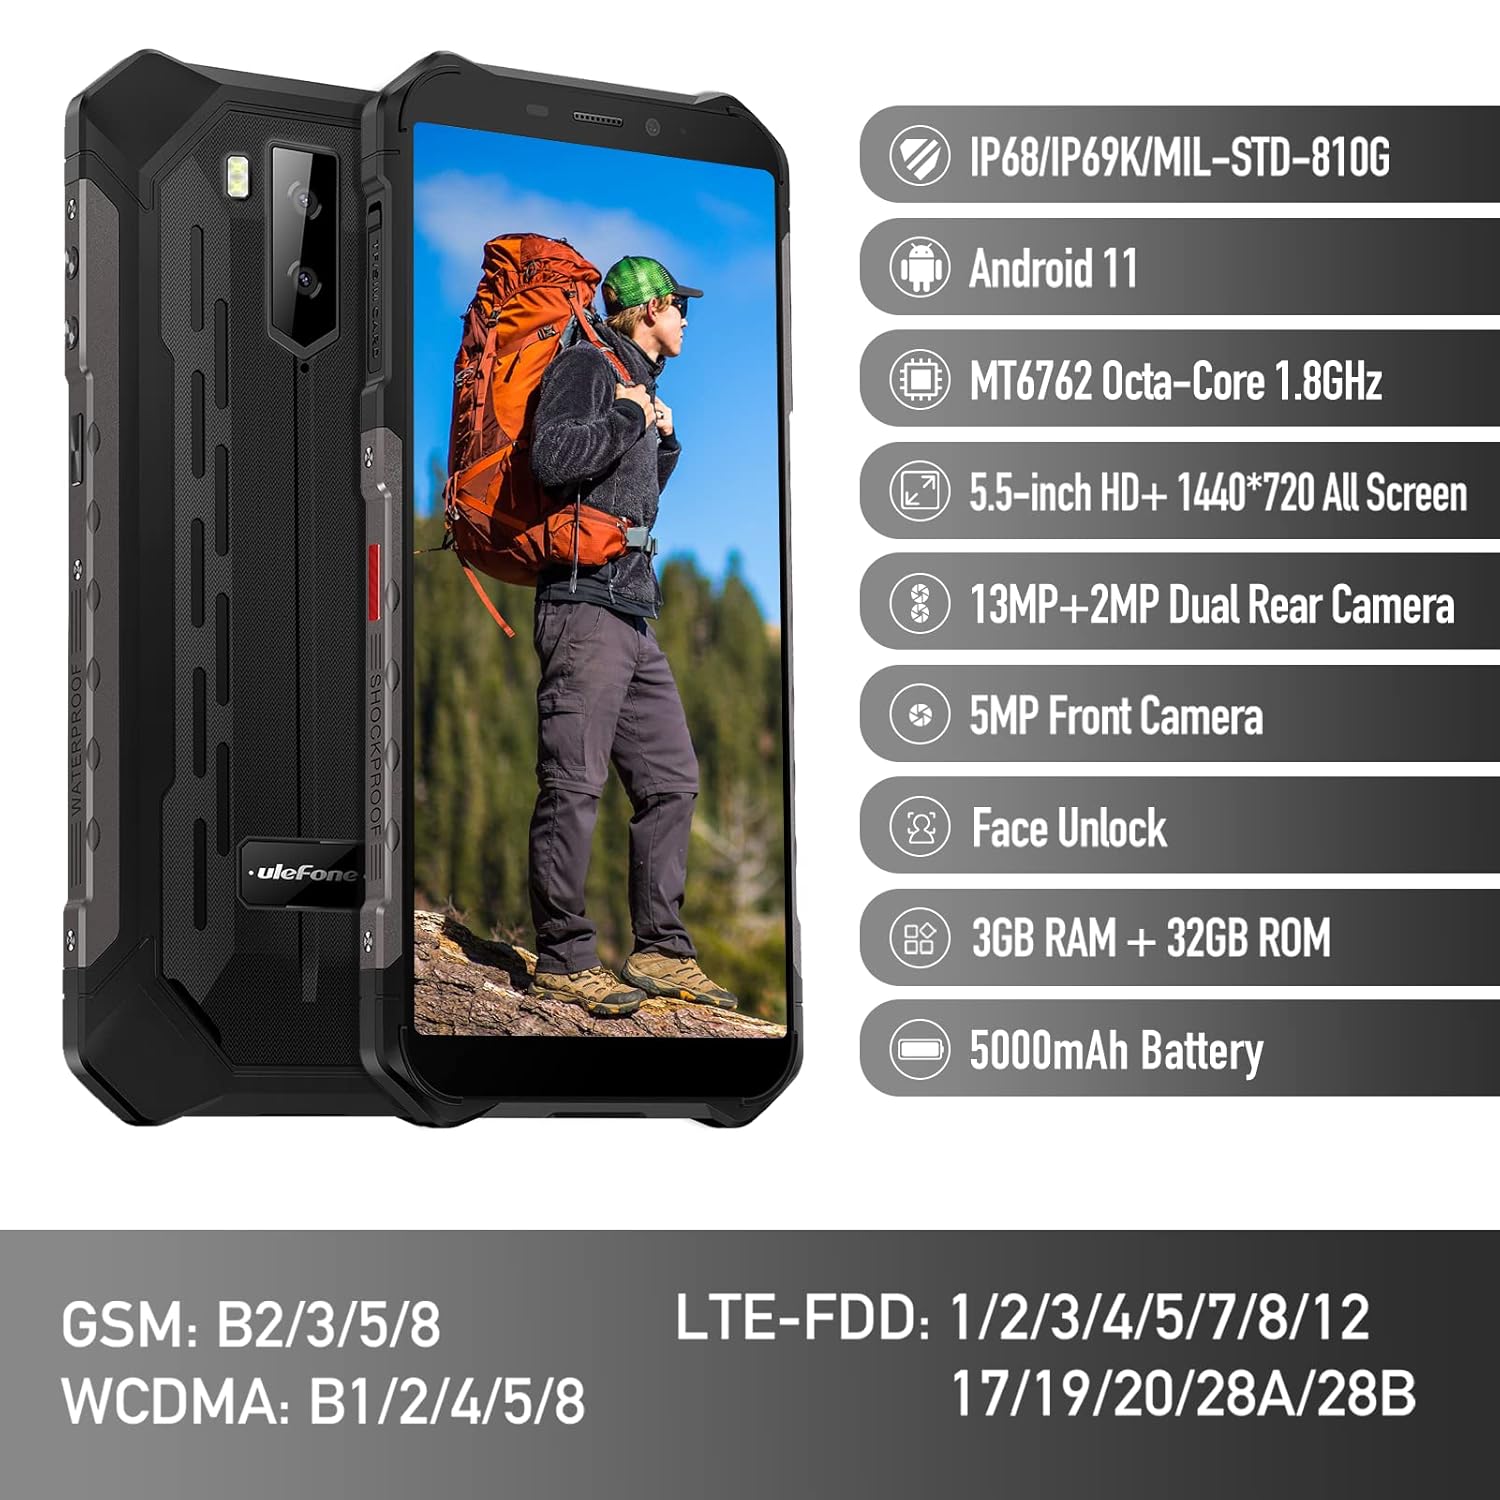
Figure 1: Ulefone Armor X9 Rugged Phone overview, highlighting its robust design and core specifications like IP68/IP69K rating, Android 11, Octa-Core processor, 5.5-inch HD+ screen, 13MP+2MP dual rear camera, 5MP front camera, Face Unlock, 3GB RAM + 32GB ROM, and 5000mAh battery.
2. Подешавање
2.1. Инсталација SIM картице и TF картице
The Ulefone Armor X9 supports dual SIM cards and a TF (microSD) card for expandable storage. Follow these steps to install them:
- Пронађите лежиште за СИМ картицу са стране телефона.
- Користите приложени алат за избацивање СИМ картице да бисте отворили лежиште.
- Carefully place your Nano-SIM cards into the designated slots (SIM1 and SIM2).
- If using a TF card, place it into the dedicated TF card slot. Note that some configurations may share a slot between SIM2 and the TF card.
- Gently push the tray back into the phone until it is flush with the device body. Ensure the tray is properly sealed to maintain water and dust resistance.

Figure 2: Illustration of the dual SIM and TF card tray, showing how to insert SIM1, SIM2, and a TF card into the Ulefone Armor X9.
2.2. Почетно пуњење
Before first use, it is recommended to fully charge your Ulefone Armor X9. Use the provided USB cable and power adapter.
- Прикључите USB кабл на порт за пуњење на телефону.
- Повежите други крај УСБ кабла на адаптер за напајање.
- Укључите адаптер за напајање у зидну утичницу.
- Индикатор пуњења ће се појавити на екрану. Оставите телефон да се пуни док икона батерије не покаже да је пуна.
2.3. Укључивање/искључивање
- За укључивање: Press and hold the Power button (usually on the right side) until the Ulefone logo appears.
- За искључивање: Press and hold the Power button until the power options menu appears on the screen. Select "Power off" and confirm.
- Рестартовати: У менију опција напајања изаберите „Поново покрени“ и потврдите.
3. Упутство за употребу
3.1. Основна навигација (Android 11)
Your Ulefone Armor X9 runs on Android 11, offering an intuitive user interface. Common gestures and navigation include:
- Провуче до: Приступите фиоци апликација.
- Превуците доле: Отворите панел са обавештењима и брза подешавања.
- Додирните: Изаберите ставку или отворите апликацију.
- Дуго притисните: Приступите контекстуалним менијима или померите иконе.
- Зумирање штипкањем прстију: Увећајте или умањите слике и web странице.

Figure 3: Screenshots of the Android 11 interface on the Ulefone Armor X9, showing settings menus, quick toggles, and the sound recorder application.

Figure 4: The 5.5-inch 18:9 All Screen display of the Ulefone Armor X9, showcasing its immersive viewing experience with an image of a skier.
3.2. Употреба камере
Your phone is equipped with a 16MP Triple Rear Camera and a Front Camera. To use the camera:
- Отворите апликацију „Камера“ са почетног екрана или из фиоке апликација.
- Додирните дугме затварача да бисте снимили фотографију.
- Пребацујте се између режима за фотографисање и снимање видеа по потреби.
- Tap the icon to switch between the front and rear cameras.
- Explore various camera modes and settings for optimal results.
3.3. Повезивање
The Ulefone Armor X9 supports various connectivity options:
- Ви-Фи: Идите на Подешавања > Мрежа и интернет > Wi-Fi да бисте се повезали са доступним мрежама.
- Блуетоотх: Go to Settings > Connected devices > Bluetooth to pair with Bluetooth devices.
- ГПС: The phone features AGPS for accurate location services. Ensure location services are enabled in Settings > Location.
- УСБ: Повежите телефон са рачунаром помоћу USB кабла за пренос података или пуњење.
3.4. Откључавање лицем
For convenient and secure unlocking, your Ulefone Armor X9 supports Face Unlock:
- Идите у Подешавања > Безбедност > Откључавање лицем.
- Пратите упутства на екрану да бисте регистровали своје лице.
- Ensure good lighting and hold the phone at eye level during registration.
- Once registered, you can unlock your phone by simply looking at the front camera.
4. Одржавање
4.1. Чишћење и њега
To maintain the performance and appearance of your rugged phone:
- Обришите екран и кућиште меком крпом која не оставља влакна.
- За тврдокорну прљавштину користите мало дamp крпа. Избегавајте јаке хемикалије или абразивне материјале.
- Ensure all port covers are securely closed to maintain water and dust resistance, especially after charging or using headphones.

Figure 5: The Ulefone Armor X9's 360° All Protection Design, showcasing its superior materials and superb durability against impacts and harsh conditions.
4.2. Water and Dust Resistance (IP68/IP69K)
The Ulefone Armor X9 is rated IP68/IP69K, meaning it is resistant to dust and water immersion. However, this resistance is not permanent and may decrease over time with normal wear. To ensure optimal protection:
- Do not intentionally submerge the phone in water for extended periods or beyond specified depths.
- Avoid exposing the phone to high-pressure water or extreme temperatures.
- Ensure all port covers are tightly sealed before exposure to water or dust.
- Ако се телефон покваси, добро га осушите пре пуњења или отварања било ког порта.
4.3. Брига о батерији
To prolong the life of your 5580mAh Lithium Polymer battery:
- Avoid extreme temperatures (hot or cold) as they can degrade battery performance.
- Use only the original charger and cable or certified compatible accessories.
- Не дозволите да се батерија често потпуно испразни. Напуните је пре него што достигне веома низак ниво.
КСНУМКС. Решавање проблема
If you encounter issues with your Ulefone Armor X9, try the following troubleshooting steps:
5.1. Телефон се не укључује
- Уверите се да је батерија напуњена. Повежите телефон са пуњачем најмање 30 минута.
- Притисните и држите дугме за напајање 10-15 секунди да бисте поново покренули рачунар.
5.2. Проблеми са пуњењем
- Verify that the charging cable and adapter are working correctly. Try a different charger if available.
- Уверите се да је прикључак за пуњење чист и да нема остатака.
- Make sure the charging cable is fully inserted into the port. Some rugged phone ports may require a firm connection due to protective covers.
5.3. SIM/TF Card Not Detected
- Ensure the SIM/TF card is correctly inserted into the tray and the tray is fully seated.
- Поново покрените телефон.
- Check if the SIM card is active with your network provider.
5.4. App Crashes or Freezing
- Затворите и поново отворите проблематичну апликацију.
- Обришите кеш меморију и податке апликације (Подешавања > Апликације > [Назив апликације] > Меморија и кеш).
- Уверите се да је апликација ажурирана на најновију верзију.
- Поново покрените телефон.
5.5. Фацтори Ресет
Ако проблеми и даље постоје, враћање на фабричка подешавања би их могло решити. Упозорење: Овим ћете обрисати све податке на телефону. Направите резервну копију важних података пре него што наставите.
- Идите на Подешавања > Систем > Опције ресетовања.
- Изаберите „Обриши све податке (ресетовање на фабричка подешавања)“.
- Потврдите своју одлуку и унесите ПИН/лозинку ако се то од вас затражи.
6. Спецификације
Below are the detailed specifications for the Ulefone Armor X9:

Figure 6: Details of the Ulefone Armor X9's Octa-Core Processor, highlighting its power-efficient yet powerful performance, along with 3GB RAM and 32GB ROM, and support for up to 256GB TF card extendable storage.
| Феатуре | Спецификација |
|---|---|
| Оперативни систем | Андроид 11.0 |
| РАМ | 3 ГБ (Note: Feature bullets mention 4GB RAM, please verify actual model) |
| Капацитет меморије | 32 ГБ (Expandable with TF card up to 256GB. Feature bullets mention 128GB ROM, please verify actual model) |
| ЦПУ модел | МТ6762 Оцта-Цоре 1.8ГХз (Note: Specifications list 'Snapdragon', but image indicates MT6762. Please verify actual model) |
| Димензије производа | 15.8 к 7.75 к 1.38 цм |
| Тежина артикла | 472 г |
| Батерије | 1 литијум-полимерска батерија (5580 mAh, укључена) |
| Бежична комуникација | Мобилни, Bluetooth, USB, Wi-Fi |
| ГПС | АГПС |
| Посебне карактеристике | Rear Camera, Face Unlock, IP68/IP69K, MIL-STD-810G |
| Дисплаи | 5.5-inch HD+ 1440*720 All Screen |
| Задња камера | 13MP+2MP Dual Rear Camera (Note: Feature bullets mention 16MP Triple Rear Camera, please verify actual model) |
| Предња камера | Предња камера од 5МП |
| Боја | Црно |
| Произвођач | Улефон |
Note: Specifications are based on available product data and may vary slightly. Please refer to your product packaging for the most accurate information. There are discrepancies between feature bullets, specifications, and image text regarding RAM, ROM, CPU, and camera megapixels. This manual uses the most frequently cited or detailed information, with notes for clarification.
7. Гаранција и подршка
7.1. Информације о гаранцији
Your Ulefone Armor X9 is covered by a manufacturer's warranty. The specific terms and duration of the warranty may vary by region and retailer. Please refer to the warranty card included in your product packaging or contact your point of purchase for detailed information regarding warranty coverage and claims.
7.2. Корисничка подршка
For technical assistance, troubleshooting beyond this manual, or warranty inquiries, please contact Ulefone customer support or your authorized dealer. You can typically find contact information on the official Ulefone webсајту или у документацији вашег производа.
- Visit the official Ulefone website for FAQs, software updates, and support contact details.
- Држите рачун о куповини и серијски број производа при руци када контактирате подршку.


