1. Увод
This manual provides detailed instructions for the installation, operation, and maintenance of the ASUS TUF Gaming B660M-PLUS WiFi motherboard. This motherboard is designed to support 12th Generation Intel Core processors and DDR5 memory, offering a robust foundation for personal computer systems.
Please read this manual thoroughly before beginning the installation process to ensure proper setup and to prevent damage to components.
2. Безбедносне информације
- Увек искључите кабл за напајање из зидне утичнице пре него што додирнете било које унутрашње компоненте.
- Носите антистатичку наруквицу или често додирујте уземљени метални предмет како бисте испразнили статички електрицитет пре руковања компонентама.
- Handle components by their edges to avoid touching sensitive circuits.
- Обезбедите одговарајућу вентилацију унутар кућишта рачунара како бисте спречили прегревање.
- Држите матичну плочу даље од влаге и екстремних температура.
- Refer to the CPU and memory manufacturer's guidelines for specific installation instructions.
3. Садржај пакета
Verify that your package contains the following items. If any item is damaged or missing, contact your retailer.
- Матична плоча ASUS TUF Gaming B660M-PLUS WiFi
- I/O Shield (if not pre-mounted)
- SATA каблови за пренос података
- M.2 пакет завртњева
- Ви-Фи антена
- Support DVD/USB Drive (containing drivers and utilities)
- Упутство за употребу и Водич за брзи почетак
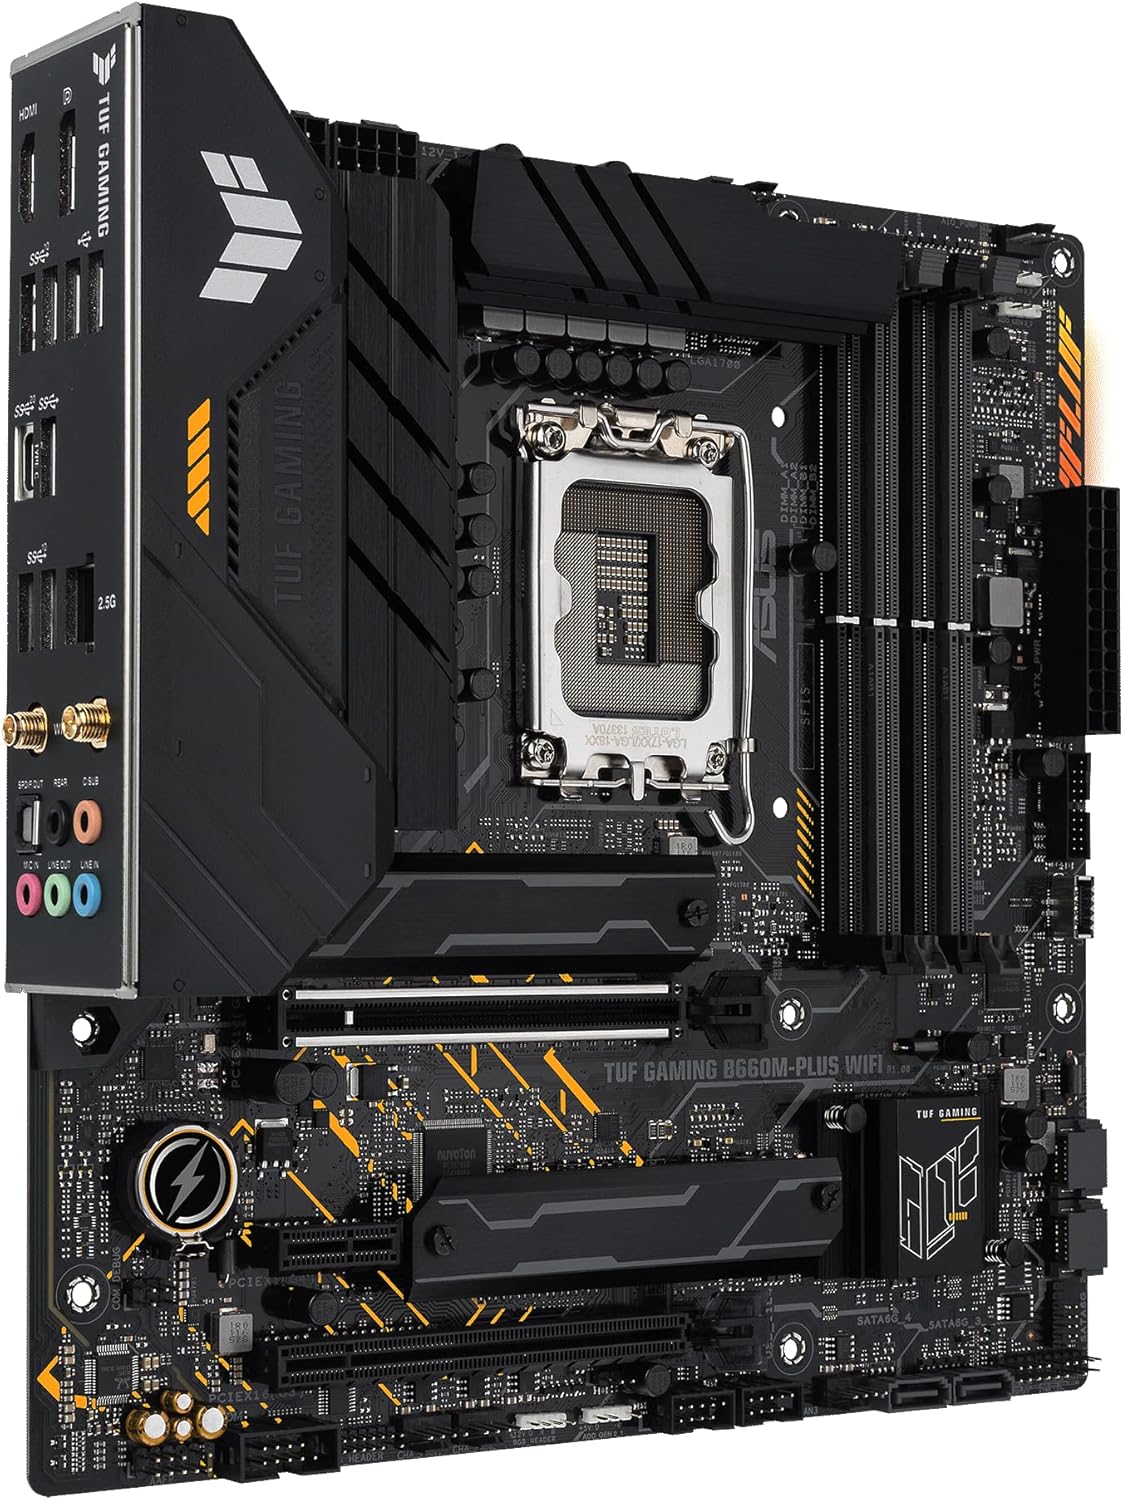
4. Распоред матичне плоче
Упознајте се са кључним компонентама и конекторима на матичној плочи.

Слика 4.1: Одозго надоле view of the ASUS TUF Gaming B660M-PLUS WiFi motherboard, showing the CPU socket, DIMM slots, PCIe slots, and heatsinks.
4.1 CPU Socket (LGA 1700)
The LGA 1700 socket supports 12th Generation Intel Core processors. Ensure the CPU is correctly oriented before installation.

Figure 4.2: Close-up of the LGA 1700 CPU socket on the motherboard, ready for processor installation.
4.2 ДДР5 ДИММ слотова
This motherboard features four DDR5 DIMM slots, supporting up to 128GB of system memory with speeds up to 6000MHz (OC).
4.3 ПЦИе слота
Includes a PCIe 5.0 x16 slot for graphics cards and multiple PCIe 4.0 M.2 slots for high-speed storage.
4.4 САТА порта
Four SATA 6Gb/s ports are available for connecting traditional hard drives and SSDs.
4.5 Задња И/О плоча
The rear I/O panel provides various connectivity options.

Слика 4.3: Детаљно view of the rear I/O panel, showing USB ports, HDMI, DisplayPort, 2.5G Ethernet, Wi-Fi antenna connectors, and audio jacks.
- УСБ портови: Multiple USB 2.0, USB 3.2 Gen 1, USB 3.2 Gen 2, and USB 3.2 Gen 2x2 Type-C ports.
- Видео излази: HDMI, DisplayPort.
- Мрежа: 2.5G Ethernet port, Wi-Fi 6 antenna connectors.
- аудио: Audio jacks for speakers, microphone, and line-in.
- S/PDIF Out: Оптички S/PDIF дигитални аудио излаз.
5. Подешавање и инсталација
Пратите ове кораке за правилну инсталацију матичне плоче и компоненти.
5.1 Инсталирање ЦПУ -а
- Отворите полугу процесорског утичнице и подигните плочу за оптерећење.
- Пажљиво поравнајте процесор са утичницом, водећи рачуна да се троугласта ознака на процесору поклапа са ознаком на утичници.
- Пажљиво поставите процесор у утичницу без присиљавања.
- Затворите плочу за оптерећење и притисните ручицу надоле док се не закључа на своје место.

Слика 5.1: Одозго надоле view of the motherboard with a CPU installed in the LGA 1700 socket.
5.2 Installing RAM (DDR5)
- Отворите копче на оба краја DIMM слота.
- Поравнајте зарез на DDR5 меморијском модулу са кључем у DIMM слоту.
- Чврсто уметните меморијски модул у слот док се клипови не уклопе на место.
- For optimal performance, install memory modules in the recommended dual-channel configuration (refer to the motherboard manual for specific slot pairing).
5.3 Инсталирање уређаја за складиштење
Инсталација М.2 ССД-а:
- Пронађите M.2 слотове на матичној плочи. Неки слотови могу имати хладњаке које је прво потребно уклонити.
- Уметните M.2 SSD у слот под углом од 30 степени.
- Push the SSD down and secure it with the provided M.2 screw or Q-Latch mechanism.
- If applicable, reattach the M.2 heatsink.
Инсталација SATA диска:
- Повежите један крај SATA кабла за пренос података са SATA портом на матичној плочи.
- Повежите други крај SATA кабла за пренос података са вашим SATA чврстим диском или SSD-ом.
- Повежите SATA кабл за напајање са вашег напајања на диск.
5.4 Installing the Graphics Card
- Open the latch on the PCIe 5.0 x16 slot.
- Align your graphics card with the slot and press it down firmly until it clicks into place and the latch closes.
- Причврстите графичку картицу за кућиште рачунара помоћу завртња.
- Повежите све потребне PCIe каблове за напајање са напајања на графичку картицу.
5.5 Повезивање напајања
- Connect the 24-pin ATX power connector from your power supply to the corresponding header on the motherboard.
- Connect the 8-pin and 4-pin (or 8-pin only, depending on your CPU power requirements) ATX 12V power connectors to the motherboard.
5.6 Повезивање конектора на предњој плочи
Connect the cables from your computer case's front panel (power button, reset button, USB ports, audio jacks, LED indicators) to the corresponding headers on the motherboard. Refer to the motherboard diagram for exact locations.
5.7 Повезивање периферних уређаја
Connect your monitor, keyboard, mouse, and other peripherals to the appropriate ports on the rear I/O panel.
Слика 5.2: Под углом view of the motherboard, highlighting the rear I/O panel and various connectors.
6. Упутство за употребу
6.1 Прво покретање
- After assembling all components, connect the power cord to the power supply and turn on the power switch.
- Притисните дугме за напајање на кућишту рачунара.
- The system should power on and display the ASUS logo.
6.2 Подешавање BIOS-а/UEFI-ја
Да бисте ушли у услужни програм за подешавање BIOS/UEFI-ја, притисните тастер Избриши кључ или F2 key during the Power-On Self-Test (POST) process. Here you can configure system settings, boot order, and monitor hardware status.
6.3 Инсталација драјвера
After installing your operating system, install the necessary drivers for the motherboard components. These can be found on the included support DVD/USB drive or downloaded from the official ASUS support website. The ASUS Armory Crate software can assist with driver and utility installation.
6.4 Услужни програми
The ASUS Armory Crate software provides tools for system monitoring, fan control (Fan Xpert 4), two-way AI noise cancellation, RGB lighting customization, and peripheral management.
7. Одржавање
- Чишћење: Regularly clean dust from inside your computer case using compressed air. Ensure the system is powered off and unplugged before cleaning.
- Ажурирања BIOS-а/UEFI-ја: Периодично проверавајте подршку за ASUS website for BIOS/UEFI updates. Updates can improve system stability, compatibility, and performance. Follow the instructions provided by ASUS carefully when updating the BIOS/UEFI.
- Ажурирања драјвера: Редовно ажурирајте своје драјвере како бисте осигурали оптималне перформансе и компатибилност са новим софтвером и хардвером.
КСНУМКС. Решавање проблема
Ако наиђете на проблеме, размотрите следеће уобичајене кораке за решавање проблема:
- Нема напајања: Ensure all power cables (24-pin, 8-pin/4-pin CPU, PCIe for GPU) are securely connected. Check the power supply switch and wall outlet.
- Без приказа: Verify that the monitor is connected to the graphics card (or motherboard if using integrated graphics) and powered on. Reseat the graphics card and RAM modules.
- Нестабилност/падови система: Check RAM installation and compatibility. Ensure CPU cooler is properly installed. Update drivers and BIOS/UEFI.
- Компонента није откривена: Reseat the component (e.g., M.2 SSD, SATA drive, PCIe card). Check cable connections. Verify settings in BIOS/UEFI.
For more detailed troubleshooting or persistent issues, refer to the comprehensive manual on the ASUS support webсајт или контактирајте техничку подршку компаније ASUS.
9. Спецификације
| Феатуре | Спецификација |
|---|---|
| Бранд | АСУС |
| Назив модела | ТУФ ГАМИНГ Б660М-ПЛУС ВИФИ |
| ЦПУ Соцкет | ЛГА 1700 |
| Компатибилни процесори | Intel LGA 1700 (12th Gen Intel Core) |
| Тип чипсета | Интел Б660 |
| Технологија РАМ меморије | ДДР5 |
| Брзина меморије | До 6000 MHz (OC) |
| Max RAM Memory Size | 128 ГБ |
| Доступни меморијски слотови | 4 |
| Интерфејс графичке картице | ПЦИ Екпресс 5.0 |
| Total PCIe Ports | 3 (1x PCIe 5.0 x16, others for M.2/expansion) |
| Укупно SATA портова | 4 |
| УСБ портови | Rear: USB 3.2 Gen 2x2 Type-C, USB 3.2 Gen 2, USB 3.2 Gen 1, USB 2.0. Front: USB 3.2 Gen 1 Type-C, USB 3.2 Gen 1, USB 2.0. |
| Етхернет | 2.5Г Етхернет |
| Бежично повезивање | Ви-Фи 6 |
| Видео излази | ХДМИ, ДисплаиПорт |
| Форм Фацтор | Мицро АТКС |
| Број модела | 90MB1AZ0-M1EAY0 |
10. Гаранција и подршка
ASUS products are designed with quality and reliability in mind. For information regarding your product's warranty, please refer to the warranty card included in your package or visit the official ASUS webсајту.
За техничку подршку, преузимање драјвера, ажурирања BIOS-а и додатну документацију, посетите званичну ASUS страницу за подршку. webсајт:
When contacting support, please have your motherboard model name (TUF GAMING B660M-PLUS WIFI) and serial number ready.