1. Производ је готовview
The ClosetMaid SuiteSymphony Wood Closet Organizer Kit is a versatile storage and organization system designed to enhance your home. This all-in-one kit features a central tower, expandable hang rods, top shelves, and four drawers, providing a comprehensive solution for organizing clothing and other items. The system is adjustable to fit closet spaces ranging from 6 to 10 feet wide, with options to trim components for smaller areas.
The tower includes two adjustable shelves and three fixed shelves, plus a top shelf. The three expandable hang rods can extend from 30 to 48 inches wide. The four drawers come in two sizes (two 10-inch high and two 5-inch high) with full extension glides, a shaker raised panel design, and satin nickel hardware. All necessary assembly and installation hardware are included.

Figure 1: Fully assembled ClosetMaid SuiteSymphony Wood Closet Organizer Kit.
2. Укључене компоненте
Before beginning assembly, ensure all components listed below are present and undamaged. If any parts are missing or damaged, please contact ClosetMaid customer support.
- Wood Closet Tower with 5 Shelves (2 adjustable, 3 fixed)
- 3 Adjustable Closet Rods (expandable from 30-48 inches)
- 3 Top Shelves
- 3 Top Shelf Support Brackets
- 4 Closet Drawers (2 x 10 in. H, 2 x 5 in. H)
- Assembly & Installation Hardware (cam locks, cam posts, leveling feet, L-brackets, wall anchors, screws, nails)
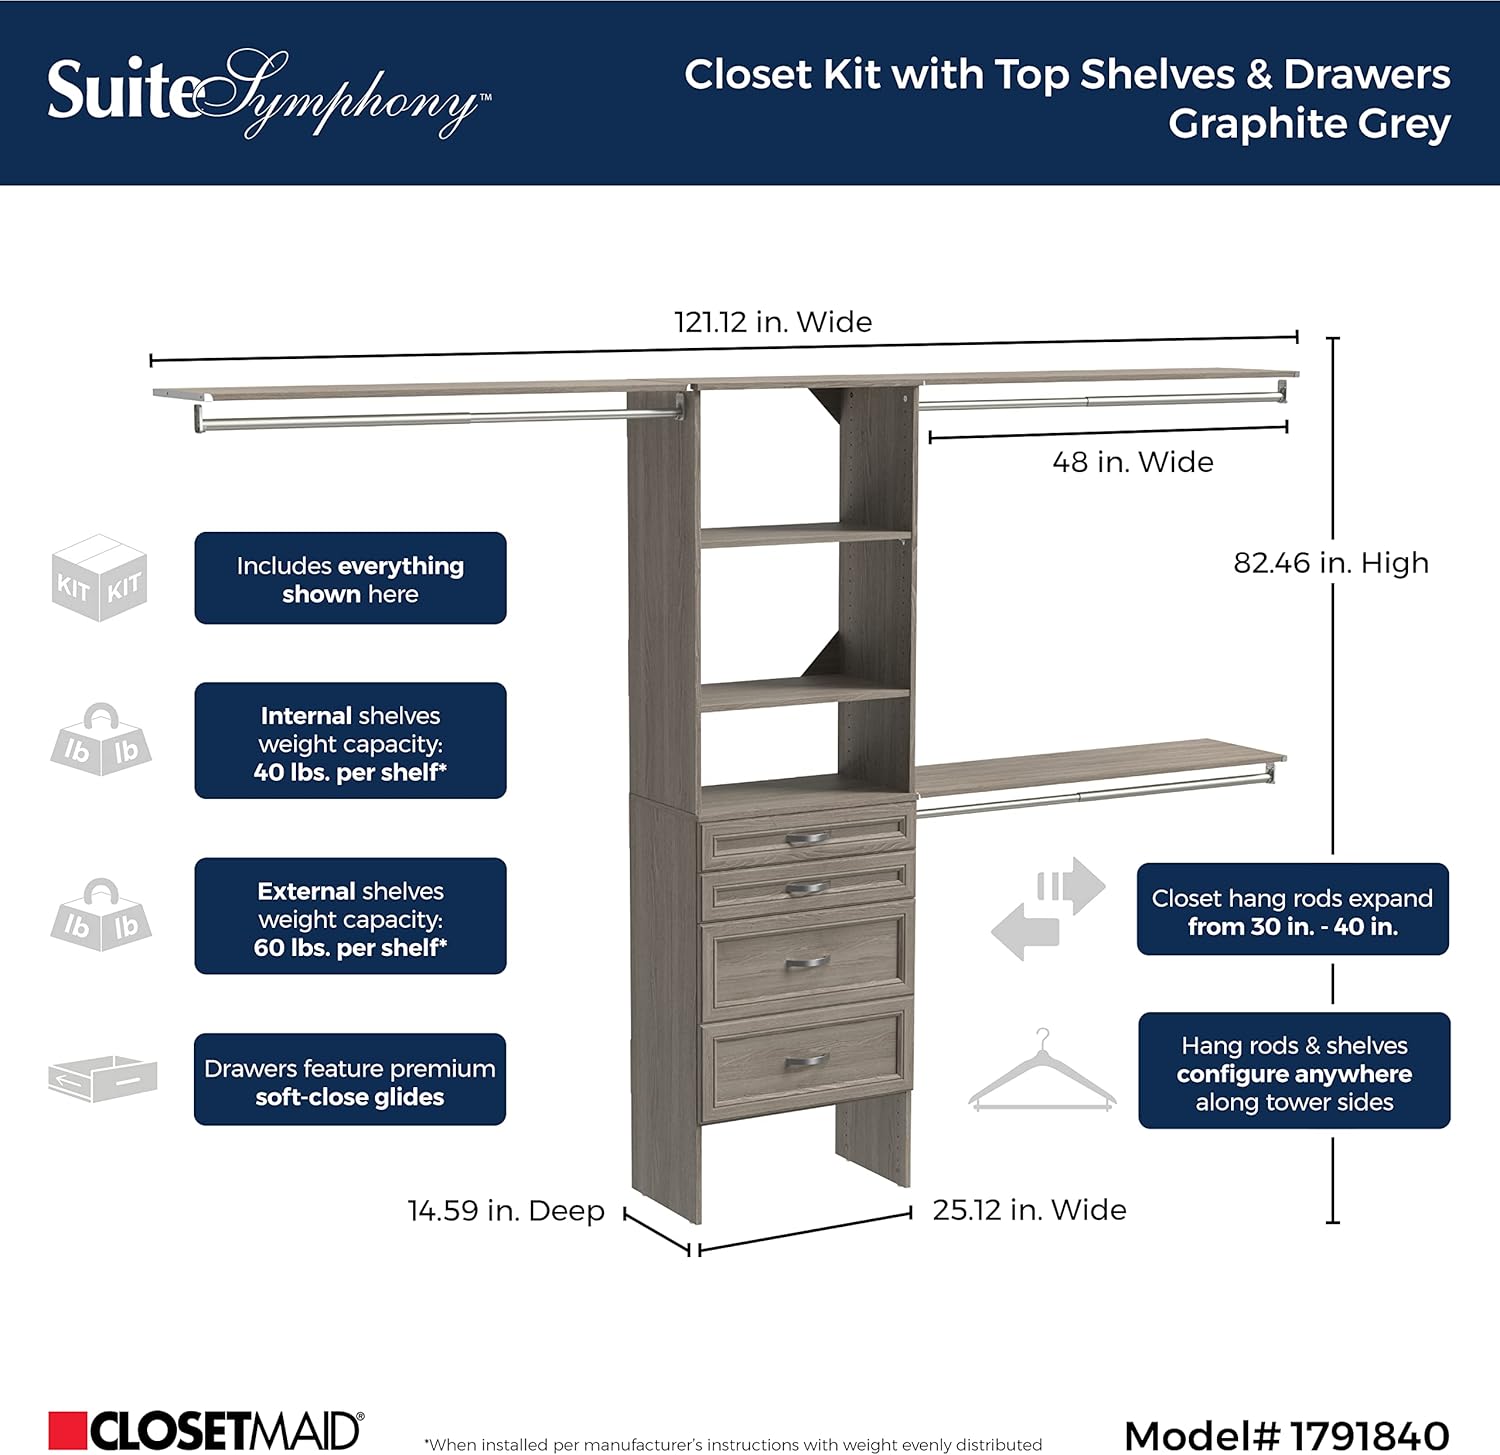
Figure 2: Kit dimensions and shelf weight capacities (Internal shelves: 40 lbs/shelf, External shelves: 60 lbs/shelf).
3. Упутство за монтажу
User assembly is required, and all necessary hardware is included. It is recommended to lay down a carpet or protective covering to prevent scratches to your floor during assembly. A rubber mallet, screwdriver, drill, and possibly a hacksaw or pipe cutter for rods, and a hand saw or circular saw for shelves, may be needed.
3.1. Assembling the Tower Base
- Prepare Bottom Shelves: Take the cam locks and push them into the designated holes on each of the bottom shelves.
- Install Cam Posts: Screw the cam posts into the corner holes on each of the top shelves.
- Prepare Side Panels: Get the side panels. Align them into two sets with their unfinished edges facing each other. Push two cam locks into the top of each of the four panels.
- Install Cam Posts on Side Panels: Screw the cam posts into the eighth hole from the bottom on each side panel.
- Attach Leveling Feet: Using a rubber mallet, gently tap the bottom nuts into the bottom of one set of your side panels. Then, screw the leveling feet into these nuts.
- Assemble First Section: Slide a bottom shelf onto one side panel and tighten the cam locks using a screwdriver. Turn the assembly onto its side and attach the second side panel, ensuring all unfinished edges are facing upwards. Tighten the cam locks.
- Assemble Second Section: Repeat the previous step for the second set of bottom shelf and side panels.
- Повежите горњи панел: Attach the top panel to the base and top units. Take the top shelf and push the cam posts into the holes at the top of the side panels. Tighten the cam locks.
- Secure Gussets: Attach the gussets to all corners on the unfinished side of the unit. Ensure the unit is square and not angled. Use a hammer and nails to secure the gussets, making sure the nails go in straight.
3.2. Attaching Tower to Wall
- Position Tower: Place the assembled tower unit in its desired location within the closet.
- Level the Unit: Adjust the leveling feet to ensure the unit is perfectly level before securing it to the wall. Use a level tool to verify.
- Install L-Brackets (Base): Place one of the L-brackets inside the unit, below the top gusset. Mark the drill points. Drill a small pilot hole into the wall, insert a wall anchor, and secure the L-bracket to the wall with a screw.
- Secure L-Brackets (Side Panel): Drill a small pilot hole into the side panel through the end hole of the L-bracket and secure it with a small screw. Repeat for the other side.
- Stack Top Unit: If your kit includes a separate top unit, you may need assistance to lift it. Align the dowels from the base unit with the holes on the bottom of the top unit to stack them.
- Attach Top Unit to Wall: Secure this top unit to the wall by installing L-brackets in the same manner as done for the base unit.
3.3. Installing Shelves and Rods
- Инсталирајте носаче полица: Push the clear shelf supports into the holes at the desired locations for your adjustable shelves.
- Поставите подесиве полице: Carefully place the adjustable shelves onto the installed shelf supports.
- Cover Open Holes: Push the white covers into any open holes at the bottom of each unit for a finished look.
- Plan Rod Placement: Decide which side of the tower will have double-hang rods and which side will be for long-hanging clothes.
- Install Rod Brackets (Tower Side): Place a rod bracket under the top shelf of the tower, approximately 1/8 inch back from the front edge. Measure and mark the hole locations on the unit. Drill small pilot holes if necessary, then secure the rod bracket with two rod bracket screws.
- Install Rod Brackets (Wall Side): Hook the closet rod onto the bracket installed on the tower. Extend the rod to the opposite wall. Hold another rod bracket in place on the wall, ensuring the rod is level and the same distance from the back wall as the bracket on the tower. Mark the hole locations on the wall.
- Secure Wall Brackets: Drill 1/4-inch holes at the marked locations on the wall. Insert a wall anchor into each hole. Secure the rod bracket to the wall with wall screws.
- Install Closet Rods: Install the closet rods into the secured brackets.
- Cutting Rods (if necessary): For smaller closets, the hang rods may need to be cut. Measure the required length and cut the rods on the end without the pre-drilled hole using a hacksaw or pipe cutter.
- Cutting Top Shelves (if necessary): If top shelves won't fit, measure the necessary length and cut them down. Use painter's tape to mark the cut line and prevent chipping. Use a hand saw or circular saw with a fine-toothed blade. Always use safety precautions.


4. Упутства за употребу
The ClosetMaid SuiteSymphony system is designed for versatile home organization. Utilize the various components to maximize your closet space:
- Hang Rods: Use the expandable hang rods for shirts, pants, jackets, and other hanging garments. The adjustable nature allows for double-hang sections or single long-hang sections as needed.
- полице: The tower's fixed and adjustable shelves are ideal for folded items, sweaters, shoes, bags, or decorative storage bins. Adjust the shelves to accommodate items of varying heights.
- фиоке: The four drawers provide concealed storage for folded clothing, accessories, or personal items. The full extension glides ensure easy access to contents.
- Горње полице: Install the top shelves above hang rods for additional storage space for less frequently used items or seasonal clothing.

Слика 7: Прample of an organized closet using the SuiteSymphony system.
5. Одржавање
To maintain the appearance and longevity of your ClosetMaid SuiteSymphony Wood Closet Organizer Kit, follow these simple care instructions:
- Чишћење: Wipe clean with a dry cloth. Avoid using harsh chemicals or abrasive cleaners, as these can damage the finish.
- инспекција: Periodically check all screws, cam locks, and brackets to ensure they remain tight and secure. Tighten any loose fasteners as needed.
- Ограничења тежине: Adhere to the recommended weight capacities for shelves (Internal: 40 lbs/shelf, External: 60 lbs/shelf) to prevent damage or collapse.
КСНУМКС. Решавање проблема
If you encounter any issues with your ClosetMaid SuiteSymphony system, refer to the following common troubleshooting tips:
- Unit is Wobbly/Unstable:
- Уверите се да су сви затварачи и вијци потпуно затегнути.
- Verify that the leveling feet are properly adjusted and the unit is level on the floor.
- Confirm that the L-brackets securing the unit to the wall are firmly installed into wall anchors or studs.
- Shelves Not Sitting Evenly:
- Check that all shelf supports are fully inserted into the corresponding holes at the same height.
- Ensure the shelves are correctly seated on all four supports.
- Фиоке се не померају глатко:
- Inspect the drawer glides for any obstructions or misalignment.
- Ensure the drawer box is assembled correctly and is square.
- Verify that the unit itself is level, as an unlevel unit can affect drawer operation.
- Hang Rods Sagging:
- Do not exceed the recommended weight capacity for the hang rods.
- Ensure the rod brackets are securely fastened to both the tower and the wall.
7. Спецификације
| Атрибут | Детаљ |
|---|---|
| Бранд | ЦлосетМаид |
| Број модела | 1791840 |
| Боја | Грапхите Греи |
| Материјал | Engineered Wood (TSCA Title VI Compliant) |
| Димензије производа (Д к Ш к В) | 14.7 к 120.56 к 82.46 инча |
| Тежина артикла | 148.04 фунти |
| Унит Цоунт | 15.0 Цоунт |
| Тип монтаже | Freestanding (with wall attachment for stability) |
| Финисх Типе | Matte or Smooth Finish |
| Број полица | 10 (5 in tower, 3 top shelves, 2 adjustable) |
| Укључене компоненте | Wood Closet Tower with 5 Shelves, (3) Adjustable Closet Rods, (3) Top Shelves, (3) Top Shelf Support Brackets, Closet Drawers, Assembly & Installation Hardware |
| Обавезна монтажа | Да |
| Упутства за негу | Обришите чистом сувом крпом |
8. Гаранција и подршка
8.1. Информације о гаранцији
The manufacturer will replace any missing or damaged part due to manufacturer defect for 30 days after purchase. Please retain proof of purchase for all warranty claims. Combining ClosetMaid branded products with third-party components or products will void the ClosetMaid manufacturer’s warranty.
8.2. Корисничка подршка
For further assistance, missing parts, or warranty claims, please contact ClosetMaid customer support directly. Refer to the contact information provided with your product packaging or visit the official ClosetMaid webсајту.


