Увод
This manual provides detailed instructions for the setup, operation, and maintenance of your PATPET P Collar 910 Replacement Remote. Please read this manual thoroughly before use to ensure proper functionality and safety.
Производ је завршенview
The PATPET P Collar 910 Replacement Remote is designed to control compatible PATPET P Collar 910 receiver collars. It features a durable design, multiple training modes, and a long-range capability.
Укључене компоненте:
- PATPET P Collar 910 Replacement Remote
- Charging Cable (dual port for remote and collar)
- Contact Points (short and long)
- Тест Лигхт Тоол
- Wrist/Neck Strap Clip
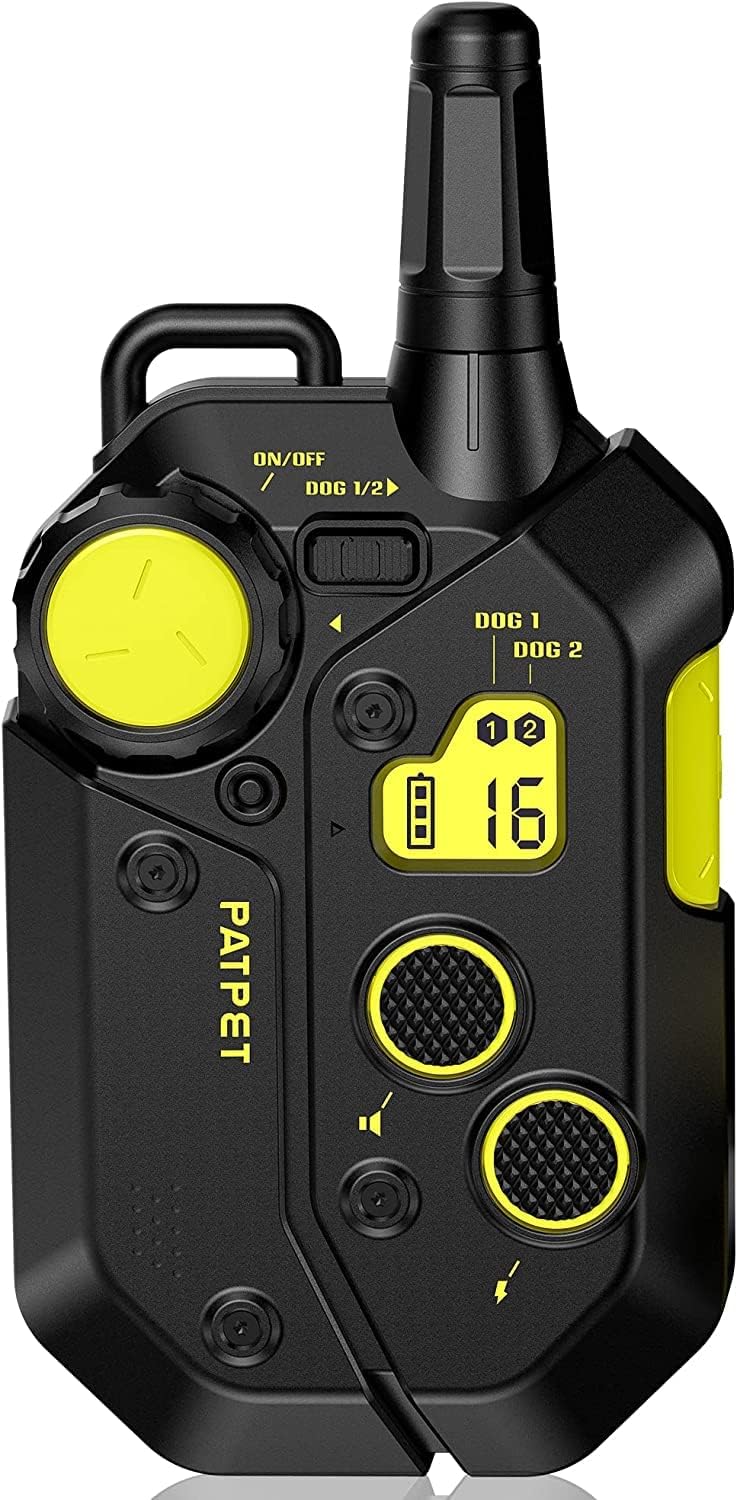
Figure 1: PATPET P Collar 910 Replacement Remote.
The remote control features an ergonomic design with clearly labeled buttons for various functions. The receiver collar is designed for comfort and durability, with an adjustable strap.

Слика 2: Детаљно view of the remote control buttons and their functions. The large yellow dial adjusts stimulation levels, the yellow button on the side is for vibration, and the smaller yellow button is for sound.
The remote includes a large rotary dial for adjusting stimulation levels, dedicated buttons for vibration and sound, and a channel select switch for controlling multiple collars.

Figure 3: A dog wearing the PATPET P Collar 910, demonstrating the effective 3/4 mile remote range.
The collar is made from a durable TPU rubber, designed to resist chewing. It is adjustable to fit various dog sizes, from 15-150 lbs with a 10"-30" adjustable belt. Excess strap material can be trimmed for a custom fit.
Упутства за подешавање
1. Charging the Devices:
Before first use, fully charge both the remote and the receiver collar. The included charging cable features two ports, allowing simultaneous charging of both devices. A full charge typically takes 2 hours.
- Connect the dual charging cable to a USB power adapter (a power brick is included).
- Plug one end into the charging port on the remote (located at the bottom).
- Plug the other end into the charging port on the receiver collar (located on the back).
- The indicator lights will show charging status.

Figure 4: Remote and collar connected to the dual charging cable.
2. Attaching Contact Points (for Static Stimulation):
If you intend to use the static stimulation feature, attach the appropriate length contact points to the receiver collar. Choose the length that ensures good skin contact through your dog's fur.
- Select the desired contact point length (short or long).
- Screw the contact points into the designated holes on the underside of the receiver collar.
- Ensure they are securely fastened.
3. Укључивање/искључивање:
- даљински: Press and hold the ON/OFF button (usually the large yellow button) until the screen illuminates.
- Огрлица пријемника: Press and hold the power button on the back of the collar until you feel a slight vibration and the green LED flashes every 4 seconds, indicating it is active.
- To power off, repeat the process for each device.
4. Pairing the Remote and Receiver (if necessary):
The remote and receiver are typically pre-paired. If re-pairing is needed or you are adding an additional receiver:
- Ensure the remote is on and select the desired dog channel (Dog 1 or Dog 2).
- Turn off the receiver collar you wish to pair.
- Press and hold the power button on the receiver collar for 5 seconds until the indicator light flashes rapidly.
- While the receiver light is flashing, simultaneously press both the "Beep" button and the "Vibration" button on the remote.
- The receiver light will stop flashing and remain solid, indicating successful pairing.
Упутство за употребу
1. Selecting Training Modes:
The PATPET P Collar 910 offers three training modes: Sound (Beep), Vibration, and Static Stimulation.
- Sound (Beep): Press the dedicated "Beep" button on the remote.
- Вибрација: Press the dedicated "Vibration" button on the remote.
- Статичка стимулација: Adjust the stimulation level using the rotary dial, then press the "Static Stimulation" button.
2. Adjusting Static Stimulation Levels:
The remote offers 16 levels of static stimulation. It is recommended to start at the lowest level (Level 1) and gradually increase it until your dog responds without showing signs of distress. The current level is displayed on the remote's screen.
- Rotate the large yellow dial on the remote to increase or decrease the static stimulation level.
- Observe your dog's reaction to find the appropriate level for effective training.
3. Remote Range:
The remote control has an effective range of up to 3/4 mile (approximately 3000 feet) in open areas, allowing for flexible training environments.
Одржавање
- Чишћење: Regularly wipe down the remote and collar with a damp cloth. Ensure all charging ports are dry before charging.
- Трајање батерије: The devices feature a long battery life, with the collar offering up to 11 days of standby time on a full charge.
- Складиштење: Store the remote and collar in a cool, dry place when not in use.
Решавање проблема
| Проблем | Могући узрок | Решење |
|---|---|---|
| Огрлица не реагује на даљински управљач. | Low battery, not powered on, or not paired. | Charge both devices. Ensure both are powered on. Re-pair the remote and receiver as per "Setup Instructions". |
| Static stimulation not effective. | Contact points not making proper skin contact, or stimulation level too low. | Ensure contact points are appropriate length and have good skin contact. Increase stimulation level gradually. |
| Remote screen is blank. | Remote is off or battery is low. | Press the ON/OFF button to power on. Charge the remote. |
Спецификације
- Број модела: e1015534-598a-4ae6-bb00-9f8f76e362fa
- Бренд: ПАТПЕТ
- Компатибилни уређаји: PATPET P Collar 910
- Даљински домет: Up to 0.75 Mile (approximately 3000 feet)
- Тип батерије: Потребна је 1 литијум-јонска батерија (укључена)
- Време пуњења: Приближно 2 сата за потпуно пуњење
- Standby Time (Collar): До 11 дана
- Број канала: 2
- Static Stimulation Levels: 1-16
- Посебна карактеристика: Пуњива
- Ниво водоотпорности: Није водоотпоран
- Тежина артикла: 4.2 унци
- Димензије пакета: 6.61 к 2.72 к 1.93 инча
- Произвођач: Схензхен Патпет Тецхнологи Цо., Лтд
Гаранција и подршка
PATPET products typically come with a 1-year full warranty covering manufacturing defects. For warranty claims, technical support, or further assistance, please refer to the contact information provided with your original product packaging or visit the official PATPET webсајту.
Always ensure to follow all safety guidelines and product instructions for the well-being of your pet.


