Увод
Thank you for choosing the Epson EB-L210SF projector. This manual provides essential information for the safe and efficient use of your projector. Please read it thoroughly before operating the device and keep it for future reference.
The Epson EB-L210SF is a 3LCD Full-HD projector designed for clear and vibrant image projection. It features a laser light source for long-lasting performance.
Важне информације о безбедности
- Ласерска безбедност: Не гледајте директно у сочиво пројектора када је ласерски извор светлости активан. Избегавајте директно излагање очију ласерском зраку.
- вентилација: Ensure adequate ventilation around the projector. Do not block ventilation openings. Overheating can cause damage.
- Извор напајања: Use only the power supply specified for this projector.
- Руковање: Пажљиво рукујте пројектором. Избегавајте испуштање или излагање јаким ударцима.
- Чишћење: Искључите кабл за напајање пре чишћења. Користите меку, суву крпу. Не користите течна или аеросолна средства за чишћење.
Сетуп
1. Распакивање и постављање
Carefully remove the projector and all accessories from the packaging. Place the projector on a stable, level surface. Ensure there is sufficient space around the projector for proper ventilation.

Слика 1: Предња и бочна страна view of the Epson EB-L210SF projector, showing the lens and ventilation grilles.
2. Повезивање напајања
- Прикључите испоручене каблове за напајање на АЦ утичницу пројектора.
- Укључите други крај кабла за напајање у уземљену електричну утичницу.
3. Повезивање улазних извора
The projector supports various input sources. Connect your device (computer, Blu-ray player, etc.) to the appropriate port on the projector's rear panel.

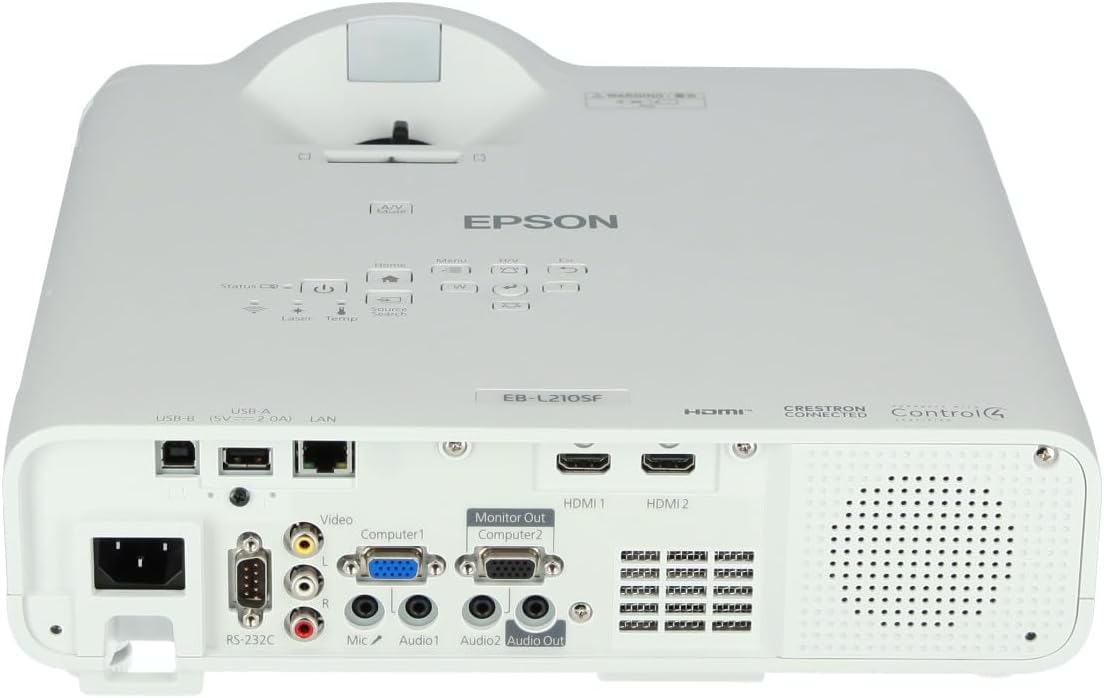
Figure 2: Rear panel of the projector, displaying various input and output ports including HDMI, Computer (VGA), Video, USB, and Audio connections.
- ДВИ: Connect an HDMI cable from your device to one of the HDMI ports (HDMI 1 or HDMI 2).
- Рачунар (VGA): Connect a VGA cable from your computer to the Computer 1 or Computer 2 port. For audio, connect a separate audio cable to Audio 1 or Audio 2.
- видео: Connect composite video and audio cables to the Video and Audio (R/L) ports.
- УСБ: Use the USB-A port for connecting USB storage devices or the USB-B port for display over USB.
- ЛАН: Повежите Етернет кабл за мрежну контролу и праћење.
4. Почетно укључивање и подешавање слике
- Press the power button on the projector or remote control to turn on the device. The power indicator will illuminate.
- Подесите прстен за фокусирање око сочива док слика не постане оштра и јасна.
- Користите zoom lever (if available) to adjust the image size.
- Ако слика изгледа трапезоидно, користите корекција кеистоне feature (manual or automatic) to square the image. Refer to the Operating section for details on menu navigation.
Управљање пројектором
1. Цонтрол Панел Оверview
The control panel on top of the projector allows access to various functions and settings.
Слика 3: Врх view of the projector, highlighting the control panel with buttons for power, menu, source selection, and navigation.
- Дугме за напајање: Укључује или искључује пројектор.
- Претрага извора: Кружи кроз доступне изворе улаза.
- Дугме менија: Opens the on-screen display (OSD) menu.
- Navigation Buttons (Arrow keys): Used to navigate through menu options.
- Дугме Ентер: Потврђује изборе у менију.
- Дугме Esc: Exits the current menu or returns to the previous screen.
- Хоме дугме: Accesses the home screen or quick settings.
- А/В Муте: Temporarily mutes audio and blanks the screen.
2. Selecting an Input Source
Притисните тастер Претраживање извора button on the control panel or remote control to cycle through the connected input sources (e.g., HDMI 1, HDMI 2, Computer 1, Video). The projector will automatically detect and display the active source.
3. Adjusting Image and Audio Settings
Притисните тастер Мени button to access the projector's on-screen display (OSD) menu. Use the navigation buttons to browse categories such as:
- слика: Подесите осветљеност, контраст, боју, нијансу, оштрину и температуру боје.
- Сигнал: Configure input signal settings, aspect ratio, and overscan.
- Подешавања: General projector settings like language, display options, and power management.
- аудио: Adjust volume, mute, and audio input selection.
Изаберите опцију и притисните Ентер to modify its value. Press Есц да изађете из менија.
Одржавање
1. Чишћење пројектора
- Екстеријер: Wipe the projector's exterior with a soft, dry, lint-free cloth. For stubborn dirt, dampen the cloth slightly with water, then wipe dry.
- Објектив: Gently wipe the lens with a lens cleaning cloth or lens paper. Avoid using abrasive materials or excessive force.
- Ваздушни филтер: Regularly check and clean the air filter to prevent dust buildup, which can affect performance and cause overheating. Refer to the projector's on-screen menu for filter maintenance reminders.
2. Извор ласерске светлости
The Epson EB-L210SF uses a laser light source, which offers a long operational life and does not require lamp replacement. No user maintenance is typically required for the laser light source itself.
Решавање проблема
Ако наиђете на проблеме са пројектором, погледајте следеће уобичајене проблеме и решења:
| Проблем | Могући узрок / решење |
|---|---|
| Нема пројектоване слике |
|
| Слика је мутна или ван фокуса |
|
| Слика је искривљена (трапезоидна) |
|
| Нема звука |
|
| Projector is not wireless | The Epson EB-L210SF is not inherently a wireless projector. Wireless functionality typically requires an optional external wireless adapter, which is sold separately. Please consult Epson's official website or your retailer for compatible wireless adapters. |
| Overheating warning (Temp indicator) |
|
Спецификације
| Феатуре | Детаљ |
|---|---|
| Број модела | В11ХА75080 |
| Резолуција екрана | 1920 к 1080 (Фулл ХД) |
| Технологија повезивања | HDMI, VGA, USB, LAN |
| Димензије производа | 11.81 к 11.81 к 11.81 инча |
| Тежина артикла | 10.14 фунти |
| Извор светлости | Ласер |
| Произвођач | Епсон |
| Препоручена употреба | Мониторинг |
| Посебна карактеристика | Лагана |
| Батерије су потребне | 1 AAAA (for remote control, not included with projector unit) |
| Датум првог доступног | 14. новембар 2023 |
Гаранција и подршка
За детаљне информације о гаранцији, погледајте гарантни лист који је приложен уз ваш производ или посетите званичну веб страницу Epson-а. webсајт. Услови гаранције могу се разликовати у зависности од региона.
За техничку подршку, регистрацију производа или преузимање најновијих драјвера и софтвера, посетите званичну Епсонову подршку website or contact Epson customer service in your region. Contact information can typically be found on the Epson webсајту.


