1. Увод
This manual provides detailed instructions for the LKTOP Mini 4 Pro/Mini 3 Series Battery Charging Hub and the included Controller Sticks. The charging hub is designed to efficiently manage and charge intelligent flight batteries for DJI Mini 4 Pro, DJI Mini 3 Pro, and DJI Mini 3 drones. It also features LED lighting, an alarm mode, and a storage mode. The controller sticks are compatible with various DJI remote controllers.
2. Садржај пакета
- LKTOP Mini 4 Pro/Mini 3 Series Battery Charging Hub × 1
- RC-N1/N2 Controller Stick × 3 Pairs (Gray, Black, Gold)
- USB-C to USB-C Cable (not explicitly listed in product description but implied by charging hub, assuming for completeness)
- USB-A to USB-C Cable (not explicitly listed in product description but implied by charging hub, assuming for completeness)
3. Производ је готовview
3.1. Battery Charging Hub
The LKTOP Battery Charging Hub is a multi-functional device for DJI Mini 4 Pro, DJI Mini 3 Pro, and DJI Mini 3 intelligent flight batteries. It supports sequential charging for up to three batteries and can also function as a power bank to charge other USB-C devices like remote controllers, phones, or tablets. The hub integrates LED lighting and an alarm mode for enhanced utility.

Image 1: LKTOP Mini 4 Pro/Mini 3 Series Battery Charging Hub with three batteries inserted, alongside three pairs of controller sticks and two USB-C cables.

Image 2: The charging hub connected to a 37W power adapter, simultaneously charging a drone remote controller. The image highlights Charging Mode, LED Mode, Alarm Mode, and Storage Mode.
3.2. Controller Sticks
The included controller sticks are designed for compatibility with DJI RC-N1 and RC-N2 remote controllers, as well as other models such as DJI Mini 3, Mini 3 Pro, Mini 2, Mini 2 SE, Air 2, Air 2S, Mavic 3, and Mavic 3 Pro. They are made from aluminum alloy for durability and feature a knurled non-slip design.

Image 3: Three pairs of controller sticks in gray, black, and gold, shown next to a DJI remote controller, illustrating color options and compatibility.
4. Подешавање
To begin using the charging hub, ensure you have a compatible USB-C power adapter (not included). Connect the charging hub to the power adapter using a USB-C cable. Insert your DJI intelligent flight batteries into the designated slots on the charging hub. The hub will automatically detect the batteries and begin the charging process.
5. Упутство за употребу
5.1. Режим пуњења
The charging hub supports charging up to three batteries. Depending on the input power of your adapter, the charger will automatically match the charging method. If the input power is 45W or higher, batteries may charge simultaneously. If less than 45W, batteries will charge one by one in sequence.
- Време пуњења: Approximately 50 minutes for one Intelligent Flight Battery; approximately 90 minutes for one Intelligent Flight Battery Plus.
Video 1: Demonstration of the LKTOP charging hub's charging mode, showing how batteries are inserted and charged, including simultaneous and sequential charging based on power input.
Video 2: Illustrates the sequential charging process for Mini 3 Pro batteries when using a lower wattagе адаптер за струју.
5.2. ЛЕД режим
The charging hub includes an integrated LED lighting function for convenience in low-light conditions.
- Активација: Short press and long press the function button to activate the lighting function.
- Подешавање осветљености: With each subsequent short press, the brightness will adjust through five levels (10%-100%).
- Стробе режим: The last brightness level is a strobe mode.

Image 4: The charging hub's LED lights illuminating a dark outdoor area, demonstrating its use for visibility.
Video 3: Highlights the LED lighting function of the LKTOP 100W Mini 4/3 Series Parallel Charging Hub, showing its use in dark environments.
5.3. Аларм мод
The alarm mode provides an audible alert and visual strobe for emergency situations.
- Активација: Short press and long press the function button to activate the SOS sound mode.
- Циклус режима: Subsequent short presses will cycle through strobe mode and SOS sound and light combination mode.
- Деактивација: Long press the function button to deactivate the alarm function.
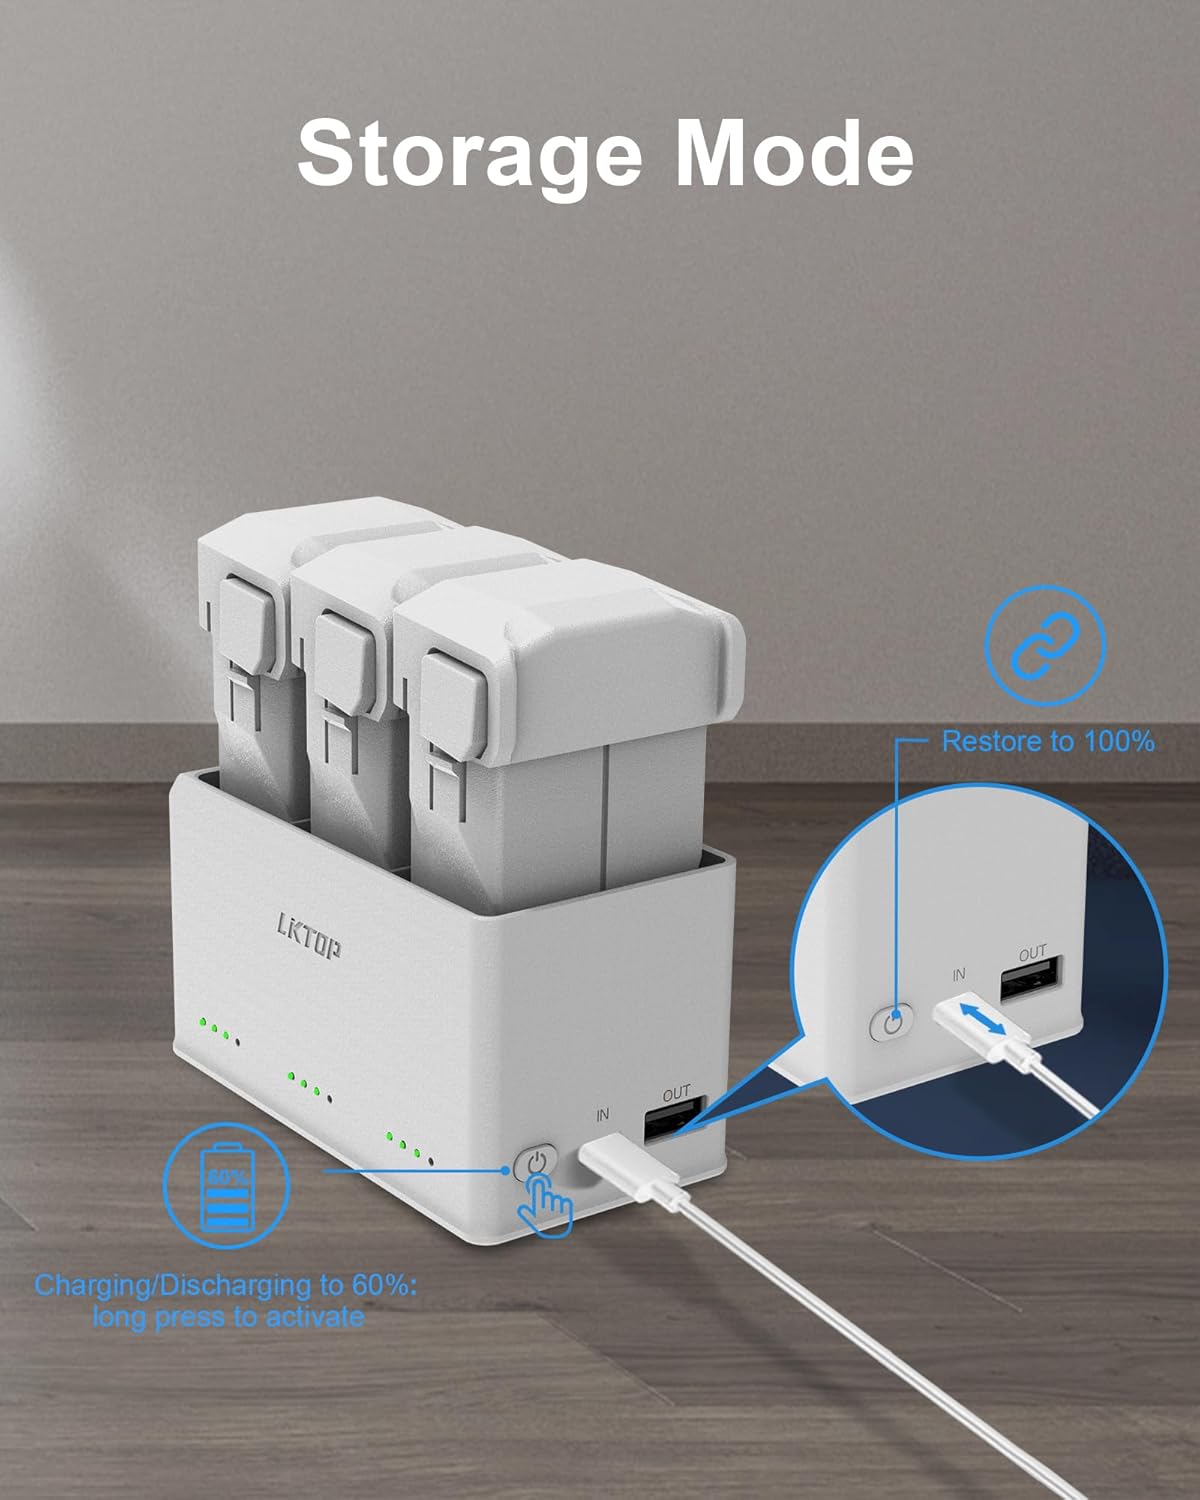
Image 5: The charging hub with its alarm mode activated, showing the sequence of alarm, strobe, and SOS sound/light combination.
5.4. Режим складиштења
The storage mode helps maintain battery health by charging or discharging batteries to an optimal storage level (around 60%).
- Активација: Long press the function button to activate the charging/discharging to 60% function.
- Full Charge Override: Unplug and reconnect the Type-C connector to restore to 100% charging.

Image 6: The charging hub in storage mode, indicating the process of charging/discharging batteries to 60% for optimal storage.
5.5. Output Mode (Power Bank Function)
The charging hub can utilize the drone batteries as a power bank to charge other devices.
- Connect your DJI remote controller, smartphone, iPad, or other USB-C compatible device to the 'OUT' port of the charging hub using an appropriate USB-C cable.
- The batteries inserted in the hub will then discharge to power your connected device.
Video 4: Demonstrates the power bank function of the charging hub, showing it charging a DJI remote controller.
6. Компатибилност
6.1. Charging Hub Compatibility
The LKTOP Battery Charging Hub is compatible with:
- ДЈИ Мини 4 Про Интеллигент Флигхт Батерија
- ДЈИ Мини 3 Про Интеллигент Флигхт Батерија
- DJI Mini 3 Intelligent Flight Battery
6.2. Controller Stick Compatibility
The included controller sticks are compatible with the following DJI remote controllers:
- ДЈИ РЦ-Н1
- ДЈИ РЦ-Н2
- ДЈИ Мини 3
- ДЈИ Мини 3 Про
- ДЈИ Мини 2
- ДЈИ Мини 2 СЕ
- ДЈИ Аир 2
- ДЈИ Ер 2С
- ДЈИ Мавиц 3
- ДЈИ Мавиц 3 Про

Image 7: Visual representation of the gray, black, and gold controller sticks and their compatibility with DJI RC-N1/N2 remote controllers.
7. Спецификације
| Назив производа | LKTOP Mini 4 Pro/Mini 3 Series Battery Charging Hub |
| Компатибилне батерије | DJI Mini 4 Pro, DJI Mini 3 Pro, DJI Mini 3 Intelligent Flight Batteries |
| Charging Time (Intelligent Flight Battery) | Approx. 50 minutes (for 1 battery) |
| Charging Time (Intelligent Flight Battery Plus) | Approx. 90 minutes (for 1 battery) |
| Инпут/Оутпут Моде | Charge 3 batteries in sequence or simultaneously charge battery and USB-C devices. |
| ЛЕД светлосни режими | 5 brightness levels (10%-100%), Strobe mode |
| Режими аларма | SOS sound mode, Strobe mode, SOS sound and light combination mode |
| Режим складиштења | Charges/discharges batteries to 60% for optimal storage. |
| Controller Stick Material | Aluminum alloy, knurled non-slip |
| Controller Stick Weight | 3.5g (per stick) |
8. Одржавање
- Keep the charging hub and controller sticks clean and dry.
- Избегавајте излагање уређаја екстремним температурама, влази или директној сунчевој светлости.
- Редовно проверавајте каблове да ли имају било какве знаке хабања или оштећења.
- Store the charging hub and batteries in a cool, dry place when not in use. Utilize the storage mode for long-term battery preservation.
КСНУМКС. Решавање проблема
- Уређај се не пуни: Ensure the power adapter is properly connected and functioning. Verify that the USB-C cable is securely plugged into both the adapter and the charging hub. Check if batteries are correctly inserted.
- LED lights not activating: Ensure a battery is inserted into the hub. Press and hold the function button as described in the LED Mode section.
- Споро пуњење: Уверите се да ваш адаптер за напајање пружа довољну снагуtage (e.g., 45W or higher for simultaneous charging). Lower wattage adapters will charge batteries sequentially.
- Controller sticks not fitting: Confirm that your remote controller model is listed under the compatible devices in Section 6.2.
10. Безбедносне информације
- Do not disassemble or modify the charging hub or controller sticks.
- Чувати ван домашаја деце.
- Use only compatible batteries and power adapters.
- Избегавајте испуштање или излагање уређаја јаким ударцима.
- If any unusual behavior or damage is observed, discontinue use immediately and contact customer support.
11. Гаранција и подршка
For warranty information, technical support, or any inquiries regarding your LKTOP product, please refer to the official LKTOP website or contact their customer service directly. Details can typically be found on the product packaging or the manufacturer's official online channels.