1. Увод
This manual provides detailed instructions for the setup, operation, and maintenance of your Geevon Digital Atomic Wall Clock with Moon Phase and Backlight (Model GN-228614C-T3-US). Please read this manual thoroughly before using the product to ensure proper function and longevity.
2. Шта је укључено
Приликом распакивања, проверите да ли су све компоненте присутне:
- One atomic clock
- One outdoor sensor
- One AC/DC power adapter
- Једно упутство за употребу
Note: 3 AAA batteries for the main unit and 2 AAA batteries for the outdoor sensor are required but not included.
3. Подешавање
3.1. Напајање главне јединице
The main unit can be powered by either the included AC/DC power adapter or 3 AAA batteries (not included).
- Коришћење АЦ напајања: Connect the AC/DC power adapter to the clock's power input port and plug it into a standard electrical outlet.
- Коришћење батерија: Open the battery compartment on the back of the clock and insert 3 new AAA batteries, observing the correct polarity (+/-).

Image: Back of the main clock unit with the battery compartment open, showing where to insert 3 AAA batteries. Control buttons are visible above the compartment.

Image: Close-up of the back of the clock showing the battery compartment and inserted batteries. A "Low Battery Indicator" graphic is also present.
3.2. Инсталирање спољашњег сензора
The wireless outdoor sensor requires 2 AAA batteries (not included).
- Отворите одељак за батерије на задњој страни спољашњег сензора.
- Insert 2 new AAA batteries, observing the correct polarity (+/-).
- Затворите одељак за батерије.
- Place the sensor in a covered outdoor location, such as under a patio or porch, to protect it from direct sunlight and rain. Ensure it is within 200 feet (60 meters) of the main unit.

Image: The main clock unit on a table indoors and the outdoor sensor mounted on an exterior wall, illustrating the wireless connection.
Video: This video demonstrates how to install batteries in both the main clock unit and the outdoor sensor, and how the outdoor sensor transmits temperature data to the main unit. It also shows the clock's display and various features in action.
3.3. Initial Synchronization and Time Zone Setting
The clock automatically attempts to synchronize with the WWVB atomic clock signal from Fort Collins, Colorado. This process can take 2-5 days for initial synchronization, especially if the signal is weak. During signal reception, the backlight will temporarily turn off for 1-2 minutes to avoid interference.
To manually set the time zone and other settings:
- Press and hold the "MODE" button for 3 seconds. The hour display will start to flash. Use the "UP" or "DOWN" buttons to set the correct hour.
- Press "MODE" to confirm and move to the minute setting. Use "UP" or "DOWN" to set the correct minute.
- Continue pressing "MODE" to cycle through year, month, and date settings, adjusting each with "UP" or "DOWN".
- After setting the date, the Daylight Saving Time (DST) display will flash. Use "UP" or "DOWN" to turn DST on or off as applicable.
- Next, the Time Zone display will flash. Use "UP" or "DOWN" to select your time zone (EST, AST, HST, AKST, PST, MST, CST).
- Finally, the temperature unit (°C/°F) will flash. Use "UP" or "DOWN" to select your preferred unit.
- Press "MODE" again to confirm all settings and end the setting procedures, entering the normal mode.

Image: The clock display showing time, date, and temperature, with graphics illustrating "Spring Forward" (+1h) and "Fall Back" (-1h) for Daylight Saving Time.

Image: Close-up of the back of the clock, highlighting the control buttons (LIGHT, MEM, 12/24, ALARM, SNZ, CH, DOWN UP/RCC, MODE) and a map of US time zones (PST, MST, CST, EST, AKST, HST, AST).
Video: This video demonstrates how to install batteries in both the main clock unit and the outdoor sensor, and how the outdoor sensor transmits temperature data to the main unit. It also shows the clock's display and various features in action.
4. Упутство за употребу
4.1. Прикажи прекоview
The 8.8-inch LCD TN HD display shows the following information:
- Време (формат 12/24 х)
- Датум и дан у недељи
- Моон Пхасе
- Унутрашња температура (°C/°F)
- Outdoor Temperature (°C/°F)
- Daily Minimum and Maximum Temperature Data
- Temperature Trends (rising/falling)

Image: The clock's large LCD display showing all its features, including time, day, date, moon phase, indoor and outdoor temperatures, and temperature trends. Dimensions of the clock are also indicated.
4.2. Контрола позадинског осветљења
The clock features 3 brightness levels: Off, Dim, and Bright. The backlight behavior depends on the power source:
- АЦ напајање: The backlight can remain on continuously at your chosen brightness level.
- Снага батерије: To conserve battery life, the backlight will illuminate for 10 seconds when the top button is tapped, then turn off.
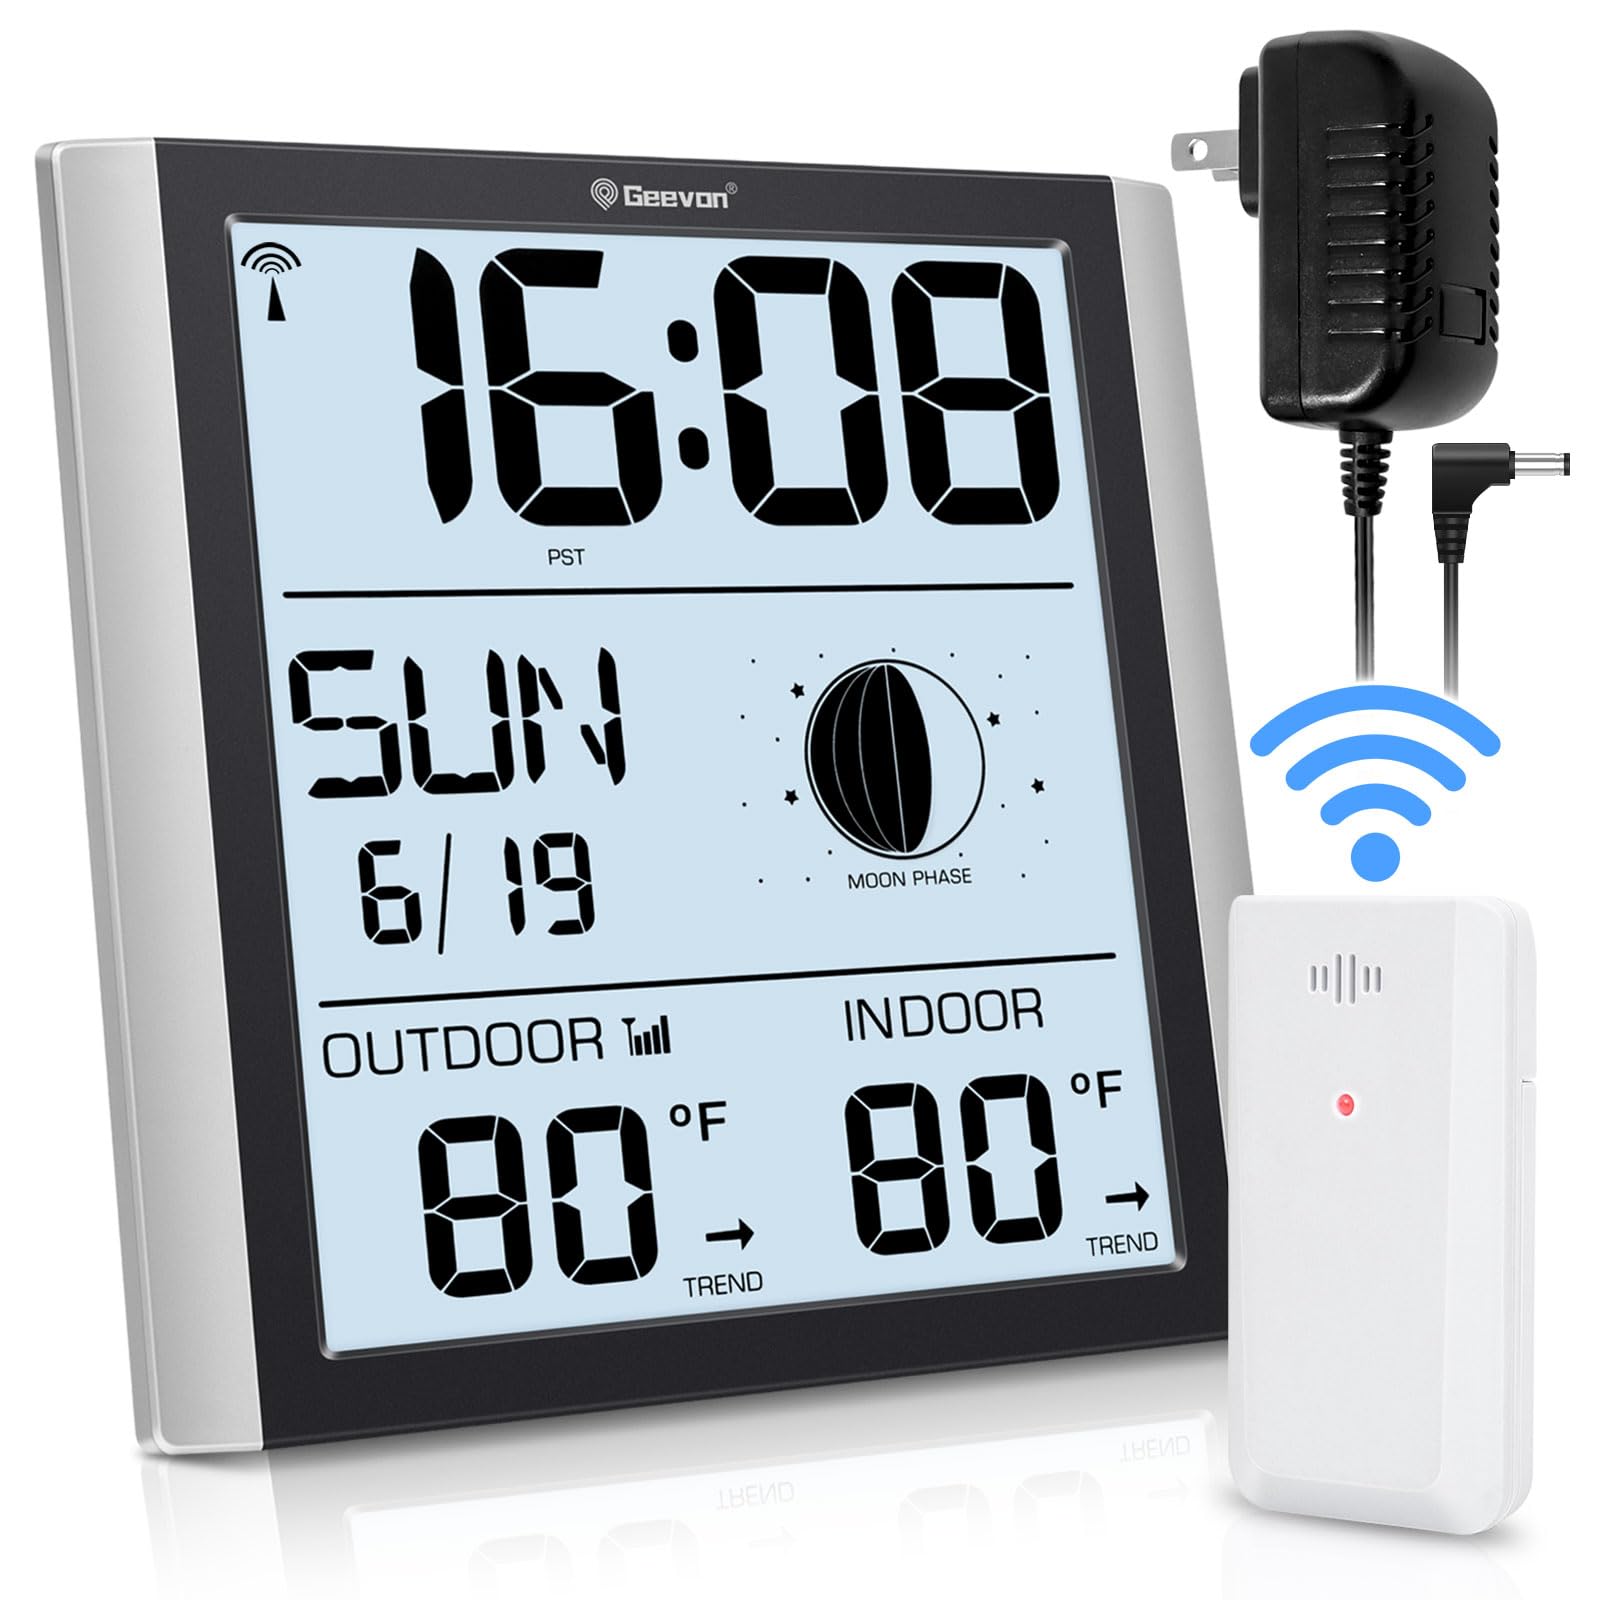
Image: The clock display shown with three different backlight settings: High, Low, and Off, demonstrating the adjustable brightness feature.
Video: This video demonstrates the three backlight brightness levels (Off, Dim, Bright) of the Geevon Atomic Wall Clock and how to adjust them by touching the top button. It also shows the clock in various room settings.
4.3. Функција аларма и одлагања
The clock includes an alarm with a snooze feature:
- Подешавање аларма: Press the "ALARM" button on the back of the clock to enter alarm setting mode. Use "UP" or "DOWN" to set the desired alarm time. Press "ALARM" again to confirm.
- Активирање аларма: Once set, the alarm will sound with a gradually increasing "beep" sound.
- Одгода: Press the "SNZ" button (top button) during the alarm to activate the 5-minute snooze function.
- Заустављање аларма: To stop the alarm completely, press any other button besides "SNZ". If no action is taken, the alarm will automatically stop after 2 minutes.
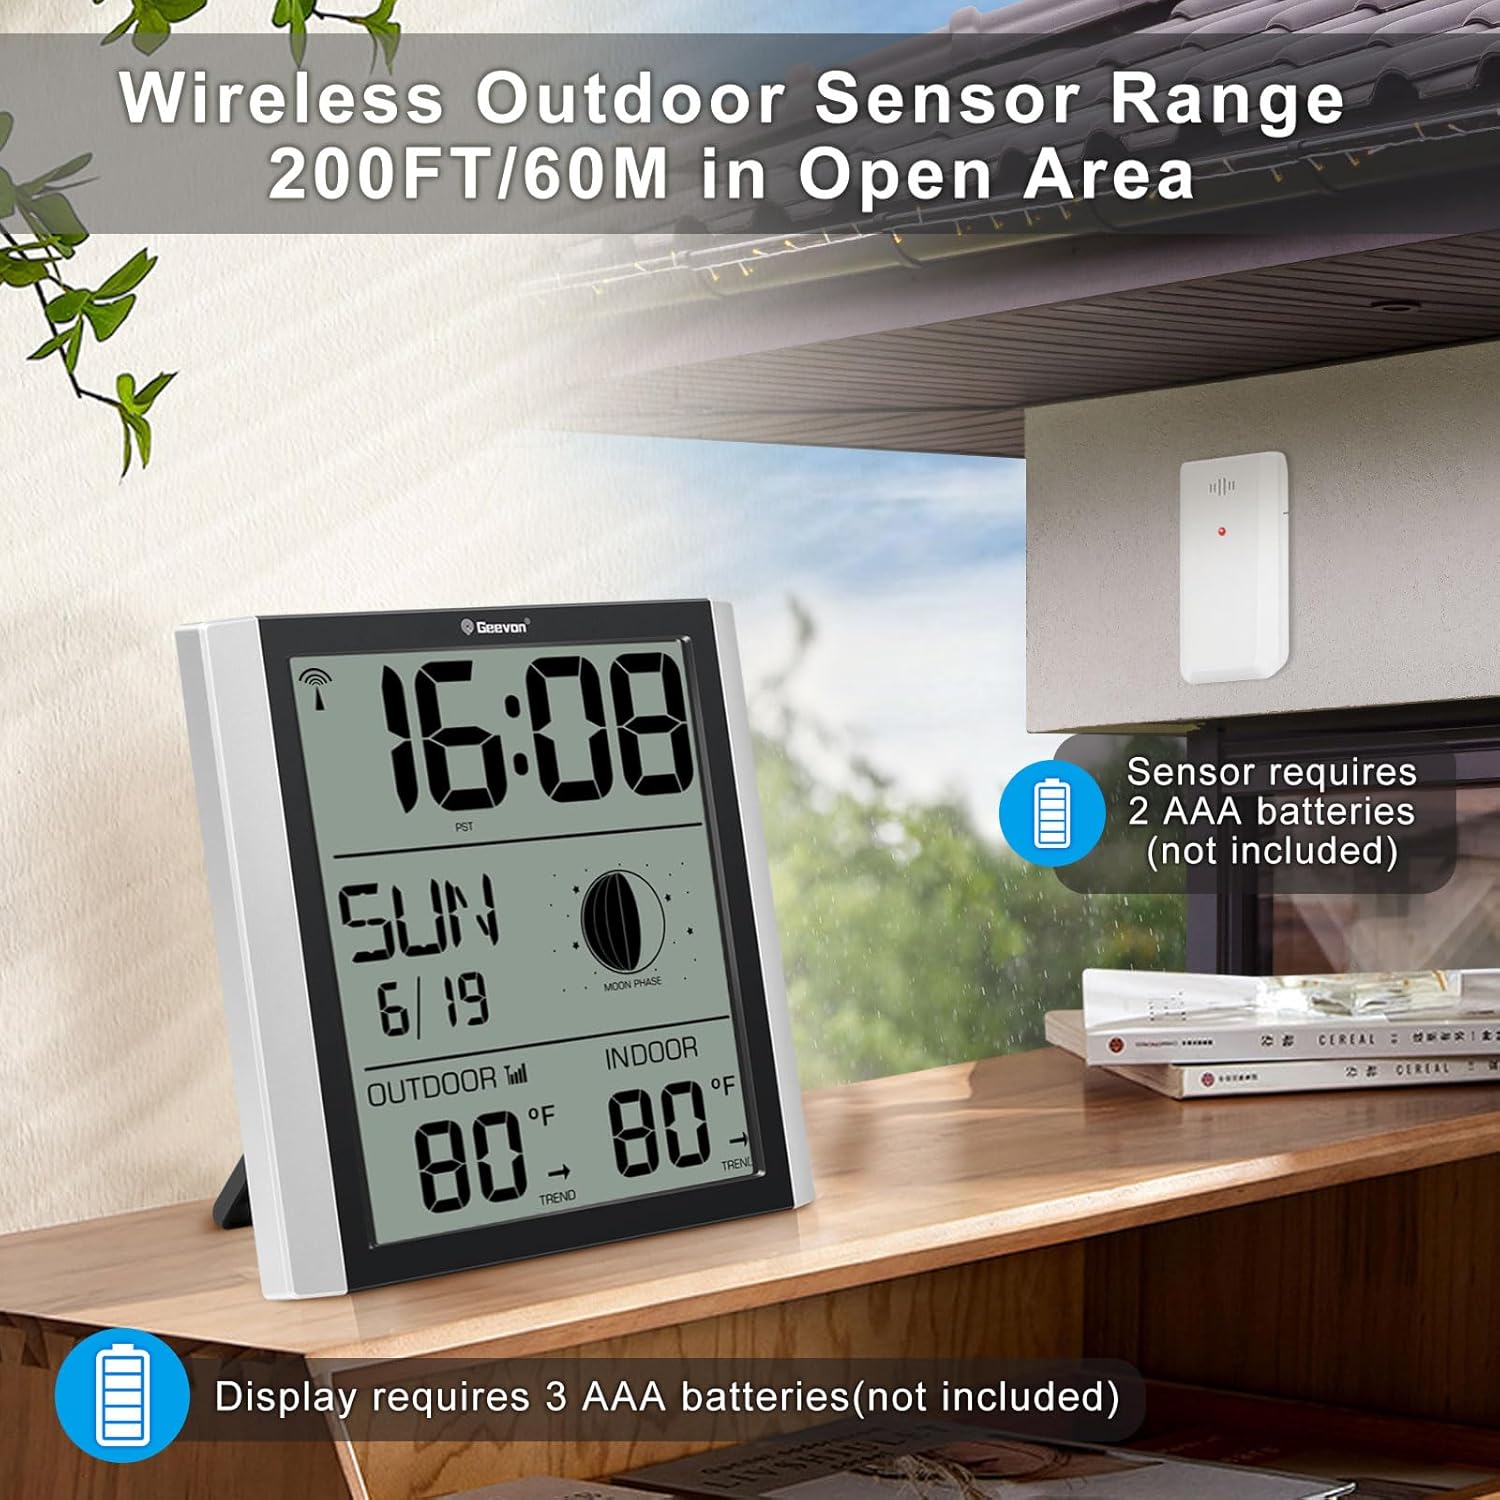
Image: The clock display with icons for "Ascending Beep" and "5-minute Snooze", illustrating the alarm features. A person is shown waking up in bed.
4.4. Temperature Unit Switching
To switch between Celsius (°C) and Fahrenheit (°F) for temperature display, press the "UP/RCC" button on the back of the clock during normal operation.
4.5. Max/Min Temperature Records
The clock records the daily minimum and maximum indoor and outdoor temperatures. Press the "MEM" button on the back of the clock to view these records. Press it again to cycle through current, maximum, and minimum readings.
5. Опције пласмана
The Geevon Digital Atomic Wall Clock offers versatile placement options:
- Употреба стола: Utilize the integrated tripod stand on the back for stable placement on a desk, nightstand, or shelf.
- Монтажа на зид: Use the two hanging holes on the back to mount the clock securely on a wall.
Image: The clock is shown with its foldable stand for tabletop use and also with hanging holes for wall mounting, illustrating its two placement methods.
For optimal performance, place both the main unit and the outdoor sensor at least 3 feet (1 meter) away from electronic devices such as TVs, computers, microwaves, or radios, as these can cause electromagnetic interference.
6. Одржавање
- Чишћење: Wipe the clock and sensor with a soft, dry cloth. Do not use abrasive cleaners or solvents.
- Замена батерије: Replace batteries in both the main unit and outdoor sensor when the low battery indicator appears on the display. Always replace all batteries at the same time with new ones.
- Складиштење: If storing the unit for an extended period, remove all batteries to prevent leakage.
КСНУМКС. Решавање проблема
| Проблем | Могући узрок | Решење |
|---|---|---|
| Нема дисплеја на главној јединици. | Нема струје или празне батерије. | Ensure AC adapter is properly connected or replace batteries. |
| Спољна температура се не приказује или је нетачна. | Outdoor sensor batteries dead, out of range, or interference. | Replace sensor batteries. Move sensor closer to the main unit. Ensure no large metal objects or electronics are between units. |
| Atomic time not synchronizing. | Weak WWVB signal, interference, or incorrect time zone. | Ensure correct time zone is set. Move clock to a location with better signal reception (e.g., near a window, away from electronics). Allow 2-5 days for initial synchronization. Signal reception is usually better at night. |
| Backlight not staying on (when using AC power). | Адаптер за напајање није повезан или је неисправан. | Ensure AC adapter is securely plugged in. If problem persists, contact support. |
8. Спецификације
- Број модела: GN-228614C-T3-US
- Бренд: Геевон
- Тип приказа: Digital LCD TN HD
- Величина екрана: 8.8 инча
- Извор напајања (главна јединица): AC/DC Power Adapter (included) or 3 x AAA Batteries (not included)
- Извор напајања (спољни сензор): 2 к ААА батерије (нису укључене)
- Повезивање: Wireless (for outdoor sensor)
- Домет спољног сензора: Up to 200 ft (60 m) in open area
- Прецизност температуре: ±1 °Ц
- Посебне карактеристике: Atomic Clock (WWVB), Moon Phase, Backlight (3 levels), Alarm with Snooze, Indoor/Outdoor Temperature, Max/Min Temperature Records, Temperature Trend Indicator, 12/24H Time Format, Calendar (Day, Month, Date, Day of Week), Daylight Saving Time (DST) On/Off.
- Материјал: акрилонитрил бутадиен стирен (АБС)
- Димензије производа: 2.1"Д к 7.87"Ш к 7.75"В
- Тежина артикла: 1.4 фунти
9. Гаранција и подршка
Geevon is committed to providing high-quality products and excellent customer service. If you encounter any issues or have questions regarding your Geevon Digital Atomic Wall Clock, please contact our customer support team. We offer lifetime consulting services and are available 24/7 online.
За подршку, погледајте контакт информације које сте добили уз куповину или посетите званичну веб страницу Geevon-а. webсајту.