1. Увод
The LSC Smart Connect Solar IP Camera is designed to provide reliable outdoor surveillance with the convenience of solar power. This camera offers 1080p video recording, two-way audio, and night vision capabilities up to 10 meters. It integrates seamlessly with the LSC Smart Connect app, allowing for remote monitoring and control. Key features include a light and sound alarm, flash function, and privacy mode to enhance security.
This manual provides essential information for the proper setup, operation, and maintenance of your LSC Smart Connect Solar IP Camera, ensuring optimal performance and longevity.
2. Садржај пакета и подешавање
Before beginning installation, please ensure all components are present and undamaged.

Слика 2.1: The LSC Smart Connect Solar IP Camera packaging, showing the camera, solar panel, and app interface. This image represents the complete product package as received.
2.1 Компоненте прекоview
The package typically includes the LSC Smart Connect Solar IP Camera unit, a solar panel for continuous power, and mounting accessories.
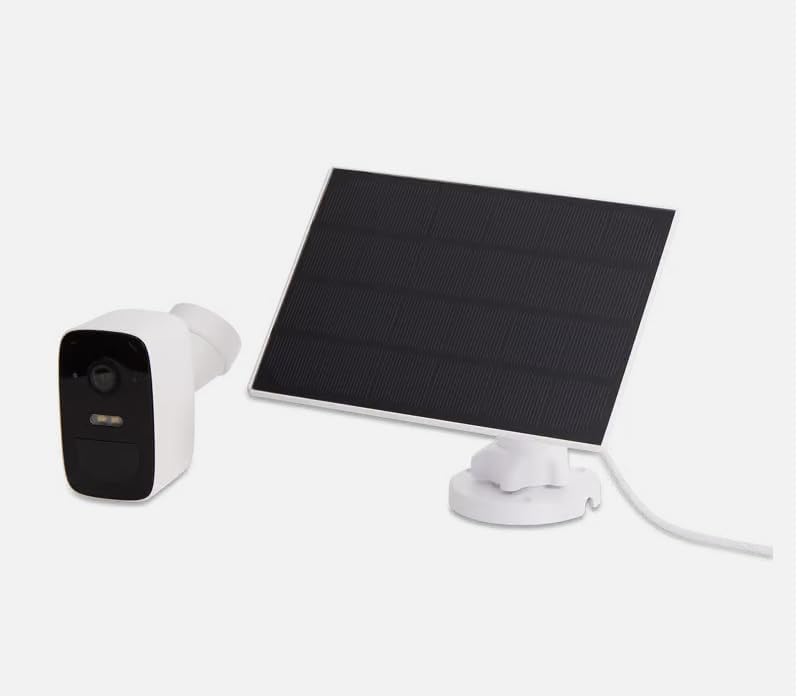
Слика 2.2: The LSC Smart Connect Solar IP Camera shown alongside its separate solar panel. This illustrates the two main components of the surveillance system.
2.2 Почетни кораци подешавања
- Преузмите апликацију: Download the "LSC Smart Connect" app from your smartphone's app store (iOS or Android).
- Креирајте налог: Отворите апликацију и региструјте се за нови налог или се пријавите ако га већ имате.
- Укључивање камере: Ensure the camera is charged or connected to the solar panel. The camera should enter pairing mode (indicated by an LED light).
- Додај уређај: In the app, select "Add Device" or the "+" icon. Follow the on-screen instructions to connect the camera to your 2.4GHz Wi-Fi network. Ensure your Wi-Fi signal is strong at the installation location.
- Монтажа: Choose a suitable outdoor location for the camera and solar panel. The solar panel should receive direct sunlight for most of the day. Use the provided screws and mounting brackets for secure installation. The camera supports wall mounting.
For detailed mounting instructions, refer to the quick start guide included in your product packaging.
3. Упутство за употребу
Once your camera is set up and connected, you can begin monitoring and utilizing its features through the LSC Smart Connect app.
- Уживо View: Отворите апликацију и изаберите камеру view живи феед.
- Двосмерни аудио: Use the microphone icon in the app to speak through the camera and the speaker icon to hear audio from the camera's vicinity.
- Ноћни вид: The camera automatically switches to night vision in low-light conditions, providing clear images up to 10 meters.
- Детекција покрета и упозорења: Configure motion detection sensitivity and set up push notifications to receive alerts on your smartphone when activity is detected.
- Функције аларма: Activate the light and sound alarm or flash function via the app to deter intruders.
- Recording & Playback: The camera supports local storage (e.g., microSD card, not included) or cloud storage (subscription may be required) for recording. Access recorded footage through the app's playback feature.
- Режим приватности: Utilize the privacy function to temporarily disable recording and live view for specific periods.
4. Одржавање
Regular maintenance ensures the optimal performance and longevity of your LSC Smart Connect Solar IP Camera.
- Чишћење: Периодично чистите сочиво камере и соларни панел меком крпомamp cloth to remove dust, dirt, and debris. Avoid abrasive cleaners.
- Ефикасност соларног панела: Ensure the solar panel is free from obstructions (e.g., leaves, snow) that could block sunlight and reduce charging efficiency.
- Ажурирања фирмвера: Check the LSC Smart Connect app regularly for firmware updates. Keeping the camera's firmware updated ensures access to the latest features and security enhancements.
- Провера везе: Periodically verify the Wi-Fi connection strength and camera status in the app.
КСНУМКС. Решавање проблема
If you encounter issues with your LSC Smart Connect Solar IP Camera, refer to the following common troubleshooting steps:
- Камера ван мреже:
- Проверите јачину Wi-Fi сигнала на локацији камере.
- Ensure the camera is receiving adequate power from the solar panel or is sufficiently charged.
- Рестартујте свој Wi-Fi рутер и камеру.
- Verify that the camera is connected to a 2.4GHz Wi-Fi network.
- Лош квалитет слике:
- Очистите сочиво камере.
- Уверите се да нема препрека испред објектива.
- Проверите брзину ваше интернет конекције.
- Детекција покрета не ради:
- Verify motion detection settings in the app (sensitivity, detection zones).
- Ensure notifications are enabled on your smartphone and in the app.
- Батерија се не пуни:
- Уверите се да је соларни панел чист и да прима директну сунчеву светлост.
- Проверите везу између соларног панела и камере.
If issues persist, consult the LSC Smart Connect app's help section or the manufacturer's support resources.
6. Спецификације
| Феатуре | Спецификација |
|---|---|
| Резолуција снимања видео записа | 1080п |
| Боја | Црно/Бело |
| Бежична комуникациона технологија | Ви-Фи (2.4ГХз) |
| Врста инсталације | Завртање / Монтажа на зид |
| Ноћни вид | 10 метара |
| Димензије артикла (Д к Ш к В) | 15 к 6 к 15 цм |
| Произвођач | ЛСЦ |
| Број модела | 3203968 |
| ASIN | B0D899HFXL |
| Препоручена употреба производа | Оутдоор Сецурити |
| Технологија повезивања | Бежични |
| Компатибилни уређаји | Смартпхоне |
| Тип контролера | SmartThings (via LSC Smart Connect App) |
| Унутрашња/спољна употреба | Оутдоор |
7. Гаранција и подршка
For warranty information, please refer to the documentation included with your purchase or contact the retailer/manufacturer directly. Typically, products come with a limited warranty covering manufacturing defects.
For technical support, frequently asked questions, or further assistance, please visit the official LSC Smart Connect website or utilize the support section within the LSC Smart Connect mobile application.
Онлине ресурси:
- LSC Smart Connect App (available on iOS App Store and Google Play Store)
- Manufacturer's Official Website (for product updates and support)


