1. Увод
Thank you for choosing the Sarmert C2 4K Dual Dash Cam and Hardwire Kit. This manual provides detailed instructions for the installation, operation, and maintenance of your new dash camera system. Please read this manual thoroughly before use to ensure proper functionality and to maximize the benefits of your device. This system is designed to provide reliable video recording for your vehicle, enhancing safety and security.
2. Производ је готовview
2.1 Садржај пакета
- Sarmert C2 4K Dual Dash Cam (Front Camera)
- Задња камера
- USB C Hardwire Kit (11.5ft)
- 64ГБ МицроСД картица
- Упутство за употребу
2.2 Кључне карактеристике
- 4K Ultra-Clear Sensor: Provides high-resolution video capture for both front and rear views.
- Супер ноћни вид: Enhances low-light performance for clear recordings in dark conditions.
- 24/7 Parking Monitoring: Continuous surveillance with motion detection and collision alerts (requires hardwire kit).
- Заштита Г-сензора: Аутоматски закључава и чува хрануtage upon collision detection to prevent overwriting.
- Лов Волtagе Заштита: Hardwire kit automatically cuts power to prevent car battery drain.
- Built-in 2.4GHz & 5G WiFi: For faster video download and app control.
- Уграђени ГПС: Tracks routes and speed, viewable via complimentary GPS player software.
- Universal Compatibility (Hardwire Kit): Compatible with most USB Type-C dash cams, GPS navigators, and radar detectors.
- Multiple Safety Protections (Hardwire Kit): Includes short circuit, overheating, adjustable low voltage, and cable reversal prevention.
2.3 Product Components and Features Visuals

Слика 2.3.1: Завршеноview of the Sarmert C2 4K Dual Dash Cam system components, including the front dash cam, rear camera, USB-C hardwire kit, and a 64GB microSD card.
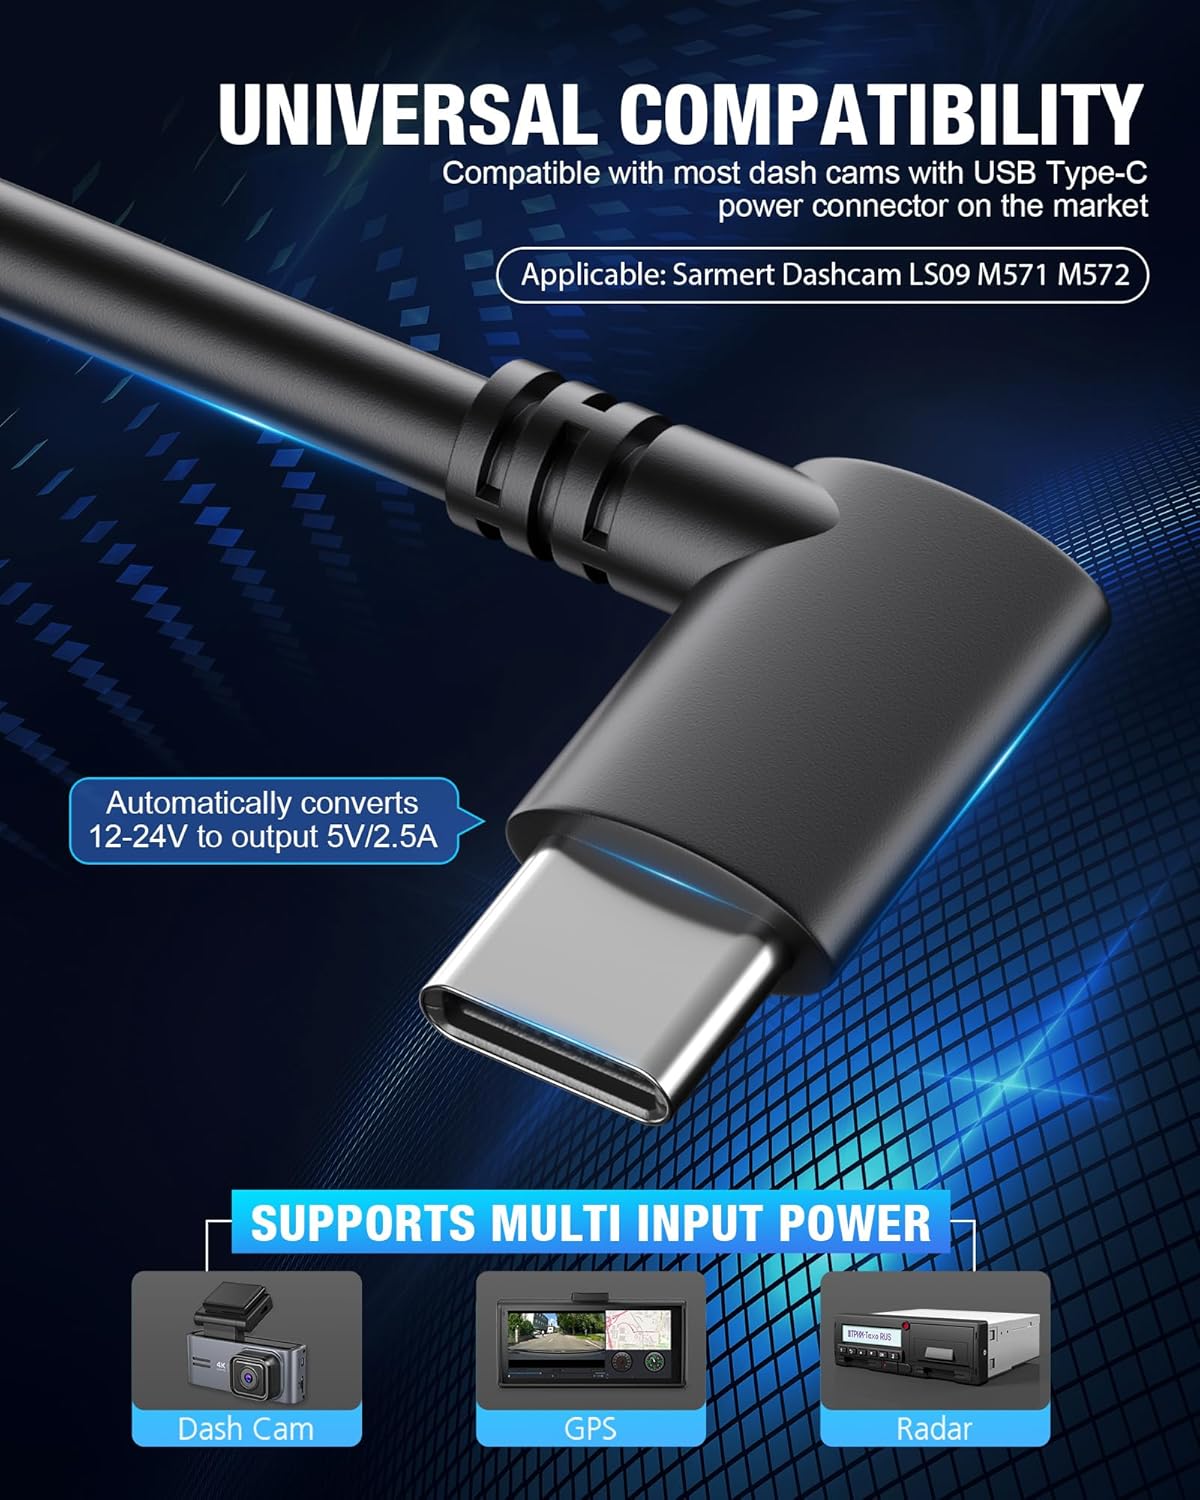
Figure 2.3.2: Illustration of the 24-hour parking monitor and G-sensor functionality, which activates and locks footage upon collision detection, theft, or vicious scratch detection.

Figure 2.3.3: The USB Type-C hardwire kit, demonstrating its universal compatibility with various USB Type-C powered devices such as dash cams, GPS units, and radar detectors, converting 12-24V to 5V/2.5A output.

Figure 2.3.4: The C2 4K Dual Dash Cam's Super Night Vision technology, which enhances low-light performance for clear capture of details like license plates in darkness.

Figure 2.3.5: Features such as built-in 2.4GHz & 5G WiFi for faster video download and OTA firmware upgrades, along with built-in GPS for tracking routes and speed.
3. Подешавање и инсталација
3.1 Инсталација контролне камере
- Очистите подручје ветробранског стакла где ће бити монтирана камера на инструмент табли.
- Attach the front dash cam to the windshield using the provided adhesive mount, ensuring a clear view на путу.
- Route the power cable neatly along the windshield trim and dashboard.
- Install the rear camera on the rear windshield, ensuring it has a clear view. Connect its cable to the main dash cam unit.
3.2 Инсталација комплета хардверских каблова
The hardwire kit enables 24-hour parking monitoring and protects your car battery from draining. Installation typically takes 10-25 minutes.

Figure 3.2.1: Detailed diagram of the hardwire kit, showing the USB Type-C output cable, hardwire kit box, input cable, and the three lead wires (GND, ACC, BAT+).
- Locate your vehicle's fuse box. Refer to your vehicle's manual for its location.
- Connect the Black wire (GND): Attach this wire to a metal bolt or screw on the vehicle's chassis for a ground connection.
- Connect the Red wire (ACC): Connect this wire to a fuse in your fuse box that is only powered when the ignition is on (Accessory power).
- Connect the Yellow wire (BAT+): Connect this wire to a fuse in your fuse box that has constant power, even when the ignition is off (Battery power).
- Route the hardwire kit cable neatly and discreetly to the dash cam.
- Plug the USB-C connector of the hardwire kit into the dash cam's power port.
Напомена: If you are not experienced with car electrical systems, it is highly recommended to seek professional installation to avoid damage to your vehicle or the device.
3.3 Лов ВолtagПодешавања заштите
The hardwire kit features smart low voltage protection to prevent your car battery from draining. It automatically cuts off power after 60 seconds if the car battery drops to a preset voltage.
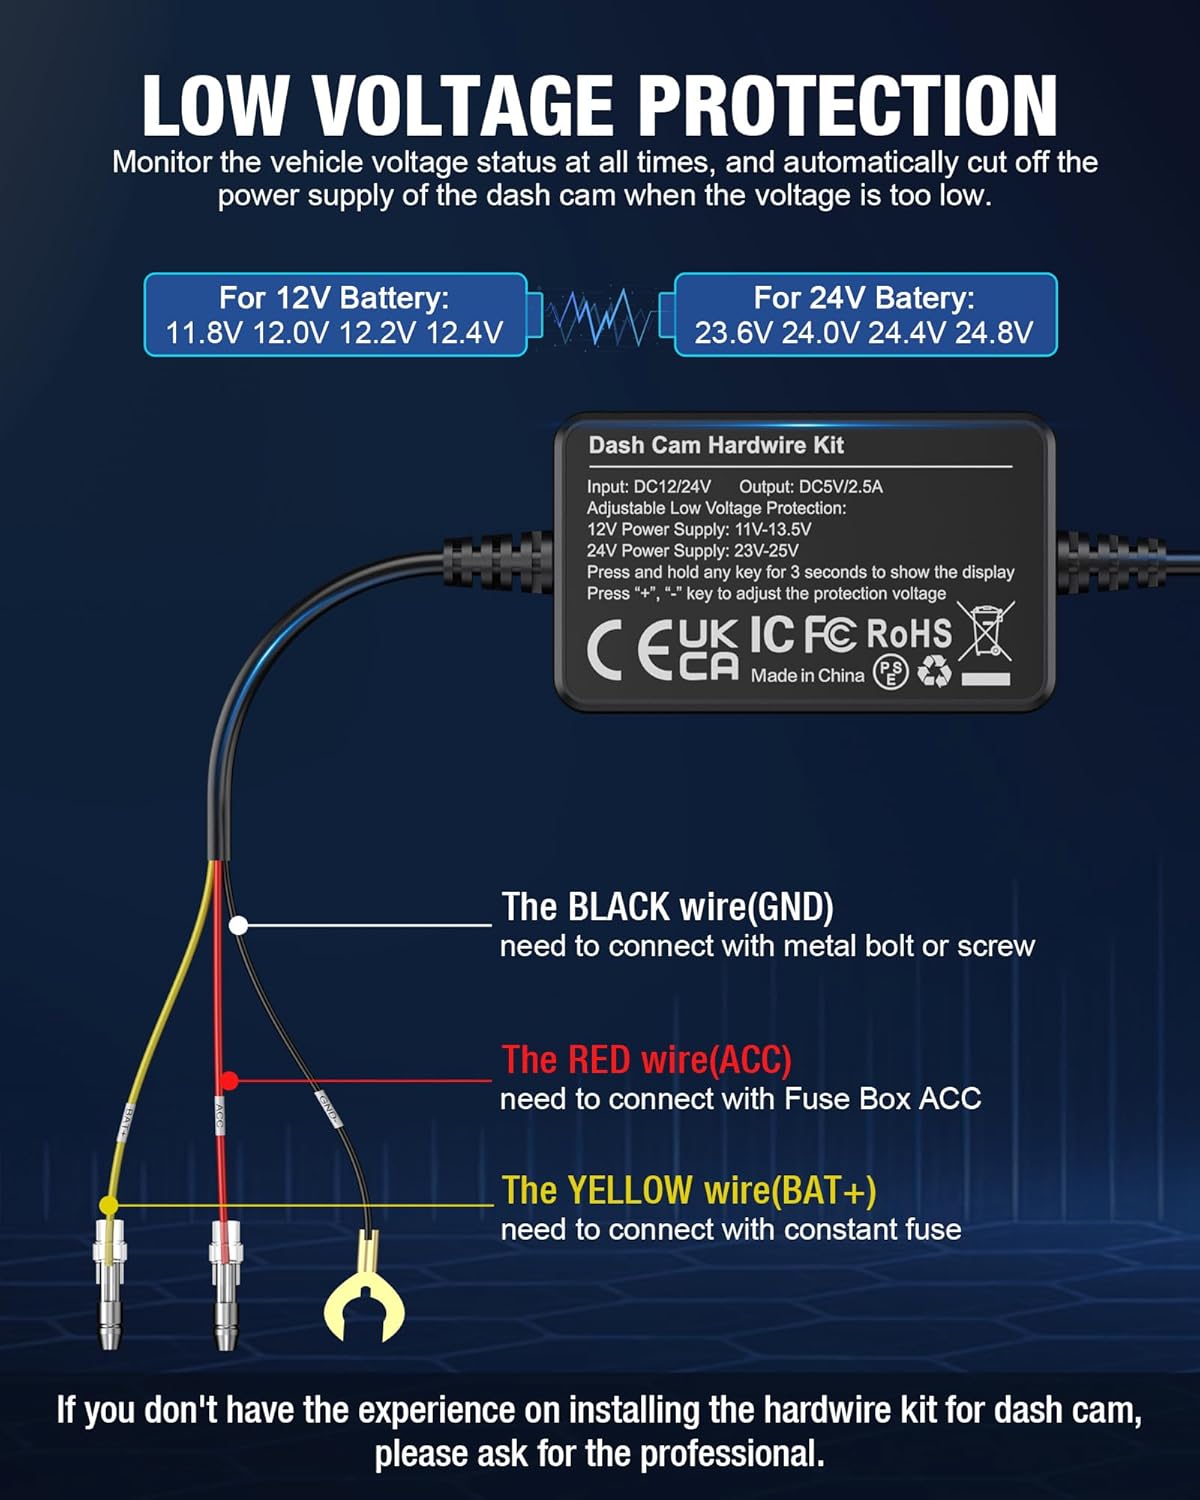
Слика 3.3.1: Ниска запреминаtage protection settings. For a 12V battery, cutoff options are 11.8V, 12.0V, 12.2V, 12.4V. For a 24V battery, options are 23.6V, 24.0V, 24.4V, 24.8V. Press and hold any key for 3 seconds to show the display, then use '+' or '-' to adjust the voltage.
To adjust the protection voltage:
- Press and hold any key on the hardwire kit for 3 seconds to activate the digital display.
- Use the '+' and '-' buttons to select your desired low voltage cutoff threshold.

Figure 3.3.2: The 3-lead hardwire kit provides multiple safety protections including battery drain prevention, over-current protection, short-circuit protection, reverse connection protection, and overheat protection.

Figure 3.3.3: The complete hardwire kit package, including the main unit and various fuse taps for different vehicle fuse box types, ensuring broad compatibility.
4. Упутство за употребу
4.1 Укључивање/искључивање
- The dash cam will automatically power on and begin recording when your vehicle's ignition is turned on (if connected to ACC power).
- Аутоматски ће се искључити убрзо након искључивања паљења.
4.2 Режими снимања
- Лооп Рецординг: The dash cam continuously records video in short segments (e.g., 1, 3, or 5 minutes). When the memory card is full, it automatically overwrites the oldest unlocked footage.
- Г-сензор (снимање у хитним случајевима): In the event of a sudden impact or collision, the built-in G-sensor will detect the event and automatically lock the current video segment, preventing it from being overwritten by loop recording.
- Надзор паркирања: When the vehicle is parked and the hardwire kit is installed, the dash cam can monitor for motion or impacts. If an event is detected, it will automatically record and save the footage.
4.3 Using WiFi and App Control
The Sarmert C2 dash cam features built-in 2.4GHz and 5G WiFi for easy access to recordings and settings via a mobile application.
- Download the official Sarmert app (e.g., 'RoadRec' or similar, check product packaging for exact app name) from the App Store or Google Play.
- Enable WiFi on your dash cam through its menu settings.
- На свом паметном телефону се повежите на WiFi мрежу камере за аутомобил (SSID и лозинка се обично приказују на екрану камере за аутомобил).
- Отворите апликацију за view ливе фооtagе, репродукција снимљених видео записа, преузимање fileна телефон и подесите подешавања камере у аутомобилу.
4.4 GPS функционалност
The built-in GPS module records your vehicle's driving route and speed. This data can be viewed using a complimentary GPS player software on your PC or Mac. Refer to the Sarmert website or app for details on downloading the GPS player.
5. Одржавање
- Чишћење: Use a soft, dry cloth to clean the dash cam lens and screen. Do not use liquid cleaners or abrasive materials.
- меморијска картица: Format the microSD card regularly (e.g., once a month) through the dash cam's settings to ensure optimal performance and prevent data corruption. Use a high-quality Class 10 or U3 microSD card.
- Ажурирања фирмвера: Check the Sarmert official webПериодично проверавајте веб локацију или апликацију ради ажурирања фирмвера. Ажурирање фирмвера ваше камере за аутомобил може побољшати перформансе и додати нове функције.
- температура: Избегавајте излагање камере за аутомобил екстремним температурама током дужег периода.
КСНУМКС. Решавање проблема
6.1 Уобичајена питања и решења
- Камера у аутомобилу се не укључује:
решење: Check the power connection. Ensure the hardwire kit is correctly installed and receiving power from the vehicle's fuse box. Verify the USB-C cable is securely plugged into the dash cam.
- Монитор за паркирање не ради:
решење: Ensure the hardwire kit is correctly installed with both ACC and BAT+ connections. Verify that parking monitoring is enabled in the dash cam's settings. Check the low voltage protection setting to ensure it's not cutting power prematurely.
- Видео Фооtage is Blurry/Unclear:
решење: Clean the dash cam lens with a soft cloth. Ensure the protective film (if any) has been removed from the lens. Check if the windshield area in front of the camera is clean. Verify the video resolution settings in the dash cam menu.
- Memory Card Error/Full:
решење: Format the microSD card through the dash cam's settings. If the issue persists, try a different high-quality microSD card (Class 10 or U3 recommended). Ensure loop recording is enabled.
- Проблеми са ВиФи везом:
решење: Ensure WiFi is enabled on the dash cam. Restart both the dash cam and your smartphone. Make sure you are connecting to the correct WiFi network broadcasted by the dash cam. Try reinstalling the mobile application.
7. Спецификације
| Феатуре | Спецификација |
|---|---|
| Назив модела | C2 |
| Резолуција снимања видео записа | 2160п (4К) |
| Технологија повезивања | USB-C, Wireless (WiFi) |
| Тип монтаже | Монтажа на контролној табли |
| Јачина звука улаза комплета хардверских кабловаtage | 12В-24В |
| Hardwire Kit Output Voltagе/Струја | 5В/2.5А |
| Дисплаи Типе | ЛЕД |
| Укључене компоненте | Хардвире Кит |
| Боја | Црно |
| Тип услуге возила | Car, Truck, Van, SUV, Motorcycle |
8. Гаранција и подршка
Sarmert products are designed for reliability and performance. For warranty information, technical support, or service inquiries, please refer to the contact details provided on the official Sarmert website or the product packaging. Please retain your proof of purchase for warranty claims.
For the latest information and support, visit the official Sarmert store: Sarmert Store on Amazon


