1. Увод
This manual provides detailed instructions for the safe and efficient use of your Crelander 10.1 Inch Android 13 Tablet. Please read this manual thoroughly before operating the device and retain it for future reference.
The Crelander 10.1 Inch Android 13 Tablet is a versatile device designed for productivity, entertainment, and communication. It features a powerful processor, ample storage, a vibrant display, and comprehensive connectivity options, including 4G LTE calling.
2. Садржај пакета
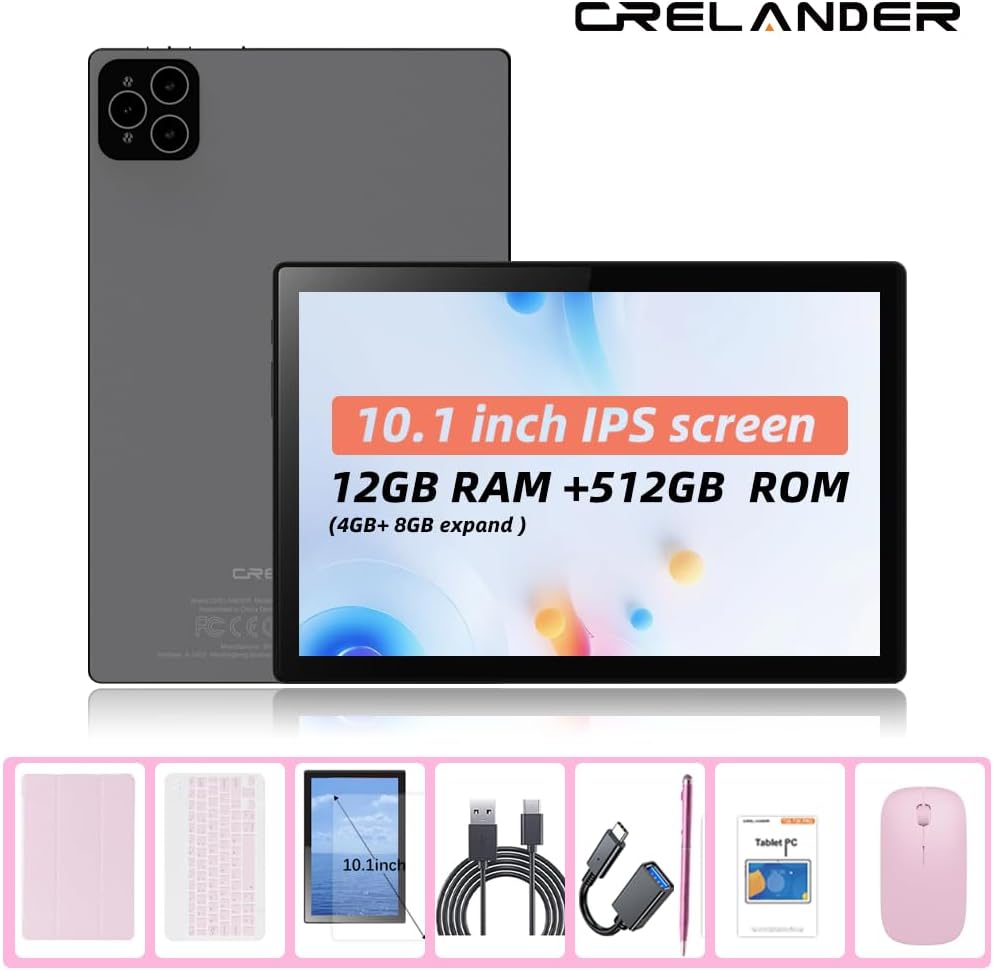
Након отварања пакета, проверите да ли су сви предмети присутни и у добром стању. Стандардни пакет садржи:
- Crelander 10.1 Inch Android 13 Tablet
- Протецтиве Цасе
- Бежична тастатура
- Бежични миш
- Стилус Пен
- УСБ кабл за пуњење
- USB-C to USB-A Adapter (OTG)
- Кориснички приручник (овај документ)

Figure 2.1: Crelander Tablet and included accessories.
3. Распоред и карактеристике уређаја
Familiarize yourself with the physical layout of your tablet.
Слика 3.1: Предњи и задњи View Таблете.
Кључне карактеристике:
- 10.1-инчни IPS HD екран: 1280x800 pixel resolution for clear and vibrant visuals.
- Оперативни систем Андроид 13: Enhanced performance and user experience.
- Високе перформансе: 12GB RAM (with potential virtual expansion) and 512GB internal storage (ROM).
- Прошириво складиште: Supports up to 1TB TF (microSD) card for additional storage.
- 4G LTE Calling: Integrated SIM card slot for cellular connectivity and voice calls.
- Двоструке камере: Предња и задња камера за фотографије, видео записе и видео позиве.
- Препознавање лица: За безбедно и практично откључавање.
- 8000мАх батерија: Дуготрајна снага за продужену употребу.
- Бежична повезаност: Bluetooth and Wi-Fi (802.11n) for seamless connections.
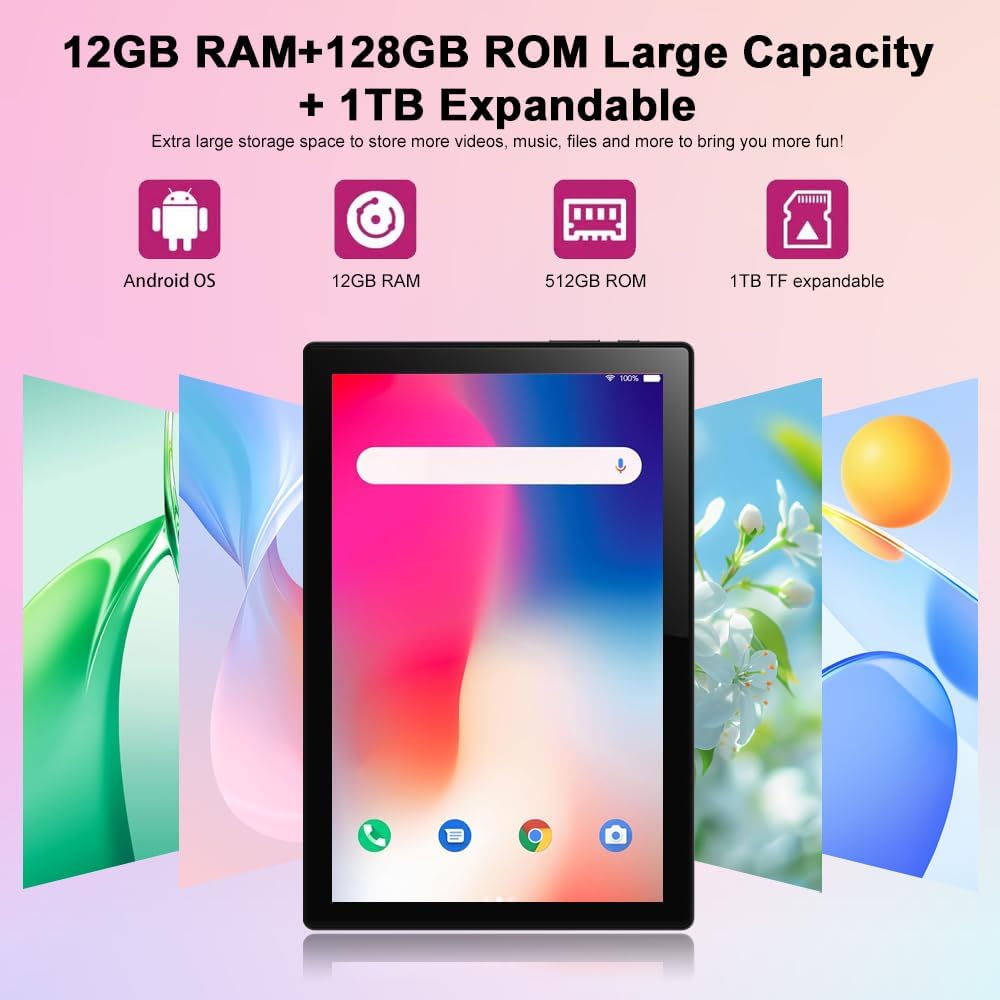
Figure 3.2: Storage and RAM Capabilities.

Слика 3.3: Спецификације екрана.
4. Почетак рада: Подешавање
4.1 Пуњење таблета
Before first use, fully charge the tablet. Connect the USB charging cable to the tablet's charging port and the other end to a compatible USB power adapter (not included) or a computer's USB port. The battery indicator on the screen will show charging status.
4.2 Укључивање/искључивање
- За укључивање: Press and hold the Power button until the Crelander logo appears.
- За искључивање: Притисните и држите дугме за напајање док се не појави мени са опцијама напајања, а затим изаберите „Искључи“.
- Рестартовати: Притисните и држите дугме за напајање док се не појави мени са опцијама напајања, а затим изаберите „Рестарт“.
4.3 Чаробњак за почетно подешавање
При првом укључивању, таблет ће вас водити кроз почетни процес подешавања. То укључује:
- Избор језика.
- Повезивање на Ви-Фи мрежу.
- Подешавање вашег Google налога (опционо, али се препоручује за преузимање апликација).
- Setting up screen lock (PIN, pattern, password, or facial recognition).
4.4 Inserting a SIM Card (for 4G LTE Calling)
The tablet supports Micro SIM cards for 2G/3G/4G cellular connectivity and calling.
- Пронађите лежиште за СИМ картицу са стране таблета.
- Use the provided SIM ejector tool (if included) or a small paperclip to open the tray.
- Carefully place the Micro SIM card into the designated slot on the tray, ensuring correct orientation.
- Пажљиво гурните лежиште назад у таблет док не кликне на своје место.

Figure 4.1: Inserting a Micro SIM Card.
4.5 Inserting a MicroSD (TF) Card
To expand storage, insert a MicroSD (TF) card (up to 1TB, not included).
- Locate the MicroSD card slot, often combined with the SIM tray or a separate slot.
- Insert the MicroSD card into the slot with the gold contacts facing down, until it clicks into place.
- The tablet will recognize the card, and you may be prompted to format it for internal or portable storage.
5. Управљање таблетом
5.1 Основна навигација
The Android 13 operating system uses touch gestures for navigation:
- Додирните: To open apps, select items, or activate buttons.
- Превуците: To scroll through pages, menus, or switch between home screens.
- Зумирање штипкањем прстију: To zoom in or out on images, maps, or web странице.
- Дуго притисните: Да бисте приступили контекстуалним менијима или преместили иконе апликација.
5.2 Повезивање додатне опреме (тастатура, миш, оловка)
Укључена тастатура и миш се повезују путем Bluetooth-а. Оловка је обично пасивна и не захтева упаривање.
- Омогући Блуетоотх: Иди на Подешавања > Повезани уређаји > Блутут и укључите Блутут.
- Упаривање тастатуре/миша: Put the keyboard/mouse into pairing mode (refer to their individual manuals if needed). Select the device from the list of available Bluetooth devices on your tablet and follow on-screen prompts to pair.
5.3 Using Facial Recognition
Set up facial recognition for quick and secure unlocking.
- Иди на Подешавања > Безбедност и приватност > Откључавање уређаја > Откључавање лицем.
- Follow the on-screen instructions to register your face using the front camera.
- Ensure good lighting and hold the tablet at eye level during registration.

Figure 5.1: Facial Recognition in Use (Illustrative).
5.4 Wi-Fi and Cellular Data
- Ви-Фи: Приступ Подешавања > Мрежа и интернет > Интернет да бисте се повезали са доступним Wi-Fi мрежама.
- Мобилни подаци: If a SIM card is inserted, enable mobile data via Подешавања > Мрежа и интернет > СИМ картице.

Figure 5.2: Android OS and Wireless Connectivity.
6. Одржавање и њега
- Чишћење: Користите меку крпу која не оставља влакна за чишћење екрана и кућишта. Избегавајте абразивна средства за чишћење или раствараче.
- Одржавање батерије: Избегавајте екстремне температуре. За дуготрајно складиштење, напуните батерију на око 50%.
- Ажурирања софтвера: Редовно проверавајте системска ажурирања путем Подешавања > Систем > Ажурирање система како би се осигурале оптималне перформансе и безбедност.
- Управљање складиштем: Периодично бришите кеш меморију, деинсталирајте некоришћене апликације и преносите велике files to external storage (MicroSD card) to maintain performance.
- Заштита: Use the provided protective case to guard against drops and scratches.
КСНУМКС. Решавање проблема
| Проблем | Могуће решење |
|---|---|
| Таблет се не укључује. | Ensure the tablet is charged. Connect to a charger for at least 30 minutes before attempting to power on again. |
| Повезивање на Ви-Фи није могуће. | Check if Wi-Fi is enabled in settings. Restart your router. Forget the network and reconnect. |
| СИМ картица није откривена. | Ensure the SIM card is correctly inserted and is a Micro SIM. Restart the tablet. Check with your carrier if the SIM is active. |
| Таблет је спор или не реагује. | Close unused apps. Clear app caches. Restart the tablet. Consider a factory reset as a last resort (backup data first). |
| Батерија се брзо празни. | Reduce screen brightness. Disable unused features like Bluetooth/GPS. Close background apps. Limit notifications. |
8. Спецификације
| Феатуре | Детаљ |
|---|---|
| Број модела | CR-T40-pink |
| Оперативни систем | Андроид 13 |
| Дисплаи | 10.1-inch IPS HD Touchscreen (1280 x 800 pixels) |
| Процесор | МТ6763 |
| РАМ | 12ГБ |
| Интерна меморија (РОМ) | 512ГБ |
| Екпандабле Стораге | Up to 1TB via MicroSD (TF) card |
| камере | Front and Rear (specific MP not detailed in all specs, but 5MP/13MP mentioned in image) |
| Батерија | 8000mAh (Built-in rechargeable) |
| Повезивање | Wi-Fi (802.11n), Bluetooth, 4G LTE (Micro SIM) |
| Димензије (ДкШкВ) | 10 к 0.3 к 7 инча |
| Тежина | 3.3 фунти |
| Боја | Пинк |
9. Гаранција и подршка
Crelander products are designed for reliability and performance. For warranty information, technical support, or service inquiries, please refer to the contact information provided with your purchase or visit the official Crelander webсајту.
Сачувајте доказ о куповини за гаранцијске захтеве.


