1. Производ је готовview
The AOSU T2 Ultra 4-Cam Kit is a comprehensive 4K solar security camera system designed for wireless outdoor home surveillance. It features TrueColor Night Vision, AI recognition, motion tracking, and 360-degree pan and tilt capabilities, ensuring extensive coverage and intelligent monitoring.
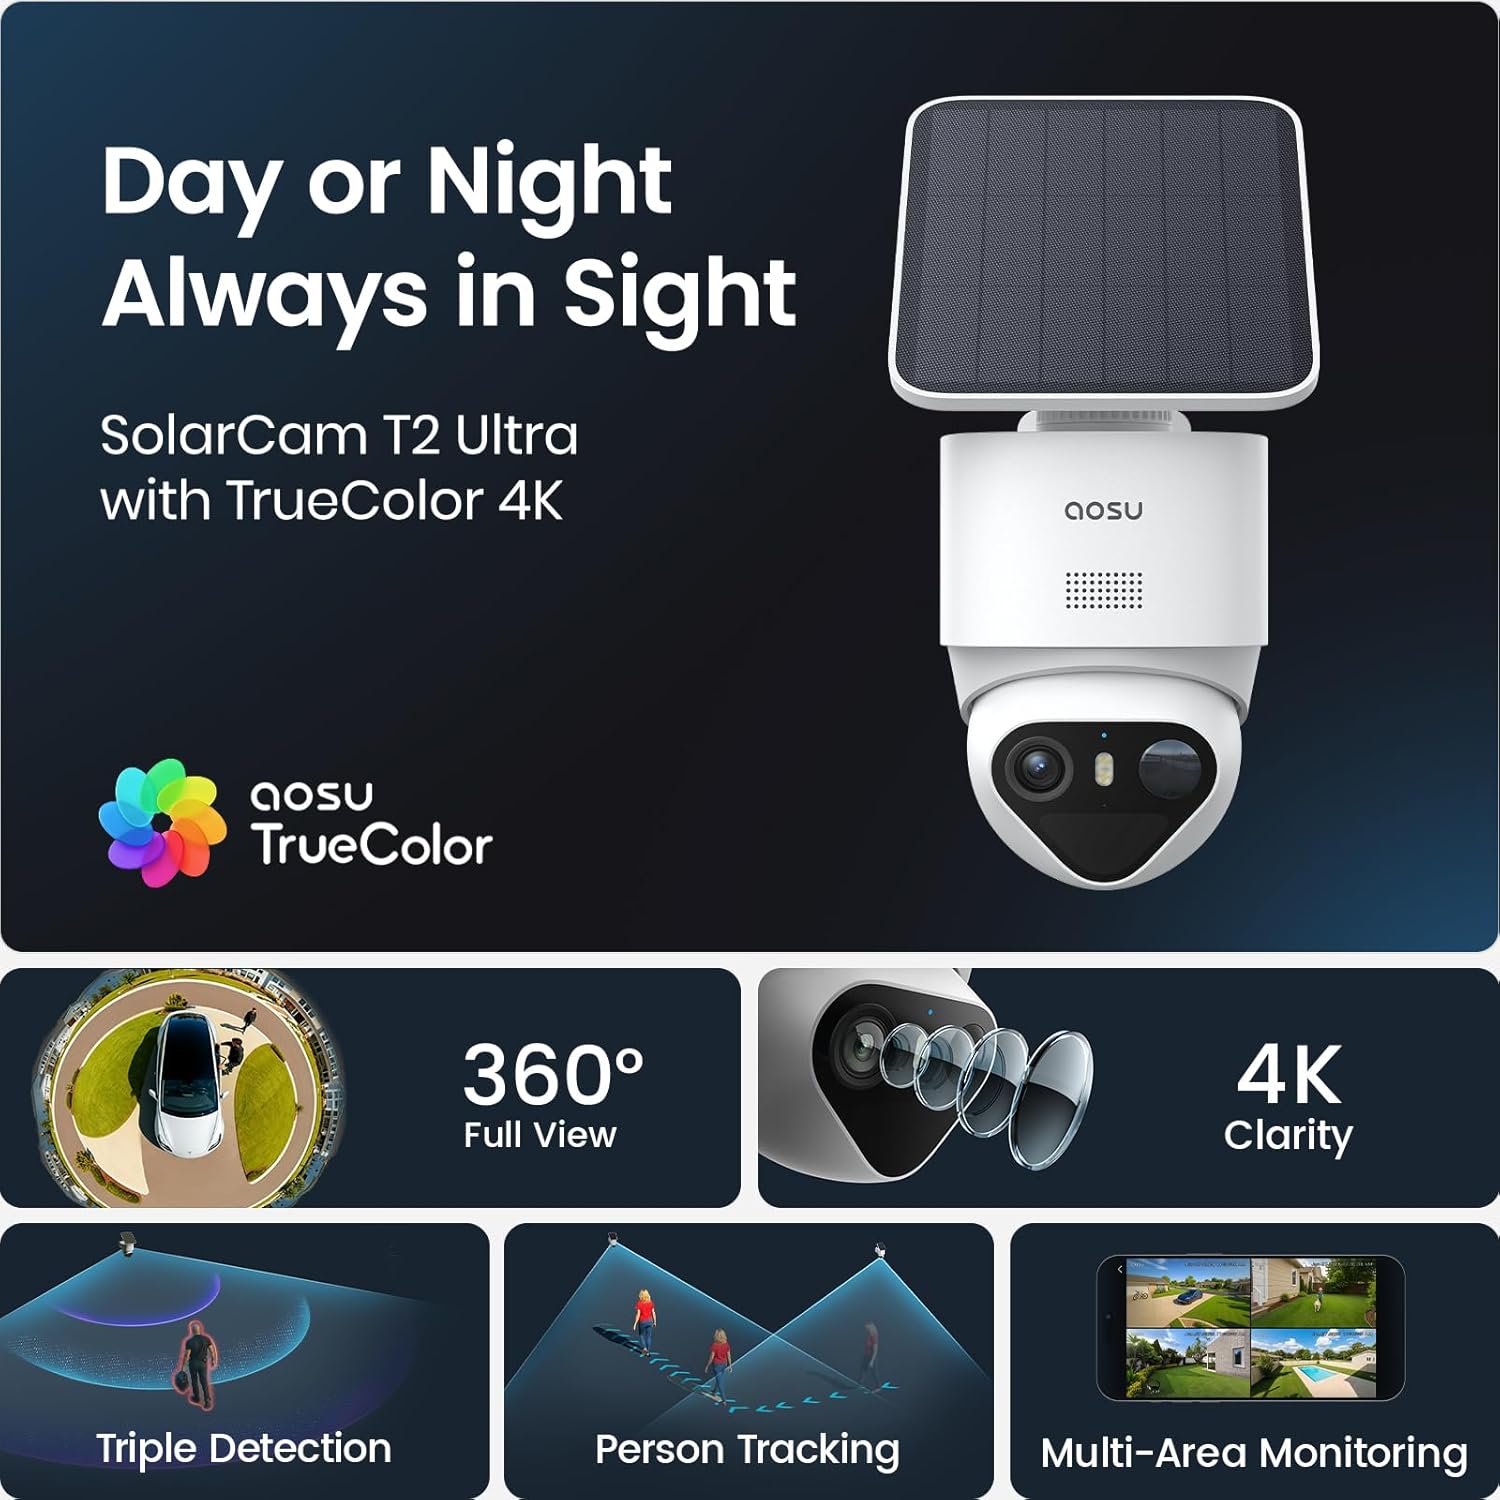
Image: AOSU T2 Ultra camera with solar panel, illustrating its 24/7 surveillance capability.
2. Шта је укључено
The AOSU T2 Ultra 4-Cam Kit includes the following components:
- 1 × AOSU SolarCam Max System 4-Cam Kit
- 1 × aosuCortex/Power Adapter/Ethernet
- 4 × Соларни панел
- 4 × Mounting Kit & Screw Packs
- 1 × Упутство за употребу
The system is designed for easy installation with all necessary hardware provided.
3. Подешавање и инсталација
Follow these steps to set up and install your AOSU T2 Ultra 4-Cam Kit:
- Download the AOSU App: Download the "aosu" application from your device's App Store or Google Play.
- Креирајте налог: Open the app and create your user account by filling in the registration information.
- Додајте уређаје: Click "Add devices" within the app.
- Скенирање КР код: Scan the QR code located on the camera to pair it with the app.
- Укључивање камере: Open the waterproof plug at the bottom of the camera. Press and hold the power button for 5 seconds until you hear "Hello aosu" and the blue light flashes.
- Reset Camera (if needed): Press and hold the RST button for 5 seconds until hearing a beep to reset the camera for pairing.
- Повежите се на Ви-Фи: Select your 2.4GHz Wi-Fi network and enter the password. Wait for the camera to connect successfully.
- Изаберите локацију за инсталацију: Select a location with strong Wi-Fi signal, 7-10 feet from the ground, and up to 30 feet from the motion detection zone. Ensure the solar panel has optimal sunlight exposure.
- Монтирајте соларну плочу: Attach the positioning sticker for the solar panel, drill holes with a 16/64" (6mm) drill bit, insert anchors, and tighten screws. Connect the solar panel to its base.
- Монтирајте камеру: Attach the positioning sticker for the camera, drill holes, insert anchors, and secure the camera base with screws. Install the camera into the base.
- Connect Solar Panel to Camera: Plug the cord from the solar panel into the USB port of the camera.
For a visual guide, please refer to the setup video below:
Video: Step-by-step guide on how to set up and install the AOSU SolarCam D1 Lite, demonstrating app connection and physical mounting.

Image: A woman easily installing an AOSU camera with a solar panel, highlighting the quick and easy DIY setup without messy wires or professional installers.
4. Управљање вашим системом
The AOSU T2 Ultra system offers intuitive control via the AOSU app. Once connected, you can view live feeds, manage settings, and review забележени догађаји.
- Уживо View: Приступ храни у реалном временуtagса свих повезаних камера.
- Пан & Тилт: Control the camera's 360-degree pan and tilt directly from the app.
- Двосмерни разговор: Комуницирајте са посетиоцима или одвратите уљезе користећи уграђени микрофон и звучник.
- Режими ноћног вида: Switch between black & white IR, full-color night vision (with spotlight activation), or turn night vision off.
- Детекција покрета: Customize sensitivity and detection zones to receive alerts only when necessary.

Image: A smartphone showing a multi-camera live view from the AOSU system, demonstrating simultaneous monitoring of different areas.
5. Кључне карактеристике
- 4K Color Night Vision: The F/1.0 ultra-wide aperture and large 1/1.8'' starlight sensor capture full-color footage even in total darkness without a floodlight.
- 90-Day Local Storage: Store up to 90 days of footage with built-in 32GB memory, expandable to 16TB via an external drive, with no subscription fees.
- 360° Coverage + Auto Patrol: Pan 355° and tilt 90° for wide-area monitoring. Tap-to-view and app-based patrol functions allow instant angle checks. Supports up to 4 cameras for full property coverage.
- Triple Smart Detection: PIR, radar, and on-device AI accurately detect human activity, filtering out false alarms from trees, pets, or vehicles.
- Solar + Battery Power: Stay powered all year long with just 90 minutes of direct sunlight daily. The large-capacity battery ensures reliable operation during cloudy days, and the detachable solar panel allows optimal mounting.
- Multi-Camera Tracking: The system links clips from multiple cameras into one video for a complete event context, sending a single alert for comprehensive understanding.
- AI-Powered aosuCortex: Enjoy disguise detection, smart event tracking, and multi-camera live view for clearer event understanding.
- Optional AI Features: Customize surveillance with pay-as-you-go features via the aosu App, including Smart Search, Daily Security Reports, and Abnormal Behavior Analysis (subscription-based).

Image: A clear demonstration of AOSU's TrueColor Night Vision, showing vivid, natural colors in low-light conditions without a spotlight.

Image: The aosuCortex hub with an external hard drive, emphasizing the private and expandable local storage solution.
6. Спецификације
| Атрибут | Валуе |
|---|---|
| Врста монтаже | Валл Моунт |
| Резолуција за снимање видео записа | 2160p, 4k |
| Боја | Бела |
| Број ставки | 4 |
| Технологија бежичне комуникације | Блуетоотх, Ви-Фи |
| Форм фацтор | Доме |
| Viewугао уласка | 360 степени |
| Домет за ноћни вид | 32.8 стопа |
| Брзина кадрова | 15 кадрова у секунди |
| Ниво водоотпорности | Водоотпоран |
| Батерије | 2 9V batteries required. (included) |
| Посебне карактеристике | 32G Local Recording, Face Recognition, True Color Vision in Darkness, aosuCortex AI With Behavior Detection |
| Препоручена употреба производа | Оутдоор Сецурити |
| Технологија повезивања | Бежични |
| Компатибилни уређаји | Смартпхоне |
| Извор напајања | Солар Поверед |
| Тип контролера | Amazon Alexa, Apple HomeKit, Google Assistant |
7. Одржавање
To ensure optimal performance and longevity of your AOSU T2 Ultra 4-Cam Kit, regular maintenance is recommended:
- Чиста сочива: Повремено обришите сочива камере меком крпомamp крпа за уклањање прашине и остатака.
- Проверите соларне панеле: Ensure solar panels are free from obstructions (leaves, dirt) to maximize charging efficiency.
- Ажурирања фирмвера: Keep your camera firmware updated through the AOSU app for the latest features and security enhancements.
- Здравље батерије: Monitor battery levels via the app and ensure consistent solar charging.
КСНУМКС. Решавање проблема
If you encounter issues with your AOSU T2 Ultra 4-Cam Kit, consider the following troubleshooting steps:
- Без конекције: Verify your Wi-Fi network is 2.4GHz and the password is correct. Ensure the camera is within Wi-Fi range.
- Лош видео квалитет: Check your Wi-Fi signal strength. Ensure camera lenses are clean and free from obstructions.
- Лажни аларми: Adjust motion detection sensitivity and detection zones in the AOSU app to minimize unwanted alerts.
- Батерија се не пуни: Ensure solar panels are receiving direct sunlight for at least 90 minutes daily and are free from obstructions.
- Проблеми са апликацијом: Ensure your AOSU app is updated to the latest version. Try restarting the app or your smartphone.
Ако проблеми и даље постоје, контактирајте корисничку подршку.
9. Гаранција и подршка
The AOSU T2 Ultra 4-Cam Kit comes with a 1-годишња гаранција. For any questions or assistance, AOSU provides responsive customer support.
You can find support and additional resources through the AOSU app or by visiting the official AOSU webсајту.


